---
title: "No-code Automation via Joomla Web Services (API)"
description: "How to automate Joomla with no code: connect Make.com, n8n, Zapier etc to the Joomla Web Services (API), with step-by-step examples and templates."
format: html
theme: darkly
number-sections: true
smooth-scroll: true
link-external-icon: true
toc: true
toc-depth: 4
other-links:
- text: List of all presentations
href: https://slides.woluweb.be/
include-in-header:
- file: ../woluweb-opengraph.html
- file: ../woluweb-analytics.html
- file: ../woluweb-other.html
- text: |
---
{{< include ../marc_dechevre_by.md >}}
Note: I am always happy to improve this presentation further. Please contact me for any feedback/suggestion or if you know of any other interesting resource about this topic!
**Video** versions of this presentation:
- early version in August 2025 for Joomla's 20th anniversary - 1h30m
-
- final version in October 2026 for the Joomla World Conference:
-
## Introduction
Long story short, **Automation** is about interconnecting different Tools (your website, an RSS Feed, a CRM, a Mailbox, Artificial Intelligence, a Drive in the Cloud, a Social Network etc).
So obviously Automation is an endless topic. Therefore in this presentation we focus on using Automation *in the context of Joomla*, by using its Web Services (also called API) to connect it with other Tools.
If you are a coder, you can of course code all these interactions manually. The nice thing with the Automation Tools mentioned below is that you can do it
- with no code
- just with a few clicks / drags & drops, by configuring ready-to-use interfaces
Here are a few examples of Tools that you can interconnect:
{fig-alt=""}
## Resources
Thanks to the Joomla Community, we are [*standing on the shoulders of giants*](https://en.wikipedia.org/wiki/Standing_on_the_shoulders_of_giants)
We all learn from each other! Let's start with a list of useful links I have gathered:
- Joomla Community Magazine
-
-
-
- Presentations
- JoomlaDay ES 2024
- > Automatiza el contenido de tu Joomla con ChatGPT *by Josean Telleria*
- Direct YouTube link (so you can enable automatic Captions & Translation):
- JDayUSA 2025
- *by Eoin Oliver*
- after the event Eoin made a *public* 30 minutes demo combining Joomla, Convert Forms and a CRM:
- Blog Post:
- Corresponding Video:
- Joomla Web Services (API)
- Documentation:
- 100+ Endpoints Joomla Web Services Collection For Postman (by Alexandre Elisé):
- Playing with the Joomla Web Services (API) in Joomla 4 or 5 or 6:
- Make.com
- Full 3.5H course ("the Only Video You'll Need to Master Make.com & AI Workflows - Beginner to Pro"):
- Zapier.com
- [Zapier University, Course 101](https://www.youtube.com/playlist?list=PLqzJRGwum4KO2ISMYKmK0Ci7hm_508NfO)
## Automation tools
There are many Automation tools out there. Here is a selection.
At the moment, **Make.com** and **n8n** are the only tools having a ready-to-use integration with Joomla for a series of Actions (like Create/Retrieve/Update/Delete and List Article/Category/Menu)... but anyway *anything* can be done with *any tool*: you then just use a simple `HTTP Request` / `API Call` Action.
### Make.com
(previously known as Integromat)
#### Advantages
IMHO, Make.com is the best tool to start with:
- there is a free tier (1000 Operations/month. Just be aware that if your Scenario has X steps, it counts as X Operations) so you can use it for your experiments and even for your Scenarios in Production if your volume is reasonable
- it is very intuitive to use and configure
- for a long time it was the only tool having a ready-to-use integration with Joomla - see screenshot hereafter (since the end of 2025 n8n also has a "Joomla node" - see the corresponding section below)
#### Make.com has a Joomla integration
In 2024 [ACV Multimedia](https://www.acvmultimedia.com/en/about-us) made a Joomla integration for Make.com, for which we are very thankful:
{fig-alt=""}
A lot of Joomla Operations are ready to be configured:
- Actions
- **C**reate
- a category
- a menu
- an article
- **R**etrieve
- a category by its ID
- a menu by its ID
- an article by its ID
- **U**pdate
- a category specified by its ID
- a menu specified by its ID
- an article specified by its ID
- **D**elete
- a category specified by its ID
- a menu specified by its ID
- an article specified by its ID
- List
- the articles in the website
- the categories in the website
- the menus in the website
- `Perform an arbitrary authorized API call`
(with this you can literally do anything in Joomla but you have to "configure" it yourself)
- Triggers
- when a new article is *created*
- when an article is *updated*
Note: **C**reate + **R**etrieve + **U**pdate + **D**elete is typically known by its abbreviation: **CRUD**
#### Learn more
More explanations by the Authors:
- [Ane Miren Alvarez's Articles in the Joomla Community Magazine](https://magazine.joomla.org/all-issues/june-2024/create-a-make-com-automation-with-the-joomla-api)
- [Josean Telleria's Presentation at JoomlaDay ES 2024](https://www.youtube.com/watch?v=lFkscfcQuUY)
At JDayUSA 2025, Eoin Oliver:
- made a general presentation where Make.com was mentioned for 5-10 minutes:
- and after the event he made a *public* 30 minutes demo combining Joomla, Convert Forms and a CRM:
- video:
- [detailed transcript](https://squareballoon.co.uk/blog/tutorials/how-to-automate-joomla-to-pipedrive-crm-using-convert-forms-and-make-com-including-custom-fields/)
General course:
"[Make.com: full 3.5h course (the Only Video You'll Need to Master Make.com & AI Workflows - Beginner to Pro)](https://www.youtube.com/watch?v=Ij0dRKiO_Hw)"
### Zapier.com
Zapier is very well known because it was one of the first players.
About pricing: they have a free tier, but it only includes 100 Tasks / month.
There are plans to have a Joomla integration:
- current project:
- if you are interested in contributing, please join the `Zapier integration for Joomla` [channel on Mattermost](https://joomlacommunity.cloud.mattermost.com/main/channels/zapier-integration-for-joomla)
Note that Zapier ships with its own AI tool. It can certainly be handy, but in my case whenever I wanted to do something specific it never really helped and I always had to figure it out & do it manually myself.
### n8n.io
Note: "node automation" => "nodemation" => "n8n"
There is a free self-hosted Community Edition available on GitHub:
- Self-hosting:
- Community Edition Features (vs Enterprise):
#### self-hosted
So this means that you can install n8n on your (local or remote) server for free. For more details see
Of course, one of the advantages of self-hosted n8n is that it is free:
- personally I run it on my local computer, where I trigger Workflows myself (for example to mass import Users or Articles)
- but if you want your Workflows to be triggered for example by external Tools, then you need to make your own server accessible from outside
As with every tool accessing your website, you should care about _security_: if you go for _self-hosted_ then you are also responsible for keeping it up to date (because if somebody breaks into your automation tool, he/she has access to all the services you connected to it).
I have not tested them myself (and I am not sponsored in any way) but apparently these are 2 interesting providers for _self-hosted n8n_:
- Hostinger
-
- see this video by Shubham Sharma giving a Promo Code for KVM2:
- In March 2026, Infomaniak ran a live session about installing n8n on your regular hosting (~10 EUR/month)
-
-
-
#### SAAS Version
A word about the pricing of the SAAS version:
- the cheapest monthly plan is more expensive than Make.com for example
- but you don't pay by Operation (within a Workflow) but for a number of Workflow executions
#### Joomla n8n node
At the end of December 2025, Mohamed Abdelaziz aka released an n8n node to integrate with Joomla content entities like _Article, Category, Tag and Media_:
- on GitHub:
- it even integrates Joomla Custom Fields:
- see instructions on
- see the Article in the Joomla Community Magazine on
### Pabbly Connect
(mentioned, among others, by Emmanuel Lemor, who is very positive about it, so also worth checking)
They seem to regularly have lifetime offers.
Also another positive point is the fact that plenty of Operations are free (like calculations etc), which is not necessarily the case for other Platforms.
Note: I have not tested it myself, so if you have any experience, please share!
### IFTTT
IFTTT ("If This Then That") is a very well-known tool.
There is a free plan with (only) 2 "Applets", which is nice to test the tool.
### Huginn
(mentioned, among others, by Brian Teeman)
- advantages:
- open-source
- self-hosted
- disadvantage:
- at first sight looks more technical:
Note: I have not tested it myself, so if you have any experience, please share!
### Composio.dev
(mentioned, among others, by Eoin Oliver)
It seems like they have a generous free plan that would work for a lot of things.
Note: I have not tested it myself, so if you have any experience, please share!
### pipedream / string.com
On 19 Nov 2025 acquires :
Note: I have not tested it myself, so if you have any experience, please share!
## Get your Joomla API Token
### For your own account as Super User
For your own Super User account from the backend, simply
- edit your User account > Tab `Joomla API Token` {fig-alt=""}
- copy the API Token {fig-alt=""}
But even if many are not aware of it, access to the Web Services is not exclusively for Super Users as explained hereafter.
### For any User from any Group (even Author)
As you know, the _Principle of Least Privilege (PoLP)_ dictates that users are granted only the bare minimum level of access and system resources needed to perform their legitimate functions.
There are 2 steps in order to set up access to the Web Services for any User whatever his/her User Group (see also for example )
- At the global level
- create a new `User Group` having `Public` as parent. In this example I call it `🔑 Web Services Access` {fig-alt=""}
- in the plugin `User - Joomla API Token` add the newly created `User Group` {fig-alt=""}
- in `Global Configuration > Permissions` set `Web Services Login` to `Allowed` for the newly created `User Group` {fig-alt=""}
- apparently, there is a change of behaviour between J6.1.0 and J6.2.0
- to be precise since [the August 2026 security release (5.4.8 and 6.1.3)](https://www.joomla.org/announcements/release-news/joomla-6-1-3-5-4-8-security-bugfix-release.html) all API components now require the `core.manage` permission for anything that creates or edits a record, regardless of permissions, corresponding to "Access Administrator Interface"
- so in practice
- if the User is _Manager_ or above (ie _Administrator_ or _Super User_) the procedure above is enough for Permissions
- but if the User is _Publisher_ or below (ie _Editor_ or _Author_) then for the newly created `User Group` you should set
- `Access Administration Interface` to `Allowed`
- in `Articles > Permissions`
- in `Media Manager > Permissions` _if you need to upload Media_
- `Edit Custom Field Value` to `Allowed` _if you need to feed Custom Field Values_
- in `Articles > Permissions`
- note that the User still won't be able to acces the Administration Interface {fig-alt=""}
- At the User level: for each User who should have access to Web Services
- Edit the User
- on the `Assigned User Groups` Tab check the newly created `User Group` {fig-alt=""}
- on the `Joomla API Token` Tab you see the following message: _You cannot see the token for users other than yourself. You can still enable, disable or reset their token eg when there is a suspicion their token has leaked to unauthorised persons._
- In order for each User to see his/her `Joomla API Token`, you should of course in the front-end
- have a login form
- either via a Module
- or via a Menu Item (which can be hidden)
- create a Menu Item of Type `Edit User Profile` (which can be hidden) {fig-alt=""}
Note:
- an Author can _create_ an Article (from the interface or via the Web Services) but that Article will always have the Status "Unpublished" and "Unfeatured", even if Status was set to Published (1) and Featured to Yes (1). In other words, Article Creation will work, but what you set for Published and Featured will simply be ignored
- so if you want your User to be able to have their Articles Published and Featured for example, they should be in the User Group "Publisher" and not "Author"
- of course check the documentation about ACL (and maybe you will want to create a specific User Group with specific rights)
-
-
### Impersonation
As mentioned above, even a Super User *can not* create or view API Tokens for other Users: this is a security feature in Joomla itself.
Still, imagine that you are asked as a Super User to set up for given Users
- their Automation tool
- their MCP Server
- or [Grafida](https://github.com/grafida/grafida/)
How could you get their API Token without having to ask them to do "technical things"?
Well, actually with _impersonation_ you could simply log in as those Users, without even knowing their password.
To do this
- install for example the following extension: (txs Nicholas!)
- enable the whole Package, including its plugins
- if needed configure it in the `System - Skeleton Key` Plugin
- in the backend, go to `Users > Manage`
- next to each User you will see a `Login as user` button
- open the Menu Item `Edit User Profile` that you created in the front-end
- if you enabled the `Action Log - Skeleton Key` Plugin, you will for example see in the User Actions Log: _User Marc was authorised to log into the frontend as “Demo User”_
{fig-alt=""}
## Practical examples with Make.com
All these examples are illustrated with Make.com because
- of the reasons mentioned above
- I have prepared for you a few _templates_ and a series of _examples_. Hopefully this will flatten the learning curve even further 🙂
But again I repeat: you could do the equivalent with any other Automation Tool of course.
### Create or Update Articles
#### Create a new Joomla Article for every new Item in some RSS feed
Let's take an RSS Feed from
For example:
##### Create a new Scenario
In Make.com, create a new Scenario
##### The RSS Module as Source
- Add your first Module and search for `RSS` {fig-alt=""}
- Select `Watch RSS Feed Items` {fig-alt=""}
- Configure it by typing the `URL` of your RSS Feed and type the `maximum # of returned items` (you can always change that number later by clicking again on the Module. Usually I like to start with a small number for my tests and only increase it afterwards) {fig-alt=""}
- Choose where to start (can always be changed afterwards with a right-click, for example if you like to restart from scratch or from a given date etc) {fig-alt=""}
##### The Joomla Module as Destination
- Click on `add another module`
{fig-alt=""}
- Search for Joomla {fig-alt=""}
- Select `Create an Article` {fig-alt=""}
- Configure it
- `Create a Connexion` to your Joomla Website {fig-alt=""}
- Fill in the required fields {fig-alt=""}
- `Connexion name`: put something explicit for you
- `Web URL`: for example `https://www.example.com`
- `Joomla API Token`: see above
- for Joomla, when creating an Article via the Web Services, the following 4 Fields MUST always be filled in (you can put there either *Dynamic Values* fetched at a previous Step... or *Manual Values*) {fig-alt=""}
- `Title` (select for example the Title from the RSS Feed)
- `Text` (select for example the Description from the RSS Feed)
- `Category id` (for example `2` stands typically for "Uncategorised")
- `Language` (`*` stands for "all languages", `en-GB` for "English from Great Britain", `fr-FR` for "French from France" etc)
- most probably you also want to specify a value for
- `State` (`Published`, `Unpublished`, ...)
- `Access` (`Public`, `Registered`, ...)
- `Featured` (here it is a radio with 2 Options `Yes`, `No`, but when you create your own *HTTP Request* you would write `1` or `0` in your *JSON* of course)
- and maybe you even want to fill in some other fields like
- `Note` (example: "Created via Make.com")
- `MetaDescription`
- ...
- finally click on `Save` {fig-alt=""}
##### Run
And then you can click on `Run once` and see the magic happen!
###### In case of failure
Oh wait, sometimes you run into errors... In that case
- you see a little popup in the bottom right corner
{fig-alt=""}
- there is a Red Flag on the Joomla Module on which you can click {fig-alt=""}
- then you can see the precise error message {fig-alt=""}
In the example on the last screenshot the error message is the following: `[400] Saved failed with the following error: A Trashed Article in the same category has the same alias`.
Note:
Since Joomla 6.1 you would not have that particular error any more because, even via the Web Services, Joomla adds for example a `-2`, `-3` to the Alias if the chosen Alias was already assigned to another Article within the same Category. Very handy!
That improvement made by @alikon really simplifies Automation. For the record:
- the Issue:
- the Pull Request:
But of course, you can still run into other issues, like for example being unable to Update/Edit an Article... because it is checked out in the backend.
###### In case of success
In case of success
- everything will be green {fig-alt=""}
- you can even click on the little circle at the top-right of any Module to see the Values which were passed {fig-alt=""}
###### Put your Scenario in Production
If you are happy with the result and want to trigger it automatically, simply click on the little Clock Icon on the RSS Action to determine the Schedule:
- at regular intervals (for example 15 minutes)
- every day
- ...
Then you get a popup asking you to Activate your Scenario (and if you want to do it later, you can always do it for example from the List of Scenarios).
###### History
For each Scenario you also have a History which can be useful for example
- when you are debugging
- when you want to know what has been done and when
- when you want to have a detailed view on your credit usage
- ...
##### The corresponding Template
For the sake of explanation, we have done the whole procedure step by step above.
But to make your life even easier for your first experience, [DOWNLOAD HERE our corresponding Make.com Template](https://www.make.com/en/integration/16738-rss-feed-create-joomla-article?templatePublicId=16738)
Indeed, when you want to share a Scenario you can make it a Template
- it is then shared with your Team members
- you can also get a Share link to share it with anybody
- the advantage of a Template (compared to a simple Scenario for which you can Export the Blueprint to share it) is, among other things, that you can add
- comments for each field
- default values
{fig-alt=""}
#### Create and Update Joomla Articles and their Custom Fields from GSheet - first Post then Patch and add Article ID in Google Sheet
{fig-alt=""}
When you want to mass-create Articles, it can be very handy to use for example a Google Sheet as a Source (or Airtable or whatever).
In the following example we go even further
- we Create each Article
- we Update it immediately to do things that are not foreseen in the "basic" Create Article Module, for example to fill in
- a Custom Field
- the "Finish Publishing" (`publish_down`)
- the "Start Publishing" (`publish_up`)
- finally, we even write back in the Google Sheet the ID that Joomla has just given to the newly created Article
In other words
- for Custom Fields, use the Name (ie the "Alias") of the Custom Field to identify it
- for native Joomla Fields, simply use its technical name (ie the name in the database)
In order to Update/Patch an Article, we need to set up a "Make an API Call" Module. Use the following configuration
- URL: following Joomla's documentation, we have to put
`/v1/content/articles/id` where `id` is the id of the Article we want to Edit... and which can be dynamically fetched from the Results of the previous step
- Method: PATCH
- Header
- Key: Content-Type
- Value: application/json
- Body
- put the valid JSON (see example below)
- each Value can be
- hardcoded
- or made Dynamic based on any result of a previous Step of the Scenario
- or even a mix
```json
{
"mycustomfieldname": "whatever",
"publish_down":"2026-02-01 11:00:00",
"publish_up":"2025-02-01 11:00:00"
}
```
#### Before using the `Make an API Call` Module make your life easier with the `Create JSON` Module
When you start having many Fields and/or when the Value of those Fields needs to be "sanitised" (because they contain Special Characters like quotes etc) you might end up losing a lot of time writing and testing the JSON of your Body.
Besides, you could easily make a typo (forgetting a comma, mistyping a quote etc) which would then break your action.
See for example how tricky it can be when you type your JSON manually:
{fig-alt=""}
So do yourself a favour: if you can afford 1 extra step in your Scenario, add a `Create JSON` Module:
{fig-alt=""}
Tips:
- when creating the Module, you can paste an example of JSON... and it will automatically create the data structure (list of fields)
- for each Field, you can specify its Type: Text, Number, Collection, ...
- in the Advanced Settings of the Module, choose Indentation > Tabs. This will make your Output easier to read for humans than if the whole JSON is on 1 line
- if later you want to Edit your data structure, simply click on the 3 vertical dots next to the data structure Name
#### Create Joomla Articles from GSheet with Automatic Translation and Router
{fig-alt=""}
Once you start, you can always improve further.
This example takes the previous one and adds the following actions:
- after reading the Google Sheet we use Deepl to translate some Column
- after that automatic translation we write it back in the Google Sheet in some other Column
- then based upon the Value of some column in the Google Sheet we use a Router to
- either "Create an Article"
- or "Make an API Call", for example because we need more parameters than the standard "Create an Article" Module or because we want to do something which is not (yet) in a ready-to-use Module
For our "Joomla - Make an API Call" Module, use the following configuration
- basically the same as above, but we choose POST instead of PATCH
- the JSON would look as follows
```json
{
"title":"___",
"articletext":"___",
"catid":"___",
"language":"___",
"state":"___",
"mycustomfieldname":"___"
}
```
where you replace `___` with the *hardcoded* or the *dynamic* value (based on a previous step) that you want.
Note: do you know the difference between
- articletext
- introtext
- fulltext
See for more information.
#### Mass Articles & Menu Items Creation for Multilingual Website with Association
{fig-alt=""}
Here's an illustration of what I've done on a site in production to facilitate the mass creation of Articles & Menu Items:
- X articles are created in each of the three languages
- with Special access
- with a given Author
- and placed in their respective Categories
- all with Multilingual Association
- and for each Article a corresponding Menu Item is created
- with Special access
- with a Page Class
- with Multilingual Association
It used to take a long time when doing this manually (hundreds of clicks with the risk of selecting the wrong Article in the Menu Item or the Association because the site already has 3000+ Articles, 30 of which are already called "Conclusion" for example).
{fig-alt=""}
And at each stage you can use the feedback from previous API calls (that's how I created the article in the 3rd language, for example... by adding the Multilingual Association):
{fig-alt=""}
#### Keep Joomla Articles synchronised as soon as a line is Added or Updated in a Google Sheet thanks to a webhook + Error Management
This is my ultimate solution to synchronise Joomla Articles _with a Google Sheet_.
Indeed as soon as a line is Added or Updated in a Google Sheet, the corresponding Article is Created or Updated in Joomla, thanks to a webhook.
Here is the complete Scenario.
You remember from above that the Module "Google Sheets - Watch New Rows" was ready to use.
Note that here we use the Module "Google Sheets - Watch Changes". This one requires installing an AddOn in Google Sheets. Very easy to do:
- Google Sheets > Extensions > Add-ons > Download
- Search for Make
- Install
As soon as it is installed you can configure it via Google Sheets > Extensions > Make
- specify a Sheet (optional)
- specify a Range (optional). My 2 personal tips (depending on your need of course)
- if you have Headings in Row 1, don't put Row 1 in the Range (otherwise your Scenario in Make will be triggered with data which is only Headings...)
- limit the Range to Column A for example. This way
- you don't trigger your Scenario if you are editing a row having values in numerous columns
- you can then call Column A "Trigger Sync" for example, where you would change the value every time you want to Create / Update a Row. Example: "version 1", "version 2", etc
More about the procedure here:
This is the scenario that I have set up:
{fig-alt=""}
{fig-alt=""}
Let us explain the different steps:
- in the "Google Sheets - Watch Changes" Module you find the webhook URL that you will paste in the Make AddOn in Google Sheets itself. So it is literally "listening live" to what is happening in the Google Sheet
- then the Router Module reads the "ID" Column
- if it is empty then it means that an Article should be Created
- we could create an Article *with* Custom Fields in 1 step with a "Joomla - Make an API Call" but here I prefer to do it in 2 steps
- first I use the "Joomla - Create an Article" Module, which takes care of the standard fields like Title, Content, etc. Right after that we write back in the Google Sheet the ID of the Article which has just been created (very handy!)
- only then we Update the newly created Joomla Article in order to take care of all the Fields which are not available in the "Joomla - Create an Article" Module, typically Custom Fields. The reason why I prefer to take care of the Custom Fields separately is the following: experience told me that
- most of the time the Title etc are OK in the Google Sheet
- but very often end users make errors on Custom Fields in the Google Sheet (example: a Custom Field of type URL... but they forget the `https://` or `mailto:` etc) => so even if there is an issue with some Custom Fields for example, at least the Article has already been created
- if it is not empty then it means that the Article already exists in Joomla, meaning we will Update it
As you can see, for each Joomla Module
- I made a right-click > "Add error handler"
- and I configured an Email Module
- which connects to my email account via SMTP
- and sends an email if the Joomla Module encounters an error (in that email I can pick any variable, like the Name of the Google Sheet, the Row number, ...)
To make your life easier, [DOWNLOAD HERE our corresponding Make.com Template](https://www.make.com/en/integration/17322-create-update-articles-from-gsheet-updates?templatePublicId=17322)
#### Create a new Joomla Article from a webhook & update image via FTP
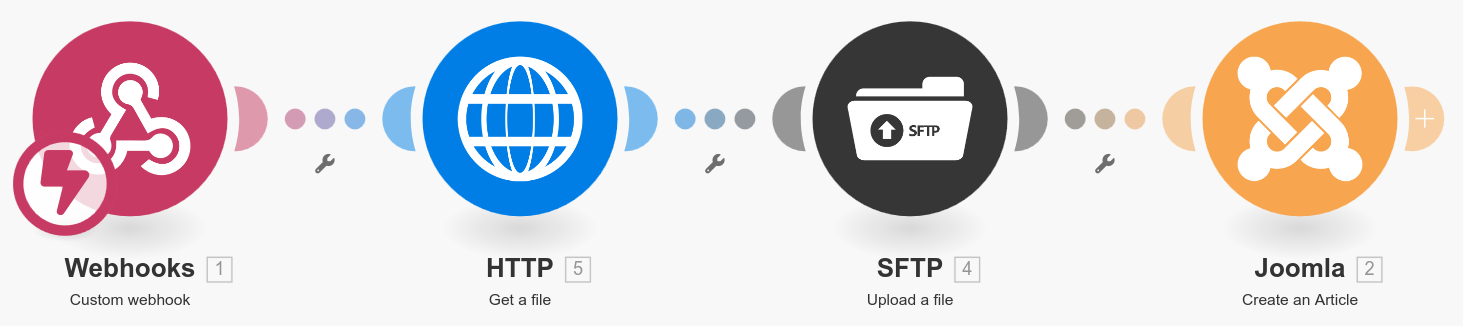{fig-alt=""}
In our first example we used an RSS Feed as Source.
But of course we could use a webhook, which is very handy: as soon as something happens in your external "Source", its webhook calls your Scenario and triggers it.
So no need to run your Scenario every 15 minutes for example to check if there is something new (and you save on the number of monthly Operations).
In this example, before creating the Joomla Article we even
- Fetch the Image referenced by the webhook
- and upload it via (s)FTP to our website
#### Migrate from WordPress to Joomla
{fig-alt=""}
We can also easily migrate content from WordPress to Joomla.
Here is an example in order to
1. watch Posts from WordPress
2. Get a Media Item from WordPress, based on step 1
3. and then Create a Joomla Article where, among other things,
- "Introduction image url" is the `Source URL` of step 2
- "Introduction image alternative text" is the `Featured Media` of step 2
##### Other ways to Migrate from WordPress to Joomla
Joomla currently has 2 projects for migrating WordPress sites to Joomla sites, each with a different approach:
- Advanced Migration Tool: the Joomla Academy project by @Rahul, which uses an export file from the source CMS that is imported into Joomla. The media are migrated via FTP. You can find the code in
- Migrating CMSs using the web services API: the Google Summer of Code project by @Reem Atalah, which uses the web services API of both the source and the target CMS to migrate all content, converting everything to and from a Common Content Model. You can find the code in . Reem wrote an article about it in the latest Joomla Community Magazine
Both projects work with a Joomla component, that you can download and install. In the repos you'll find the latest releases. Neither project is completely finished yet, but both can be used for conversion of a WordPress site to Joomla. Testers are very welcome to try them out and give feedback via the issues in the respective repositories.
Besides these two projects we also had the SoC2023 project (), which did direct transfers in the databases.
#### Create a Webhook for your forms in Joomla
If you use a Form extension like Convert Forms by Tassos or the Advanced Form Builder by ZOOlanders (for YOOtheme), you can also use a Webhook for all the actions you want to take based on that form. The advantages compared to building those actions in Joomla:
- you can do more complex things easily
- if anything fails, you can fix your scenario and re-run it with the pending data. In other words, you never lose data
Note: RSForm!Pro has a _Zapier_ Plugin in order to add Zapier Webhooks to your form. But apparently there is nothing for the other automation tools.
#### Router with Conditions, Router with fallback, Resume Using, Airtable as a Source
{fig-alt=""}
The following Scenario allows me to synchronise thousands of Films from Airtable to Joomla
- it is triggered every night and only processes the Airtable rows which have changed since the last run
- the first Router will go through both Route1 and Route2
- Route1 downloads the Image from Airtable and Uploads it via sFTP to Joomla
- in theory the image is always present, but just in case it would be missing, we added a Resume Module so that we put a tiny default image instead
- if I re-synchronise the whole source for example, I don't need to download & upload the images again and again. So I click on the Route1 where
- I can add a label, for example in my case "IMAGES On/Off"
- I can put a Condition. If I want route1 to be skipped, all I have to do is write a Condition which will never be true. Example: `1` `equal to` `2`
{fig-alt=""}
- Route2 takes care of the synchronisation with Joomla
- we first use a JSON Module so that our payload with all the Fields (Title, Introtext, Images, Custom Fields, ...)
- is easy to set up
- is sanitised
- will be used in the 2 subsequent Routes
- then we have a Router, but this time only 1 of the 2 Routes will be followed
- if the column "ID of the Joomla Article" is empty in Airtable, we follow the first Route which
- creates the Article (with only the necessary fields)
- writes back to Airtable the ID of the Joomla Article which has just been created
- updates the Article with all the Fields
- otherwise (because we "Set the route as a fallback" to Yes)
- the Article already exists so we only need to update it with all the Fields
#### Using Artificial Intelligence somewhere in that process
Another interesting possibility is to use AI somewhere in the process.
##### Either to process your data (summarise, translate, ...)
I have a nice use case of a films/movies database where there is a Field with the synopsis... but we needed a *summary* of that synopsis for the website, limited to 200 characters for example.
##### Or to communicate directly with a Joomla MCP Server
{fig-alt=""}
If your use case is complex, instead of making a complex scenario you could for example simply use a Joomla MCP Server which would then do all the necessary steps in 1 MCP Module (consuming your AI Tokens of course)
Here is a little test I successfully made with SensoMCP (which connects with OAuth).
### Watch Articles
Instead of Creating Joomla Articles based on some trigger... we can also do it the other way round: new Articles in Joomla could trigger anything!
#### Watch NEW Articles and write to GSheet
{fig-alt=""}
#### Watch UPDATED Articles and write to GSheet
{fig-alt=""}
#### Watch new Articles and publish to Facebook
{fig-alt=""}
### Create Users
#### Mass Users Creation
There are of course Extensions that allow you to mass-import Users. But using Automation makes it particularly easy and customisable.
In practice:
##### Step 1
Create a small Google Sheet with
- name
- username
- password
- email
- id
{fig-alt=""}
##### Step 2
With one click in Make.com (or Zapier or n8n etc), all the accounts are created on the site.
As a bonus, you can even read the ID of each account that has just been created... and automatically inject it into the corresponding line of the Google Sheet (column E above).
{fig-alt=""}
Since there is no ready-to-use Joomla Action for creating Users, we make our own API Call:
- URL: following Joomla's documentation, we have to put
`/v1/users`
- Method: POST
- Header
- Key: Content-Type
- Value: application/json
- Body
- put for example the following JSON or adapt
```json
{
"block": "0",
"email": "___",
"groups": [
"2"
],
"id": "0",
"lastResetTime": "",
"lastvisitDate": "",
"name": "___",
"params": {
"admin_language": "",
"admin_style": "",
"editor": "",
"helpsite": "",
"language": "",
"timezone": ""
},
"password": "___",
"password2": "___",
"registerDate": "",
"requireReset": "0",
"resetCount": "0",
"sendEmail": "0",
"username": "___"
}
```
where you replace `___` with the *hardcoded* or the *dynamic* value (based on a previous step) that you want.
##### Step 3
And we could continue the Scenario as mentioned above by sending an automatic personalised mailing to the people concerned, etc.
### Error management with Make.com
Sometimes your Scenario can't execute because of some error. Example:
{fig-alt=""}
What is then very handy is to click on the History tab of your concerned Scenario:
{fig-alt=""}
Once you have solved the root cause, you can re-enable the Scenario:
{fig-alt=""}
If there is more unprocessed data in the queue, it will ask whether it should process it or not:
{fig-alt=""}
In our case, our issue was caused by wrong data in our Source. So continuing to run it based on the historical values would keep us running into the same error again and again (and every time the Scenario is automatically disabled). So in that case what you want to do is to simply
- go to the Queue
- select the rows which should not be processed again
- and click on the red button ("Delete selected")
{fig-alt=""}
### Other
#### Retrieve files via HTTP and upload them to SFTP server
{fig-alt=""}
## Practical examples with n8n
n8n seems to me more technical than Make.com, but
- hereafter you will find a few specific things to help you start with n8n
- and for the rest, all the principles explained in the "Practical examples with Make.com" are still valid
_Note: at the end of December 2025, Mohamed Abdelaziz aka released a Joomla integration for n8n. See above and see . So in the near future I will be able to add below an example using this integration._
### Create an Article from an RSS Feed
Let's take our first example made above with Make.com: create an Article from an RSS Feed.
{fig-alt=""}
In this example everything will be done using a `HTTP Request`.
Here is how to set up the **Connection** part:
- Method: `POST`
- URL: `https://www._____.com/api/index.php/v1/content/articles` (adapt for the correct domain name of course)
- Authentication: `Generic Credential Type`
- Generic Auth Type: `Bearer Auth`
- Bearer Auth: `Bearer Auth Account` (in the configuration put your `API Token`)
- Send Headers: `enable`
- Specify Headers: `Using fields below`
- Name: `Content-Type`
- Value: `application/json`
{fig-alt=""}
Here is how to set up the **Body** part:
- Send Body: `enable`
- Body Content Type: `JSON`
- Specify Body:
- either `Using JSON` (you then have to write the proper JSON with all the fields - see examples above)
- or `Using Fields Below` (which is a very clean way to do it)
- Body Parameters: you then put the Name and the Value for
- title
- articletext
- catid
- language
- (state)
- (access)
- (note)
- ...
{fig-alt=""}
### My advice between "Using JSON" and "Using Fields Below"
Here is one of my experiences:
- in one of my workflows everything was working fine during testing: Articles were created *successfully*
- then I have put that workflow in production... and after a few days of daily automatic execution I realised that it had *failed*
What happened? In my Source (an RSS Feed) there happened to be a *quote* in the Content (we use loads of quotes in French...). But actually this character needs to be escaped.
Similarly, if in your workflow you have the following line in your JSON
```js
"articletext": "{{ $json.content }}
{{ $json['content:encoded'] }}",
```
it will throw an error because you should escape the *double quote* used for the Read More typed manually in HTML. So you should actually type
```
"articletext": "{{ $json.content }}
{{ $json['content:encoded'] }}",
```
Actually this is because we had selected `Using JSON`. Then we are responsible for escaping such characters etc.
The good thing when you select `Using Fields Below` is that you don't need to worry yourself about that
- neither for manual Values
- nor for dynamic Values
This is why I would recommend using `Using Fields Below`, especially if you are relatively new to n8n.
### JSON Validator
When you are using JSON, you can always use a JSON Validator to check that there is no technical typo.
Example:
In our case above
- our JSON as such was valid as long as it only contained the Variable names
- but once the Variables were dynamically replaced by the real content of our Source then the JSON was not valid any more because of some extra `quotes`
When you edit your workflow in n8n you can precisely switch for each Value between `Fixed` and `Expression` to check for real content.
## Practical examples with Zapier
In the following example we will show the following use case
- as Source there is a central database of Movies in Airtable (Airtable being a very well-known and powerful online database)
- as Destination there is a Joomla website, where we want to
- create an Article every time a new Movie is added in Airtable
- update that Article every time any Movie is edited in Airtable
- by using Zapier to interconnect the Source and the Destination
### The Airtable part
The database contains many simple fields like `Year`, `Duration` etc.
These can be directly used in Zapier to read from Airtable and write in Joomla
But some fields are trickier, for example the Custom Fields of Type *Checkboxes* (or *Subform*) which can have Multiple Values.
See below the section dedicated to those more advanced Custom Fields.
### The Zapier part
For your scenario, here is what the Zap looks like:
{fig-alt=""}
For a Post and for a Patch, the action we have to use is called `Webhook by Zapier`.
For the `payload type` I chose `Raw` because I wanted to be free to write my JSON as I wanted, but I guess you could directly use `JSON`.
In the configuration of the action, you have to set up the Headers (see screenshot), ie
- Authorization: Bearer YOUR_API_KEY
- Content-Type: application/json
{fig-alt=""}
So in practice:
a. here is what our Post (ie for Article Creation) looks like:
{fig-alt=""}
b. here is what our Patch (ie for Article Update) looks like:
{fig-alt=""}
c. here is what the FTP (ie to upload the image) looks like:
{fig-alt=""}
Note that with Zapier it is possible to upload your image in only _one_ step/action, while I needed _two_ with Make.com.
## Do anything in Joomla... even if not foreseen in your Automation tool
Maybe at some point you want to do something specific which is not foreseen in the Joomla integration for one of the Automation tools you are using.
Never mind! Actually you can always use a standard `HTTP Action` / `Make an API Call` to use *anything* allowed by Joomla Web Services (or any other tool).
The same principle applies for any other tool you might be using (CRM, ...).
See the next section for more details.
## Custom Fields of Type Checkboxes or of Type Subform
Simple Custom Fields like `Year`, `Duration` etc are straightforward to work with. Indeed they can be directly used in the payload.
But some Custom Fields are trickier because they can have Multiple Values, for example
- the Custom Fields of Type *Checkboxes*
- the Custom Fields of Type *Subform*
Instead of using JSON we can actually use Arrays.
This is an easier approach because it avoids the need for managing indexes like `0, 1, 2, etc` or `row0, row1, row2, etc`
### For Custom Fields of Type Checkboxes ou Radio
In the payload of our API call, instead of using a `JSON`
in a compact way:
```JSON
"domaines-dexpression": {"0":"Audiovisuel","1":"Arts visuels, plastique, numérique","2":"Langue française et lettres","3":"Musique","4":"Théâtre","5":"Danse"},
```
or in a prettifyed way:
```JSON
"domaines-dexpression":
{
"0": "Audiovisuel",
"1": "Arts visuels, plastique, numérique",
"2": "Langue française et lettres",
"3": "Musique",
"4": "Théâtre",
"5": "Danse"
},
```
we can use an `Array`
```JSON
"domaines-dexpression": [
"Audiovisuel",
"Langue française et lettres",
"Musique",
"Théâtre",
"Danse"
],
```
In our example, all we need to do is to edit the *Data structure* of our *Create JSON* Module
- we add a Field
- for the Type we choose Array instead of the usual Text
- for the Array Item Specification we leave Text
- and finally, back in our *Create JSON* content, we Map the correct Field
{fig-alt=""}
{fig-alt=""}
### For Custom Fields of Type Subform
In the payload of our API call, instead of using a `JSON`
in a compact way:
```JSON
"test-subform": {"row0": {"field148": "Français, Arts et Culture"}, "row1": {"field148": "Créativité, Engagement et Esprit d'entreprendre"}},
```
where `field148` is the "sub-field" (the ID of which being 148 on our site) of our Custom Field of Type Subform
or in a prettifyed way:
```JSON
"test-subform": {
"row0": {
"field148": "Français, Arts et Culture"
},
"row1": {
"field148": "Créativité, Engagement et Esprit d'entreprendre"
}
},
```
we can use an `Array`
```JSON
"test-subform": [
{
"field148": "Français, Arts et Culture"
},
{
"field148": "Créativité, Engagement et Esprit d'entreprendre"
}
],
```
In our example we are using Airtable as a Source. In order to avoid having to create a duplicate of my Column in order to create the JSON or the Array we can simply add 2 Modules in Make.com :
- Iterator
- Array Aggregator
{fig-alt=""}
The Iterator is configured as follows:
{fig-alt=""}
The Array Aggregator is configured as follows:
{fig-alt=""}
In the Create JSON Module, we use the output of the Array Aggregator for our Custom Field of Type Subform:
{fig-alt=""}
### Alternative in Airtable: duplicate the Field and use Formulas to generate a JSON
#### Custom Fields of Type Checkboxes
See for example in my Source the Field `Classification` (which is a kind of Parental Guidance, with Options like `PG13`).
{fig-alt=""}
- in Airtable, that field is very easy: you just tick the Options you want, it is visual and colourful.
- but in order to write that field with an API like Joomla's we need to have it in JSON format, for example: `{"0":"12","1":"S","2":"L","3":"D"}`
So as you can see from the screenshot, we created a new Field `ClassificationJSON` next to the Field `Classification`.
But of course the goal was to have it _automatically_ filled in (not _manually_).
There are 2 ways to do that in Airtable:
- via a `Airtable Formula`
- via an `Airtable Automation`
##### Via an Airtable Formula
See the respective screenshots of the _Source_ and the _JSON version of the Source_ (click on the dropdown arrow at the end of the Title of that column and click on the first option `Edit field`):
Source|JSON version
---|---:
{fig-alt=""}|{fig-alt=""}
: {tbl-colwidths="[50,50]"}
You can use Airtable's AI in order to build that formula, being in this case:
```JS
IF(
{Niveaux scolaires},
'{"0":"' & SUBSTITUTE(SUBSTITUTE(SUBSTITUTE(SUBSTITUTE(SUBSTITUTE(SUBSTITUTE(SUBSTITUTE(SUBSTITUTE(SUBSTITUTE(SUBSTITUTE(SUBSTITUTE(SUBSTITUTE(SUBSTITUTE(SUBSTITUTE(SUBSTITUTE(SUBSTITUTE(SUBSTITUTE(SUBSTITUTE(SUBSTITUTE({Niveaux scolaires}, ", ", '","1":"', 1), ", ", '","2":"', 1), ", ", '","3":"', 1), ", ", '","4":"', 1), ", ", '","5":"', 1), ", ", '","6":"', 1), ", ", '","7":"', 1), ", ", '","8":"', 1), ", ", '","9":"', 1), ", ", '","10":"', 1), ", ", '","11":"', 1), ", ", '","12":"', 1), ", ", '","13":"', 1), ", ", '","14":"', 1), ", ", '","15":"', 1), ", ", '","16":"', 1), ", ", '","17":"', 1), ", ", '","18":"', 1), ", ", '","19":"', 1) & '"}',
"{}"
)
```
##### Via an Airtable Automation
Another solution in Airtable is to use what they call `Automation` (visible at the very top of the screen, in the middle, next to `Data`, `Interfaces` and `Forms`).
In that Automation the `Action Type` is `Execute Script`, with some custom-made JavaScript (see the exact code below, after the screenshot).
Note: in this case there is always a _value_. But beware: if the initial _value_ is empty then you should still keep the curly brackets `{}` (otherwise the creation/update of the Joomla Article will be ignored because the JSON of the Body of your API Request would not be valid)
{fig-alt=""}
```javascript
let inputConfig = input.config();
let recordId = inputConfig.recordId;
let table = base.getTable("FILMS");
let record = await table.selectRecordAsync(recordId);
if (!record) {
throw new Error("Record introuvable");
}
let classificationArray = record.getCellValue("Classification");
if (!classificationArray) {
await table.updateRecordAsync(recordId, {
"ClassificationJSON": ""
});
} else {
let result = {};
let key = 0;
classificationArray.forEach(item => {
result[key] = item.name;
key++;
});
let jsonResult = JSON.stringify(result);
await table.updateRecordAsync(recordId, {
"ClassificationJSON": jsonResult
});
}
```
#### Custom Fields of Type Subform
In the case of a Custom Field of Type Subform, if you create an example in Joomla and check in the database you will notice that the structure is the following.
Example for a Custom Field of Type Subform having 1 Custom Field (field69... the name being automatically derived from the fact that the Custom Field in question has ID 69) and 3 values (row0, row1, row2):
```JSON
{"row0":{"field69":"FR"},"row1":{"field69":"EN"},"row2":{"field69":"NL"}}
```
Example for a Custom Field of Type Subform having in this case 3 Custom Fields (field2, field1 and field7) and 3 values (row0, row1, row2):
```JSON
{"row0":{"field2":1410,"field1":"blabla","field7":"blabla"},"row1":{"field2":1410,"field1":"blabla","field7":"blabla"},"row2":{"field2":1410,"field1":"blabla","field7":"blabla"}}
```
So similarly in Airtable you can also create a script which will generate that structure based on your raw column.
Note that Airtable has an AI which can create this script for you.
## Test your APIs with an API Client
See first the `Official Documentation` for a series of examples of Joomla Web Services:
For a good overview of Joomla Web Services (API) in Joomla 4 or 5 or 6, see also this `detailed presentation`:
### Postman
When you want to run tests, Postman used to be the reference (if you have not started using Postman yet, switch directly to the next section about Bruno).
In order to make it easy, Alexandre Elisé published `100+ Endpoints Joomla Web Services Collection For Postman`:
Learn Postman:
### Bruno
See this step-by-step presentation I made about Bruno:
## Using Salesforce
Speaking of *Automation*, Jeff shared this valuable information if you use *Salesforce*:
*I wanted to share a tool that is super helpful for anyone who needs to integrate Joomla (or anything else) with Salesforce. Streamscript () is a free and fabulous scripting language that runs inside the Salesforce Flow visual programming tool. It makes it easy to create listeners for inbound webhooks and/or do any kind of outbound REST calls for integration. That is what I use to create the source data for my Scheduled Task plugin. I realize now I might adapt it to call the Joomla API directly.*
*Using Streamscript on Salesforce and ConvertForms and Engagebox on Joomla, I have built a quite flexible and powerful system for purchases on our site (look at for an example). It integrates with Stripe, PayPal, and Wise (for bank transfers) and calls out to other APIs as needed. For example, we sell discounted Zoom licenses and it automates the creation and configuration of Zoom users.*
## Using AI to create your workflows
For most Automation tools mentioned above, you can export/import "scenarios" in the form of JSON files.
AI tools (like Claude) are becoming very good at creating those workflows. So don't hesitate to combine for example
- a draft generated by AI in order to gain time
- with your own fine-tuning / customisation
## MCP server for Joomla
In all the examples above, we had to write a proper payload in a (potentially) complex scenario in order to do exactly what we wanted.
But what if you could use natural language combined with AI in order to do everything, without even caring about how to build the scenario and write the correct payload?
Well, this is precisely the goal of an MCP (Model Context Protocol) Server.
And the good news is
- Joomla 6.3 should ship with its own official MCP Server. Release date: mid-April 2027
-
- if you can't wait, good news: I have already identified a dozen Joomla MCP Servers
-
Note: in October 2026 Make publishes this interesting blog post about "How to connect Claude to Make’s MCP server?":
## Security
As with every tool accessing your website, you should of course care about _security_ because if somebody breaks into your automation tool, he/she has access to all the services you connected to it.
So think to every potential security flaws like
- a weak password for your Automation tool like `123qwerty` for example
- who has access to your Automation tool
- ...
## Get in touch
{{< include ../marc_dechevre.md >}}