---
title: "Using Bruno (the API Client) to play a.o. with Joomla Web Services"
description: "Instead of using Postman just use Bruno which is open-source and free"
format: html
theme: darkly
number-sections: true
smooth-scroll: true
link-external-icon: true
toc: true
toc-depth: 4
other-links:
- text: List of all presentations
href: https://slides.woluweb.be/
include-in-header:
- file: ../woluweb-opengraph.html
- file: ../woluweb-analytics.html
- file: ../woluweb-other.html
- text: |
---
{{< include ../marc_dechevre_by.md >}}
Note: this article is **work in progress**. Please contact me for any feedback/suggestion or if you know of any other interesting resource about this topic! I will be happy to integrate them in the current article which will also be used for different Joomla presentations in order to spread the knowledge and share experiences.
## Introduction
In the past, many people were typically using Postman as API Client when testing Web Services / APIs.
More recently, many users have moved from **Postman** to **Bruno** (). Here are the main reasons:
- **Open-Source & Free**: Bruno is an open-source alternative, providing a fast, lightweight tool that remains free for core functionalities, unlike Postman's restrictive, tiered, and paid, feature-packed model.
- **No Login/Cloud Required**: Bruno allows immediate, unrestricted use without the need to create an account, log in, or worry about cloud-based synchronization.
- **Local-First & Privacy-Focused**: Unlike Postman, which stores data in the cloud, Bruno saves your API Collections, requests, and variables directly in a folder on your filesystem (using the .bru format). This ensures no data leaves your machine and works perfectly offline.
- **Git-Friendly** (Built-in Version Control): Because Bruno stores Collections as text files, you can use Git to version control, branch, and merge your API requests alongside your code, facilitating easy collaboration without proprietary tools.
- **Lightweight Performance**: As a desktop application, Bruno is faster and consumes less memory compared to the increasingly heavy, browser-based, or Electron-based, Postman interface.
- **Simple & Focused**: It specializes in API testing and development without the bloat of advanced, often unnecessary, features found in Postman.
_The aim of this presentation is to get you started with Bruno._
It is a.o. inspired by a Session made by René Kreijveld at [JoomlaCamp 26](https://www.joomlacamp.de/) on February 28th 2026 in Essen (Germany).
## Resources
- This presentation is complementary to 2 other ones I made previously where you will find more links and more information about the Joomla Web Services (API)
- Playing with the Joomla Web Services (API) in Joomla 4 or 5 or 6
-
- Automation with Joomla (Web Services / API)
-
- Other presentations about Joomla Web Services made at Joomla events
- How to use the Joomla Web Services API? _by Peter Martin aka Pe7er_ at #jd25nl & #jd22dach
-
- PhpStorm as alternative for Postman _by Roland Dalmulder_ at #jd25nl
-
-
- Joomla Web Services (API)
- Documentation
-
- Manual
-
- Collections (in historical order)
-
- historically the first Collection, released a few years ago
- by Alexandre Elisé
- format: Postman
-
- since January 2026
- a complete OpenAPI specification of Joomla's web services API
- by Herman Peeren
- format: OpenAPI
-
- since February 2026
- derived from Herman Peeren's Collection
- by René Kreijveld
- format: Bruno
- and probably relatively soon: the _Official Collection_ 😊
A big up respectively to Alexandre, Herman & René!
## Installation
### Install Bruno
Download and install Bruno from the official website:
Note: if you already have Bruno installed, make sure you update it to the latest version
For Linux users, instead of downloading the Installer ("AppImage") from the Download link above, I would recommend to use a Package Manager (APT repository / Flatpack / Snap). This way you don't miss updates.
### Install the Collection
#### Download the Collection
- Go to
- Click on the green `<> Code` button
- Click on `Download ZIP`
- Save it on your computer
- Unzip it
- Put the `bruno` folder and its content whereever you wish
- for example at the root of your local website
- or simply in a more general folder
{fig-alt=""}
#### Open the Collection in Bruno
- open Bruno
- click on the `+` sign next to Collections in the left sidebar
- select `Open Collection`
{fig-alt=""}
- navigate to the location where you copied the `bruno` folder
- open it
- click on the `Joomla Web Services API` folder
- and click the `Open` button
{fig-alt=""}
- in the left sidebar below Collections you now see the Joomla Web Services API Collection
- click on it to expand and see all the folders and requests in the Collection
{fig-alt=""}
#### Configure your Collection in Bruno
- with the Collection open, at the top right you see a dropdown called `No environment`
- click on it to expand the dropdown and select `Joomla Web Services API`
- click on the button again to reopen the dropdown and click on `Configure`
{fig-alt=""}
- it opens an `Environments` tab
- there are two ready-to-use variables
- `base_url`
- adapt the URL with the URL of your Joomla website
- example: `https://www.myjoomlawebsite.com/api/index.php`
- note: be sure to keep the `/api/index.php` part at the end of the URL, as that is the endpoint for Joomla API requests
- `api_key`
- copy the API token from your Joomla User Profile
- ideally, you should create a new Super User instead of using your own Joomla User Profile so that
- you can easily disable it (security)
- you also see more clearly in the User Actions Logs what has been done via the backend vs via the Web Services
- the Web Services can also be made available to Users not having the `Super User` Access Level but that is another topic
- paste it as the value of the `api_key` variable
- click the `Save` button at the bottom of the Environments tab
{fig-alt=""}
{fig-alt=""}
⚠️ Security Note: Since Bruno stores these variables in plain text files (.bru), ensure you never commit your specific `api_key` to a public Git repository. Use .gitignore for your environment file or share keys only within trusted teams
### Additional information
#### Multiple Environments within the same Collection
You want to work with several websites?
Good news: within the _same_ Collection you can have _multiple_ environments.
On the following example, we have simply _copied_ the first environment and then we _renamed_ it (see the corresponding icons on the right of your screen).
Once you have several Environments, you can easily switch
- either by clicking on the `Check` icon next to the desired Environment on the List
- either by clicking on the `Database` icon (also displaying the name of the Environment) at the top right of your Collection
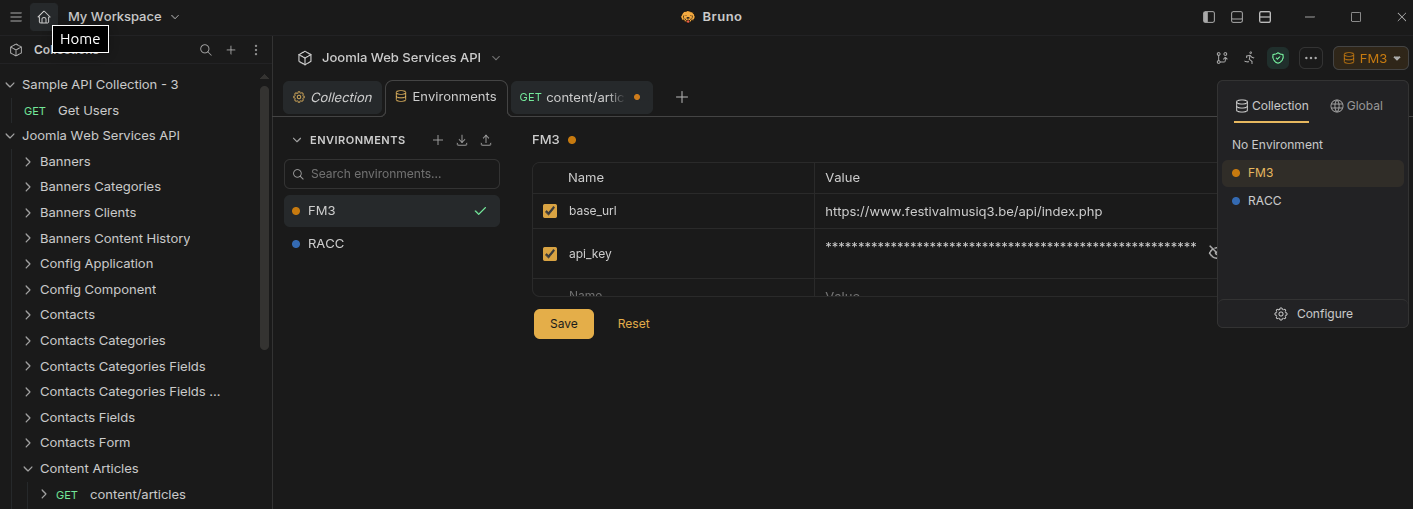{fig-alt=""}
Note that you can also for example assign a _color_ to each Environment by clicking on the `Paintbrush` icon next to the Name of the Collection
#### Headers
The Bruno Collection already integrates the correct _Headers_ (update of 7 April 2026), namely
```
'Accept: application/vnd.api+json',
'Content-Type: application/json',
```
But if you create your own Collection or want to tweak the setup, here is where it is configured:
- click on the `...` next to the Collection name in the left column
- click on Settings
- on the _Header_ tab, add the following rows
- required
- Name `Accept`
- Value: `application/vnd.api+json`
- optional
- Name `Content-Type`
- Value: `application/json`
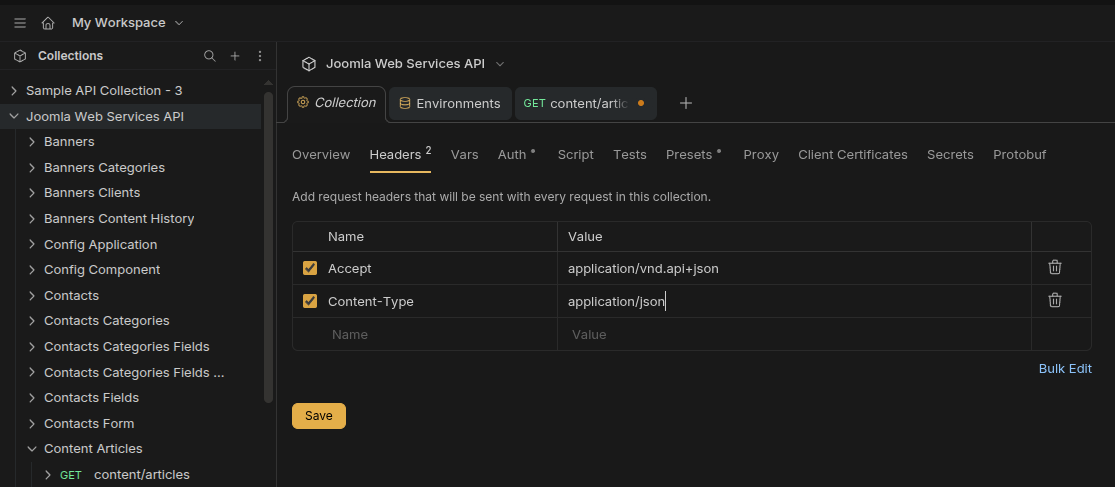{fig-alt=""}
For additional information
- see
- in particular: "Joomla by default will return a JSON API Responses when requested with an `Accept: application/json` header as well as with the specific JSON API header. Although the Core of Joomla will not support additional content types, support the ability that developers add additional content types that can be responded."
## Use your Collection in Bruno
Now it is time to start playing and to use the requests in the Collection to make API calls to your Joomla website.
For this tutorial, we will use René Kreijveld’s Bruno collection.
### Terminology
Some basic terminology first when working with APIs. You are probably familiar with the acronym `CRUD` (Create / Read / Update / Delete). The corresponding requests are the following:
- Create = `post`
- Read = `get`
- Update = `patch`
- Delete = `del`
### A simple GET Request
When you make API calls a good start is always to run a simple GET request, especially if you have little experience (a POST request is not complicated, but there are already more chances to run into errors because you would forget some required Parameters, because you put a wrong Category ID, ...).
- in the left sidebar click on Joomla Web Services API to expand the Collection
- click on `Content Articles` to see all possible requests on Articles
- click on the the first option, ie `GET content/articles`, which retrieves a List of Articles
- send the request
- either by clicking on the `right arrow` icon at the top right of your screen, next to the `` [Generate Code] and the `floppy disk` [Save] icons
- or by using the keyboard shortcut, ie `CTRL+ENTER`
{fig-alt=""}
If everything is fine, on the `Response` tab you should then see
- a green status `200 OK`
- and below the Response should contain the list of Articles of your Joomla website in `JSON` format (note that by clicking on the `JSON` button you could display the same Response in other formats like `HTML`, `XML` etc)
{fig-alt=""}
### Using Parameters in Requests
On the `Params` tab, you see that we have a number of ready-to-use parameters
- `filter` for (according to the context for example) Author, Category, Language, ...
- `list` for Ordering and Direction
In the following example
- I check `filter[category]` and put `12` as value (because I do have a Category having ID `12` of course)
- I check `filter[search]` and put `Star Wars`
When I run the request I then get the following result
{fig-alt=""}
### Using Variables in Requests
Let's now choose an another action, for example `Content Articles` > `GET content/articles/{article_id}`
On the newly opened Tab, note the URL which is mentioned after the `GET`: `{{{base_url}}}/v1/content/articles/{{article_id}}` where the Variable
- `{{{base_url}}}` is green because we have already set a Value above
- `{{{article_id}}}` is red because we have not yet set any Value
Simply click on the red `{{{article_id}}}` and in the popup you can specify the Value of an existing Article (in my case: `212`) and press `Enter` key
{fig-alt=""}
Note the `{{{article_id}}}` which was red has now become green
{fig-alt=""}
If you want to assign another value, simply
- click on `{{{article_id}}}` again
- or go on the Tab `Vars` where you see all Variables and where you can
- either uncheck the current Value (`{{{article_id}}}` will become red again)
- either change its value
{fig-alt=""}
When I run the request I then get the following result
{fig-alt=""}
### Making your Variables "global"
If for some reason you want to make a Variable "global"
- go to our Environment (where we already configured `base_url` and `api_key`)
- click on the `Joomla Web...` button at the top right of Bruno
- click on `Configure` button
- add a new line with for example
- `article_id` (without the double curly brackets) as `Name`
- the desired `Value`
{fig-alt=""}
### A simple POST request
- click on `Content Articles` to see all possible requests on Articles
- click on the the 2nd option, ie `POST content/articles`
By default, the example Body is the following
```JSON
{
"alias": "",
"articletext": "",
"catid": 0,
"language": "",
"metadesc": "",
"metakey": "",
"title": ""
}
```
But note that the only _necessary_ fields are the following:
```JSON
{
"articletext": "",
"catid": 2,
"language": "",
"title": "test post 2"
}
```
In particular
- must be present + must have a real Value
- `title`
- `catid`
- must be present in the body but can be empty (ie with `""` as Value)
- `articletext`
- `language`. Note: when you want to put a value
- `*` stands for `All`
- `en-GB` for `English`
- `fr-FR` for `French` etc (just like in your Joomla database)
Should you totally remove `"articletext": "",` from the Body then you would indeed get the following error:
```JSON
{
"errors": [
{
"title": "Save failed with the following error: Field 'introtext' doesn't have a default value",
"code": 400
}
]
}
```
### articletext vs introtext + fulltext
As you know, in Joomla
- `introtext` stands for the text in the Editor _before_ the `Read more` button
- `fulltext` stands for the text in the Editor _after_ the `Read more` button
Actually, `articletext` is "smart" and will separate your Value into `introtext` and `fulltext` when detecting `
` in the Value.
So in the Body you can use the combination that suits you the most:
- `articletext` alone
- `introtext` alone
- both `introtext` + `fulltext`
- [ but not `fulltext` without `introtext` being present. It can be empty though]
### Basic Custom Fields
Suppose you have a Custom Field of Type Text, having
- `My Own Custom Field` as Title
- `my-own-custom-field` as Name (Alias)
Then in the `Body` of the API Request you would simply add the following line in order to feed the Custom Field with the Value `lorem ipsum`:
`"my-own-custom-field": "lorem ipsum",`
### More advanced Custom Fields or Tags
- for more advanced Custom Fields, see
-
-
-
- for Tags see
-
Example: suppose you want to `POST` or `PATCH` an Article having a Custom Field of Type `Checkboxes`. In the following example its `Name` is `cinecheck`. If the `Values` I want to _check_ are respectively `12`, `V`, `F`, `L` and `H` then the `Body` of the API Request should be as follows. In particular note that you should not surround the `JSON` of the Custom Field with _quotes_.
```JSON
{
"title":"Demo from Bruno",
"cinecheck":{"0":"12","1":"V","2":"F","3":"L","4":"H"},
"note":"don't surround the JSON of the Custom Field of Type Checkboxes with quotes"
}
```
### Other Fields
Actually, if you need to add any Field (native Field or Custom Field) in a `Post` Request, the easiest way is to first do a `Get` Request in order to see
- what the `Label` is
- and how the `Value` is formatted (example: dates are formatted like `yyyy-mm-dd hh:mm:ss`)
The following example illustrates how to add Fields like
- `access`
- `created_by`
- `state`
- ... and `associations` (when you have a multilingual website you can indeed _associate_ Articles between the different languages)
```JSON
{
"title": "lorem ipsum",
"articletext": "",
"catid": 2,
"language": "en-GB",
"state": 1,
"access": 3,
"created_by": 100,
"associations": {
"nl-NL": "13",
"fr-FR": "14"
}
}
```
### What if you POST an Article and the Alias is already taken in the given Category?
With J!4.x, J!5.x and J!6.0.x, you will get an error message if you POST an Article for which the Alias is already taken in the given Category. This can sometimes be annoying when you are automating Article creation.
But as of J!6.1 (release date: mid-April 2026) you won't have to worry about that in your workflow because Joomla will automatically adapt the Alias. Example: if the Alias `my-test-article-1` is already taken, it will give `my-test-article-1`.
Thanks to Nicola Galgano (aka @alikon) for improving this!
Want to know more about this? Check
- the Pull Request of Nicola
-
- and the corresponding Issue I had posted
-
### A POST request to upload an image in a given folder
- click on `Media Files` to see all possible requests on Media
- click on the the second option, ie `POST Add Media file`
- in the Body
- for the `Path` if you put for example
- `/banners/joomlacamp26.png` the media will be uploaded in the `/banner/` folder... under the `/files/` folder
- `local-images:/banners/joomlacamp26.png` the media will be uploaded in the `/banner/` folder... under the `/images/` folder
- for the `Content` you should put your media file in `base64` format. Example for our demo:
- go to an online `base64` converter like
- upload your image
- click on the ` Code` button
- copy the result... but _without_ the initial `data:image/svg+xml;base64,`
- paste
{fig-alt=""}
#### Want to make a quick test?
Use the following `Body` where the `Content` is a tiny image:
``` JSON
{
"path": "local-images:/banners/tiny.png",
"content": "iVBORw0KGgoAAAANSUhEUgAAAAgAAAAIAQMAAAD+wSzIAAAABlBMVEX///+/v7+jQ3Y5AAAADklEQVQI12P4AIX8EAgALgAD/aNpbtEAAAAASUVORK5CYII"
}
```
You will then see this tiny image in your (8x8 pixels ) `/banners` folder:
{fig-alt=""}
#### What if the file already exists?
If the file _already_ exists when you POST you will get a 400 error:
``` JSON
{
"errors": [
{
"title": "File exists and overwriting not requested: /banners/joomlacamp26.png",
"code": 400
}
]
}
```
As explained by Herman Peeren:
> A POST request only adds a new file, cannot overwrite an existing file. When doing a POST, the overridestate parameter of the model is set to false (in the add() method in the API Controller of com_media). If you want to overwrite an existing file, you'll have to use a PATCH request (which sets the override state parameter of the model to true (in the edit() method in the controller). But in order to use that PATCH, the resource has to exist.
> This is pretty much the same for all POST and PATCH requests, also for other resources. So you always get a sequence when adding a file:
> - does the file already exist?
> - if not, then do a POST.
> - if it does exist, then do a PATCH.
> But the same holds for adding an Article (Alias must not exist), Category (idem), User (Username and Email must not already exist), etc. So you always have this same sequence. One of the things an MCP-server offers on top of just the API is this sequence. And you'll encounter it in all automation. And a step further: when creating an Article, you first have to check if the Category or User or whatever other entity is mentioned in the Article exists, and if not then create that other "dependent" resource first.
### A DEL request to delete an Article
Similarly to the workflow when deleting an Article _from the Backend_, in order to delete an Article _via the Web Services_
- one must first Patch it with State on `-2` (ie `Trashed`) in order to put it in Trash
- and only then that Article can be really deleted
## Not all Web Services are in Joomla yet
You might notice that this Collection has for example `Guided Tours`.
But at the moment (ie J!6.0) there is no Web Service for Guided Tours.
In order to see all the already available Web Services (endpoints) in Joomla
- go to the backend of your Joomla website
- click on System > Plugins
- filter on `Type` = `webservices`
Note: in the available Web Services one could choose to enable only _some_ of them.
## Go further with Bruno
A few extra information before letting you play with Bruno.
Just to keep it short, let's only mention the 3 buttons at the top right
- the `` icon allows to `Generate Code`, for example in `PHP`, `Javascript` etc
- the `🖫` icon allows to Save the changes you made to a given item of the Collection. But alternatively, if you are playing and you want to keep the "original" intact, you could also simply click on the `...` icon next to the Action in order to `Clone` it
- the `->` icon allowing to _execute_ the current request (keyboard shortcut: `CTRL+ENTER`)
Last but not least: in Bruno each item of the Collection a simple JSON file (with `.bru` extension), meaning for example that
- you can easily edit them in your `IDE` like `VS Code` or `PHPStorm` for example
- you have them available _locally_ (unlike Postman)
- you can put them in a Git repo, work in team etc
## Bruno directly in VS Code
With `Bruno for VS Code` extension, you can develop and test your APIs in Bruno right from Visual Studio Code. You can use the VS Code extension to open `.bru` files, send API requests, manage collections and environments, and much more. Streamline your development workflow by testing your APIs in the same application you use to develop them.
## Using directly PHPStorm as API Client
See this useful presentation made by Roland Dalmulder:
## Summary
- download Bruno:
- clone Joomla's Collection:
- configure the `base_url` and `api_key`
- start with a simple `GET` Request (_reading_ is always easier than _writing_ to start with)
- continue with a `POST` request
- finally contribute to the Collection and/or to Joomla! ❤️💙💚🧡
## Get in touch
{{< include ../marc_dechevre.md >}}