Joomla 4 & 5 — Cassiopeia Template — a bunch of Tips & Tricks
by Marc Dechèvre: https://www.woluweb.be — all presentations: https://slides.woluweb.be


video (English - Joomla User Group New Jersey - January 2022 - based on the 1st version of the present document )
This presentation was done several times at different events and in different languages
(at each session the present document has been improved and new sections have been added)
- JoomlaDay France in Brussels | Session in French | 2022.05.20
- Joomla User Group Maastricht (Netherlands) | Session in Dutch | 2022.03.21
- Joomla User Group New Jersey (USA) | Session in English | 2022.01.20
1 Introduction
1.1 Please contribute
Help improve this presentation that has also been converted to a Joomla Community Magazine article:
- if you think of other tips & tricks
- if any information can be more precise
- if you know of any other resource
- if you spot any typo
- if you see any error
- …
then please get back to me! ❤️💙🧡💚
1.2 Preamble - template media folders
As you might know, with the introduction of Child Templates in J4.1 the path to the “template media folders” (css, images, js and scss) changes
- from
templates/cassiopeia/in J!4.0 - to
media/templates/site/cassiopeia/in J!4.1+
for Cassiopeia (and similarly for all Templates which are / will be compatible with Child Templates).
Good to know: if you created for example a templates/cassiopeia/css/user.css in J4.0, once you update to 4.1 the file will be automagically moved to media/templates/site/cassiopeia/css/user.css.
So you don’t have to worry about this, Joomla (Dimitris Grammatikogiannis in the present case) got you covered 😉
2 Resources
“Standing on the shoulders of giants”
The goal of this session is to try and give tips & tricks about Cassiopeia which are not already out there.
But what if it is out there and you missed it?
I always like to gather all the available sources about a topic, be it Custom Fields… or Cassiopeia 🙂
So here is all I am aware of (and please get back to me if I have forgotten some):
- Cassiopeia, Joomla’s powerful built-in template: how to modify the header with css grid by Viviana Menzel in the Joomla Community Magazine - Sept 2024
- Cassiopeia, Joomla’s powerful built-in template: the basics by Viviana Menzel in the Joomla Community Magazine - Dec 2023
- New in Joomla 5 & the Cassiopeia Template: System Fonts by Brian Teeman in the Joomla Community Magazine - Dec 2023
- Customize your Cassiopeia Template by Elisa Foltyn (aka coolcat) at Joomla User Group New Jersey - Nov 2021
- Child Templates in J!4.1 by Dimitris Grammatikogiannis (aka dgrammatiko) at Joomla User Group London - Dec 2021
- Joomla 4.1 insights by Dimitris Grammatikogiannis (aka dgrammatiko) at Joomla Extensions Developers JUG on 2022.01.20
- A tutorial on how to use the Cassiopeia template for Joomla 4 by Astrid Günther on her blog
- https://blog.astrid-guenther.de/en/ Cassiopeia (see the numerous subsections)
- Joomla 4: Tweak Cassiopeia with a top banner and horizontal navigation by Astrid Günther in the Joomla Community Magazine - Sep 2021
- More information about the available Classes for the Blog View (image-left, image-right, image-bottom, image-alternate, boxed, …) by Ciaran Walsh
- How to build accessible websites using Cassiopeia by Christiane Maier-Stadtherr on 2021.09.21 at JUG London
- Joomla 4: Cassiopeia Template by Patrick Jackson in the Joomla Community Magazine - Jan 2021
- Kickstart Cassiopeia, the new Joomla frontend template Module by Maarten Blokdijk at JoomlaDay USA 2021
- Cassiopeia - Templates in Joomla 4 [in German] by Viviana Menzel at JoomlaDay DACH 2021 - Sep 2021
- Presentation https://www.dr-menzel-it.de/images/J4-Template.pdf
- Video https://www.youtube.com/watch?v=wk19Asepo8c
- Demo site with explanations https://cassiopeia.joomla.com/
- Cassiopeia Template in Joomla 4 [in German] by Hagen Graf - Oct 2021
- How to Use the Menu with Cassiopeia in Joomla 4 by LT Digital Team | Dec 9, 2021
- A Cassiopeia user.css generator by Elisa Foltyn | 2023
- Cassiopeia, Joomla’s powerful built-in template: how to use css classes for your category blog by Viviana Menzel | Feb 20, 2024
3 Reasons to love Cassiopeia
There are many good reasons to stick to the native template Cassiopeia
- it is Accessible (AFAIK it not the case for the classical templates/frameworks out there)
- it is by design super performant (I was surprised to get 97% on a Lighthouse/GTMetrix for a real website even before doing the most basic optimisation like enabling gzip)
- it uses the latest techniques (CSS Grid, CSS Variables, vanilla javascript instead of frameworks, …)
and latest tools (Bootstrap5, Font Awesome 5, …) - new features are regularly added, like the ones coming along with J4.1 (note: J4.1 RC was released on 18 January 2022: https://github.com/joomla/joomla-cms/releases)
- Child Templates
- Icons for Menu Items
Of course, you might also have you own (good) reasons to use another template/framework.
But Cassiopeia is clearly an excellent option for Joomla 4 (while for Joomla 3 I have never considered using Protostar to build a website except for testing purposes)
4 First impression of Cassiopeia
The first time I saw the Cassiopeia Template Options I thought “oh nooo, so few Options”.
But actually -as we see in this presentation and in the other resources mentioned- we can easily compensate for that.
At the end of the day, it is even a good thing to have a default Template that is not bloated because it means
- better performance
- more stability
- and even more creativity & flexibility since we can use/(re)discover Joomla core features to customize it according to our individual needs
5 Tips & tricks around Cassiopeia
5.1 Overriding the Favicon
Cassiopeia’s default favicons path can be found in the <head>
<link href="/media/system/images/joomla-favicon.svg" rel="icon" type="image/svg+xml">
<link href="/media/system/images/favicon.ico" rel="alternate icon" type="image/vnd.microsoft.icon">
<link href="/media/system/images/joomla-favicon-pinned.svg" rel="mask-icon" color="#000">
If you want to override them, all you need to do is to create an override of these icons, for example - /templates/cassiopeia/images/joomla-favicon.svg for J!4.0 - /media/templates/site/cassiopeia/images/joomla-favicon.svg from J!4.1 onwards
Note: converting online an image to svg/ico is easy, just Google it
5.2 Fonts
5.2.1 Add Google Fonts to your template
- Go to https://fonts.google.com/
- Pick the font of your choice
- Simply adapt and add the following CSS to
/media/templates/site/cassiopeia/css/user.cssin J4.1+ (was/templates/cassiopeia/css/user.cssin J4.0):
/* Import font from Google - Go to fonts.google.com, select a font and look for the import command */
@import url('https://fonts.googleapis.com/css2?family=Georama:wght@100&display=swap');
/* Use the imported font on the page: On Google you can also find the CSS instruction for using the font. If you put this in the body element then the font will be used on the whole website. */
body {
    font-family: 'Georama', sans-serif;
}
Source: https://coolcat-creations.com/en/blog/customize-your-cassiopeia-template
Note: this method should be the last choice, it hurts too much the performance. See the next options
5.2.2 Add Google Fonts locally to your template
Because of Privacy laws (like GDPR in Europe), you might not be allowed to call a distant font (because it allows the provider to track your visitors).
No problem! You can easily download the necessary files and add the corresponding CSS to /media/templates/site/cassiopeia/css/user.css in J4.1+ (was /templates/cassiopeia/css/user.css in J4.0)
See https://google-webfonts-helper.herokuapp.com/fonts
Source: https://blog.astrid-guenther.de/en/ Cassiopeia > Options in Cassiopeia > Fonts Scheme
Direct link at the moment: https://blog.astrid-guenther.de/en/cassiopeia/3cassiopeia-optionen/
5.2.3 Add any Font to your template txs to Child Template
Note: this requires J4.1+ since it makes use of the new feature called Child Template. Txs @dgrammatiko for the feature & the tip!
- Create a child and make it the default
- Edit the templateDetails.xml of the child and add one more line (basically change the font names of an existing option) in the useFontScheme field
- that’s all
See the screenshots:


See this interesting discussion about adding fonts in Cassiopeia on the French Joomla forum: https://forum.joomla.fr/forum/joomla-4-x-aa/gestion-des-templates-design-css-et-bootstrap-aa/2042331-ajouter-et-utiliser-une-police-locale-dans-cassiopeia?p=2042900#post2042900
5.2.4 Use a plugin to have the fonts locally
See https://github.com/joomtools/plg_system_jtaldef by https://www.joomtools.de
This Plugin downloads external loaded files or fonts to the local file System and serves them from the local Domain. Currently only Google fonts are handled.
Note: this works for Cassiopeia… but also for other templates btw!
More explanations (and a French version of the plugin) on
5.3 Colors
5.3.1 Changing the color set on the whole site
Add the following CSS to /media/templates/site/cassiopeia/css/user.css in J4.1+ (was /templates/cassiopeia/css/user.css in J4.0)
:root {
  --cassiopeia-color-primary: red;
  --cassiopeia-color-hover: green;
  --cassiopeia-color-link: blue;
}
Adapt the colors of course, this is just an example…
5.3.2 Changing the color set on a given page
- Go to Menu > [ your menu ]
- Click on the chosen Menu Item
- Select the Page Display tab
- In the Page Class option add for instance
colors1 - Add the following CSS to
/media/templates/site/cassiopeia/css/user.cssin J4.1+ (was/templates/cassiopeia/css/user.cssin J4.0)
Basic example:
.colors1 {
  --website-color-1: #5e2688;
  --cassiopeia-color-primary: var(--website-color-1);
}
More advanced example allowing to play with transparency (RGBA) because my initial variable is not directly expressed as a color, but as the RGB value (example: 37, 143, 167):
.colors1 {
  --website-color-primary: 37, 143, 167;
  --website-color-hover: 242, 48, 48;
  --cassiopeia-color-primary: rgba(var(--website-color-primary),0.5);
  --cassiopeia-color-hover: rgb(var(--website-color-hover));
  --cassiopeia-color-link: rgb(var(--website-color-primary));
}
5.3.3 Add new color scheme in Cassiopeia
Note: requires Joomla 4.1+
The default Joomla front-end template Cassiopeia ships with two color schemes: standard and alternative.
If you modify a color scheme your modification can get lost at some next update. In Joomla 4.1 you now have the possiblity to add additional color schemes:
Create your own css file on the media\site\templates\cassiopeia\css\global folder with a name like custom_colors_orange.css and you can then select it in the Cassiopeia template.
For more information see https://issues.joomla.org/tracker/joomla-cms/35917
5.3.4 Dark Mode
There are many good reasons to have Dark Mode on your website.
Thanks to the free plugin Dark Magic by Nicholas Dionysopoulos you can very easily enable and customize Dark Mode
- on the back-end (only with the default Atum Template)
- on the front-end (only with the default Cassiopeia Template)
Note: at the moment the README.md on https://github.com/nikosdion/DarkMagic only mentions Joomla 3. But actually the plugin has two versions, one for J3 and one for J4. Simply click on Releases on the right column
- v2.x is DarkMagic for Joomla 4
- v1.x is DarkMagic for Joomla 3
Of course, especially for the front-end, you will probably want to customize further some colors. Good news: Cassiopeia makes an extensive use of what is commonly called “CSS Variables” (the real name is “Custom Properties”), which makes it easy to customize ao colors: they are defined once and are then used at 100+ different places.
Here is an example CSS I added to /media/templates/site/cassiopeia/css/user.css in J4.1+ (was /templates/cassiopeia/css/user.css in J4.0) in order to customize further the front-end colors in Dark Mode (to have the header, the buttons, the links etc with the official colors of the site):
:root {
    --website-color-1: #D95F69;
    --website-color-2: #F29544;
}
@media screen and (prefers-color-scheme: dark) { /* to override the Dark Mode Colors defined in the Dark Magic plugin */
    :root {
        --cassiopeia-color-primary: var(--website-color-1) !important;
        --cassiopeia-color-link: var(--website-color-1) !important;
        --cassiopeia-color-hover: var(--website-color-2) !important;
        --cassiopeia-color-gradient-end: var(--website-color-1) !important;
        --cassiopeia-color-gradient-start: var(--website-color-2) !important;
    }
    .btn-primary {
        background-color: var(--website-color-1) !important;
    }
    .btn-primary:focus, .btn-primary:hover {
        background-color: var(--website-color-2) !important;
    }
    .back-to-top-link {
        color: white !important;
    }
    #cf_1 { /* Convert Forms also uses CSS Variables */
        --background-color: rgba(0, 0, 0, 0.9) !important;
    }
}
5.3.5 A CSS generator for colours by Elisa FOLTYN
Beginning of 2023, Elisa FOLTYN has created a “Cassiopeia user.css generator” :
5.4 Layout
5.4.1 Know all possible Positions in Cassiopeia
The most complete/accurate presentation of all available positions I have found so far is the following. Txs to its author, Pedro Olaia, for sharing it.
Note: the html element and classes at the “MENU” position change according to the module inside. So if the module is actually the menu module, it will be: <nav class="navbar ..."> and not <div class="moduletable module">. So some html elements and classes might change acording to the module, options selected and viewport size

5.4.4 Customizing the Blog View layout
Beyond the classical Options available in Joomla for the Blog View, Cassiopeia has some handy Classes that can be set in the Menu Item (of type Blog View) > Blog Layout tab > Article Class option:
- boxed
- image-right
- image-left
- image-alternate (in combination with image-right or image-left)
- image-bottom
For more information, see https://issues.joomla.org/tracker/joomla-cms/18319
Other Classes are also available in Cassiopeia which allow for example to have a “Masonry” Layout:
- columns-2
- columns-3
- columns-4
- masonry-2
- masonry-3
- masonry-4
See an example of masonry-3 on https://cassiopeia.joomla.com/sample-layouts/mansory-layout
I am not too sure about the use of columns-X because there is now an Option #Columns (which was not there initially in the first drafts of J4)
5.4.5 Articles Images - Left, Center or Right
Joomla 4 has changed the float options for images: there is no select box with “right”, “left” or “none” anymore, but a field to insert a css class. Cassiopeia offer the classes “float-start” for positioning the full image on the left (on the right for rtl languages), “float-end” for positioning the full image on the right (on the left for rtl languages) and “float-none” for no floating.
Of course it is also possible to modify the position of the image using own css classes. Examples:
float-startfloat-endfloat-centerwhich would then be your own css definition in the/media/templates/site/cassiopeia/css/user.cssin J4.1+ (was/templates/cassiopeia/css/user.cssin J4.0) file:
.float-center.item-image {
  text-align: center;
}
You can use the classes globally for all articles, go to Content -> Options -> Editing Layout and enter the class you want in the field “Full Text Image Class”.
Or you can use the classes on each individual article:
Source : Viviana on https://cassiopeia.joomla.com/help
5.4.6 Module Styles - card or noCard
- Go to Module > [ your module ] > Advanced tab > Module Style option
- There you see that Cassiopeia ships with two own Styles
- card
- noCard
Of course, you still have the standard Joomla Module Styles, namely
- html5
- none
- outline
- table
5.4.7 Changing the Layout ie moving Positions around
If you inspect a website using Cassiopeia you will see the following CSS:
@supports (display: grid) {
    .site-grid {
        grid-template-areas:
          ". banner banner banner banner ."
          ". top-a top-a top-a top-a ."
          ". top-b top-b top-b top-b ."
          ". comp comp comp comp ."
          ". side-r side-r side-r side-r ."
          ". side-l side-l side-l side-l ."
          ". bot-a bot-a bot-a bot-a ."
          ". bot-b bot-b bot-b bot-b .";
    }
    @media (min-width: 992px) {
        .site-grid {
            grid-template-areas:
              ". banner banner banner banner ."
              ". top-a top-a top-a top-a ."
              ". top-b top-b top-b top-b ."
              ". side-l comp comp side-r ."
              ". bot-a bot-a bot-a bot-a ."
              ". bot-b bot-b bot-b bot-b ."
        }
    }
}
This is CSS Grid. It is very easy and very visual as you can see. If you know little or nothing about CSS Grid, it is definitely worth learning the basic for example on https://css-tricks.com/snippets/css/complete-guide-grid/#prop-grid-template-areas
So if you would like to adapt the Layout and have for instance on desktop view
- the Position
bannerright after the component area - and the bottom Positions
bot-aandbot-bon the same row fifty-fifty
all it takes is to add the following CSS to /media/templates/site/cassiopeia/css/user.css in J4.1+ (was /templates/cassiopeia/css/user.css in J4.0)
@supports (display: grid) {
    @media (min-width: 992px) {
        .site-grid {
            grid-template-areas:
              ". top-a top-a top-a top-a ."
              ". top-b top-b top-b top-b ."
              ". side-l comp comp side-r ."
              ". bot-a bot-a bot-b bot-b ."
              ". banner banner banner banner ."
        }
    }
}
With other words, the nice thing about having a template based on CSS Grid is that you can change the Layout just with a few lnes of CSS, without having to edit/override/fork any PHP file.
5.4.8 Changing the width of Left / Component / Right areas
5.4.8.1 Case 1 - when Cassiopeia’s Layout is set on Fluid
What determines the width of the columns in this case is the following CSS line (being CSS Grid):
body.wrapper-fluid .site-grid {
  grid-template-columns: [full-start] minmax(0,1fr) [main-start] repeat(4,minmax(0,25%)) [main-end] 100px [full-end]
}
Note the part in the middle, namely repeat(4,minmax(0,25%))
This is equivalent to minmax(0,25%) minmax(0,25%) minmax(0,25%) minmax(0,25%) :
- The first
minmax(0,25%)determines the width of the Left position - The last
minmax(0,25%)determines the width of the Right position - And the two
minmax(0,25%)in the middle make the 50% devoted to the Component area (being for example the selected Article)
So for example if I want to reduce Left and Right from 25% width to 20%, I would simply add the following CSS to /media/templates/site/cassiopeia/css/user.css in J4.1+ (was /templates/cassiopeia/css/user.css in J4.0)
body.wrapper-fluid .site-grid {
  grid-template-columns: [full-start] minmax(0,1fr) [main-start] minmax(0,20%) minmax(0,30%) minmax(0,30%) minmax(0,20%) [main-end] 100px [full-end]
}
5.4.8.2 Case 2 - when Cassiopeia’s Layout is set on Static
In this case, for a large screen (remember: Cassiopeia is Mobile First) what determines the width of the columns is the following CSS line (still CSS Grid):
@supports (display: grid) {
  @media (min-width: 992px) {
    .site-grid {
      grid-template-columns: [full-start] minmax(0,1fr) [main-start] repeat(4,minmax(0,19.875rem)) [main-end] minmax(0,1fr) [full-end]
    }
  }
}
Note the part in the middle, namely repeat(4,minmax(0,19.875rem)) (rem being a Relative Unit)
This is equivalent to minmax(0,19.875rem) minmax(0,19.875rem) minmax(0,19.875rem) minmax(0,19.875rem) :
- The first
minmax(0,19.875rem)determines the width of the Left position - The last
minmax(0,19.875rem)determines the width of the Right position - And the two
minmax(0,19.875rem)in the middle make the 50% devoted to the Component area (being for example the selected Article)
So for example if I want to reduce Left and Right from 19.875rem to 9.875rem (but still keep the same total width), I would simply add the following CSS to /media/templates/site/cassiopeia/css/user.css in J4.1+ (was /templates/cassiopeia/css/user.css in J4.0)
@supports (display: grid) {
  @media (min-width: 992px) {
    .site-grid {
      grid-template-columns: [full-start] minmax(0,1fr) [main-start] minmax(0,9.875rem) minmax(0,29.875rem) minmax(0,29.875rem) minmax(0,9.875rem) [main-end] minmax(0,1fr) [full-end]
    }
  }
}
Of course I could also very easily change the total width by playing with the sum of 4*19.875rem
5.6 Adding a custom Javascript
5.6.1 Option 1 - directly in user.js
- Just like you can create a custom CSS file in
/media/templates/site/cassiopeia/css/user.cssin J4.1+ (was/templates/cassiopeia/css/user.cssin J4.0) - You can create a custom JS file in
/media/templates/site/cassiopeia/js/user.jsin J4.1+ (was/templates/cassiopeia/js/user.jsin J4.0)
Type for example the following code in user.js and you will have a popup appearing in the front-end:
alert( 'Hello, world!' );5.6.2 Option 2 - using a Child Template
This requires J4.1 (release date : 15 February 2022)
See in the Resources the presentations made by Dimitris.
- Go to System > Site Templates > Cassiopeia Details and Files
- Click on the Create Child Template button
- Close
- The Child Template is ready
- It can be seen next to the Parent Template in System > Site Templates
- You can customize it (create for example a file index.php at the root based on the original one but where you tweak/add something)
- Go to System > Site Templates Styles
- Make the Child Template default (or open it if you wish to customize the Options and/or Menu Assignemnts)
5.6.3 Option 3 - adding Options to Cassiopeia with a Child Template
By editing the Child Template XML file, you can easily add new Options to the Template (textarea, radio, …).
So then you can customize index.php, get this parameter and make something of it (like adding a Script in the Head)
<?= $this->params->get('myJS'); ?>
5.6.4 Option 4 - using an Module Alternate Layout
Actually with any Template and with any Joomla version, you can also very easily add any CSS or (inline or external) JS. The idea is to create a Module which will inject all the CSS & JS thanks to an Alternate Layout (Override). The advantage of this technique: you can
- use all the possible Assignments available in Modules so that the code is not loaded on all pages but only on the pages where it is necessary
- filter on language
- have a start/end date for publishing
- …
Here is the procedure
- Create an Override for the Module
Custom HTML(note that you could actually use basically any other Module type)- Go to System > Site Templates > [ your template ] Details and Files
- Select the Create Overrides tab
- Click on mod_custom
- You get the confirmation message
Override created in /templates/cassiopeia/html/mod_custom
- Transform the Override into an Alternate Layout
- Select the Editor tab
- Click on /templates/cassiopeia > html > mod_custom > default.php
- Click on the Rename File button
- Give a name of your choice, for example
add-to-head.php
- Edit the Alternate Layout
- Now instead of showing the “Content” of the Custom HTML Module we wil simply add some code which can add CSS and JS (inline of local/external files) to the Head of the page
- See for example the PHP hereafter (which you will want to adapt of course)
- See those interesting resources about Adding JavaScript and CSS in Joomla
https://docs.joomla.org/J3.x:Adding_JavaScript_and_CSS_to_the_page (addStyleSheet, addStyleDeclaration, addScript, addScriptDeclaration) - But there are even probably even better ways to do it “the Joomla4 way” (please get back to me if you can help improve this example)
https://docs.joomla.org/J4.x:Web_Assets
https://docs.joomla.org/J4.x:Http_Header_Management
https://www.joomlashack.com/blog/tutorials/web-assets-in-joomla-4/
- Create a Custom HTML Module
- Go to Content > Site Modules
- Click on New
- Select Custom
- Select the Advanced tab
- In the Layout option, select the Alternate Layout you have created (in this case
add-to-head)
Arbitrary example of code for our Alternate Layout (adding an animation for .images, h2 and h3):
<?php
use Joomla\CMS\Factory;
defined('_JEXEC') or die;
$doc = Factory::getDocument();

// adding some css file - for pure css animation
// either via a local file (to be added manually)
// $doc->addStyleSheet("/templates/cassiopeia/css/animate.css", array('version'=>'auto'));
// either via a distant file - see https://cdnjs.com/libraries/animate.css
$doc->addStyleSheet("https://cdnjs.cloudflare.com/ajax/libs/animate.css/4.1.1/animate.min.css", [], ["integrity" => "sha512-c42qTSw/wPZ3/5LBzD+Bw5f7bSF2oxou6wEb+I/lqeaKV5FDIfMvvRp772y4jcJLKuGUOpbJMdg/BTl50fJYAw==", "crossorigin" => "anonymous" , "referrerpolicy" => "no-referrer" ]);

// adding some script for animation using intersection-observer
// either via a local file (to be added manually)
// $doc->addScript('/templates/cassiopeia/js/animate.js', array('version'=>'auto'));
// either via an inline script
$myAnimation = <<<MYJS
document.addEventListener('DOMContentLoaded', function() {

    let observer = new IntersectionObserver(function (observables) {
      observables.forEach(function (observable) {
        // the element becomes visible
        if (observable.intersectionRatio > 0.5) {
          observable.target.classList.add('mytest')
          // observable.target.classList.remove('not-visible')
          observer.unobserve(observable.target)
        }
      })
    }, {
      threshold: [0.5]
    });

    // we observe the elements
    let items = document.querySelectorAll('.image, h2, h3')
    items.forEach(function (item) {
      observer.observe(item)
    })

});
MYJS;
// add the script
$doc->addScriptDeclaration($myAnimation);
with the corresponding addition to /media/templates/site/cassiopeia/css/user.css in J4.1+ (was /templates/cassiopeia/css/user.css in J4.0) where all the animations would be defined:
h2.mytest, h3.mytest, p.mytest {
    animation: fadeIn; /* referring directly to the animation's @keyframe declaration */
    animation-duration: 2s; /* don't forget to set a duration! */
}
5.6.5 Option 5 - for Bootstrap 5
Context:
- Joomla 4 ships with Bootstrap 5
- But to make your websites a.o. more performant, BS5 Javascript is not loaded by default
- Instead you can decide yourself in your child templates / overrides / alternate layouts to enable only what you need & where you need it
Suppose you need to use Tabs in a given Article. There copy-paste the following HTML (taken from the examples on https://getbootstrap.com/docs/5.0/components/navs-tabs/):
<div class="bd-example">
  <nav>
    <div class="nav nav-tabs mb-3" id="nav-tab" role="tablist">
      <button class="nav-link active" id="nav-home-tab" data-bs-toggle="tab" data-bs-target="#nav-home" type="button" role="tab" aria-controls="nav-home" aria-selected="true">Home</button>
      <button class="nav-link" id="nav-profile-tab" data-bs-toggle="tab" data-bs-target="#nav-profile" type="button" role="tab" aria-controls="nav-profile" aria-selected="false">Profile</button>
      <button class="nav-link" id="nav-contact-tab" data-bs-toggle="tab" data-bs-target="#nav-contact" type="button" role="tab" aria-controls="nav-contact" aria-selected="false">Contact</button>
    </div>
  </nav>
  <div class="tab-content" id="nav-tabContent">
    <div class="tab-pane fade active show" id="nav-home" role="tabpanel" aria-labelledby="nav-home-tab">
      <p><strong>Home text</p>
    </div>
    <div class="tab-pane fade" id="nav-profile" role="tabpanel" aria-labelledby="nav-profile-tab">
      <p><strong>Profile text</p>
    </div>
    <div class="tab-pane fade" id="nav-contact" role="tabpanel" aria-labelledby="nav-contact-tab">
      <p><strong>Contact text</p>
    </div>
  </div>
</div>
See the result in the front-end: the Tabs do appar, but clicking on the 2nd or 3rd Tab does not “do” anything.
This is because we still need to tell Joomla to load the Javascript for Tabs, namely via
\Joomla\CMS\HTML\HTMLHelper::_('bootstrap.tab', '.selector', []);You can easily add any Bootstrap Javascript to Cassiopeia by following the Official Documentation:
https://docs.joomla.org/J4.x:Using_Bootstrap_Components_in_Joomla_4
If you follow “Approach 3: Using a Template Override” don’t forget to add the Module Class bs-tab to the Module you create and then the Tabs will be working.
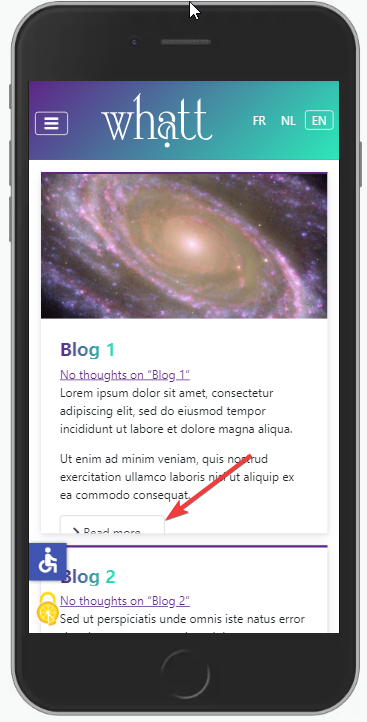
5.8 Accessibility
This is a J4 feature, not a Cassiopeia feature as such. But since Cassiopeia is conceived from scratch to be Accessible it is worth reminding those two features:
- enabling/configuring the Accessibility plugin (this adds the wheelchair icon at the bottom-left)
- Go to System > Manage > Plugins
- Search for
accessibility - Edit the
System - Additional Accessibility Featuresplugin - Select whether you want front-end and/or backend
- Set Status to Enabled
- Save
- enabling/configuring the SkipTo plugin (press Tab when opening a page or press Alt+9 any time in order to have dynamically generated links to all Menu Items but also all Titles and Modules)
- Go to System > Manage > Plugins
- Search for
skip - Edit the
System - Skip-To Navigationplugin - Select whether you want front-end and/or backend
- Set Status to Enabled
- Save
5.9 Variables with !default value in scss
[ added on 2022.04.24 ]
See https://github.com/joomla/joomla-cms/pull/37360
In this PR Rick Spaan added the “!default” setting to all the Cassiopeia variables. There where some variables who had already this setting in place, but now all variables are set as default. Setting the”!default” makes is easier for developers to create custom styling based on the Cassiopeia template for child themes for instance.
5.10 An example of Installable Child Template
[ added on 2022.04.26 ]
Frantisek from the Czech Joomla Community sent me this interesting link
https://www.joomlaportal.cz/novinky/733-child-template-pro-cassiopeia-css-grid-a-navod-dil-3
The Child Template can be downloaded at the bottom of the page (section “Přílohy”, namely attachments).
It is new (installable !) Cassiopeia Child-template:
- We added some great features as well. You might be interested in the new Child-template features.
- You can set custom colors and background images for all sections of the template.
- You can set font weight and various new fonts for the headings and default font of the Cassiopeia template.
- You can set different menu types and more. The template also supports Swiper Touch Slider. All files are free to download.
- We are also fixing some bugs in the default template
Note:
5.11 Customizing error.php, index.php etc
[ added on 2022.09.07 ]
Today someone asked me whether it was possible to override error.php without editing the original Cassiopeia file (because then you would loose your customizations potentially at every update).
So I checked: this works fine with Child Templates. Actually it is the idea behind Child Template: you can override the “root” files like
index.phperror.phpcomponent.phpoffline.php
The only thing is that you need to copy-paste the files manually. Apparently the interface does not allow (yet) to do it.
5.12 Customizing the “Error 404” Page
[ added on 2024.12.29 ]
As explained in the previous section, if you want to created a Customized “Error 404” Page you can of course create an override of error.php.
But there is an easier solution: since from October 2023 Joomla 5 has introduced two new Positions: error403 and error404. So all you need to do is to publish one or several Module(s) (Custom HTMl Module or whatever Module) in that Position to have your 404 Page customized.
5.13 Card Layouts
[ added on 2022.10.04 ]
Do you need a Card Layout?
See https://github.com/brianteeman/joomla-cards/ by Brian Teeman.
Description: “Installable com_content/category overrides with configuration settings to create card layouts. Uses default bootstrap css only.”
6 Some issues aka coming improvements
I spotted a few issues with Cassiopeia.
6.1 Issue 1 - the Hamburger Menu on small screens
On a website, you would typically have in the header
- the Logo
- the Menu Items
- the Language switcher and/or the Search
But on smartphone (more generally on small screens) even when using the Cassiopeia Collapsible Dropdown Menu, clicking on the Hamburger Menu gives something ugly:
- it pushes the rest of the header elements. In my example on this screenshot
- the logo is pushed to the right, according to the length of the longest Menu Item
- there is no room left for the Language Switcher so it comes on a new row
- and of course the content of the whole site is pushed downwards
- instead of having for instance a nice offcanvas

It seems that the “default” behaviour of Boostrap 5 is indeed to push the content down: https://getbootstrap.com/docs/5.0/examples/navbars/
But there is also an offcanvas solution: https://getbootstrap.com/docs/5.0/examples/offcanvas-navbar/
Can someone please help adding an Alternate Layout for the Menu Module in order to implement this offcanvas solution (which could then be a new Cassiopeia Alternate Layout of the Menu Module)? Txs!
Breaking news: Viviana Menzel is currently working on this. Give it a try!
See https://gist.github.com/drmenzelit/152a1954d73bcbe126194965e43c97f4
There are two Alternate Layouts: one for “default” menu and one for “metismenu”:
- The files should be copied into
/templates/cassiopeia/html/mod_menuor in/templates/cassiopeia_CHILD/html/mod_menuif you want to make this override available only for you Child Template - There are a few lines of css to be added to
/media/templates/site/cassiopeia/css/user.cssin J4.1+ (was/templates/cassiopeia/css/user.cssin J4.0)
Note: if create your override in a Child Template (ie /templates/cassiopeia_CHILD/html/mod_menu) then don’t forget to also copy all the dropdown-metismenu.php PHP files of /templates/cassiopeia/html/mod_menu because they are required.
If you want to change the current breakpoint (between offcanvas and full regular menu), simply change the following class navbar-expand-lg into navbar-expand-xl (offcanvas will prevail longer) or navbar-expand-md (offcanvas will prevail less longer) for example.
Please test and give your feedback!
6.3 Issue 3 - Layout in Blog View
[ edit 2022.02.10 - Viviana Menzel proposed a fix for this issue on https://issues.joomla.org/tracker/joomla-cms/36998 ]
When using Article Class image-right for a Blog View (1 column for instance), I noticed that the Images and Introtext would not display evenly: when the Introtext is too short for example when the Image on the Right comes next to the Text on the Left (instead of having a 50%-50% Layout).
Illustration with image-right image-alternate boxed (but I double-checked: image-right is enough to create the issue)

I did not have much time to investigate this but as a quick workaround I added the following to /media/templates/site/cassiopeia/css/user.css in J4.1+ (was /templates/cassiopeia/css/user.css in J4.0)
.image-left .blog-item .item-content, .image-right .blog-item .item-content {
    flex: 1 0 40%;
}
If you can investigate further and fix Cassiopeia for this it would be highly appreciated.
7 Thank you
Joomla User Group New Jersey for having me today
So many members of the Joomla Community for being #jPositive
😉
8 Get in touch
Any suggestion about this presentation?
Please feel free to contact me. I’ll be happy to keep improving it 🙂
Marc Dechèvre | @woluweb
+32 474 37 13 12 | +32 2 772 58 69
https://www.woluweb.be/contact
Other presentations