
 present slides https://slides.woluweb.be
present video [YouTube](https://www.youtube.com/watch?v=Ui1vR4Z5twA)
[Basic Joomla Tutorials](https://www.basicjoomla.com/) ● [@basicjoomla](https://twitter.com/basicjoomla)
https://joomla.org.au/news-articles/australian-virtual-user-group-events/avjug-august-2020-marc-dechevre-joomla-custom-fields
## Introduction

---
Since Joomla 3.7, it is possible to easily add extra fields to Articles, Contacts, and Users. This becomes possible with the new functionality **Custom Fields**.
There are 16 standard types of fields available, ranging from a Text field, Dropdown, Date selection to a field to make your own SQL selection.
With these fields, you can ensure that data is entered on the website in a structured way.
Those separate inputs can then be used freely when displaying Articles, Contacts or Users.
---
- As an Administrator you can **easily create and configure** these fields in Joomla.
- Thanks to the numerous **Options** the fields can be arranged completely according to your wishes and become visible on the front-end, back-end or in both places.
- The fields can be **grouped** and are displayed in Tabs when editing content.
- It is also possible to set
- the **ACL** (Access Control Lists, ie access rights) for the fields so that only certain users may be be able to see/edit them
- and the **Language** to ensure that a field is only visible for a specific language
---
In this workshop, you will be introduced to this new powerful functionality in Joomla.
You are going to create a simple Recipes website based on Joomla Articles where we add extra attributes such as Dish Type, Ingredients, Number of people and Preparation Time.
Thanks to the Custom Fields, we can enter and display this information in a structured way.
---

## Step by step
Let us do this in 20 little easy steps.
### Create Recipes menu & category
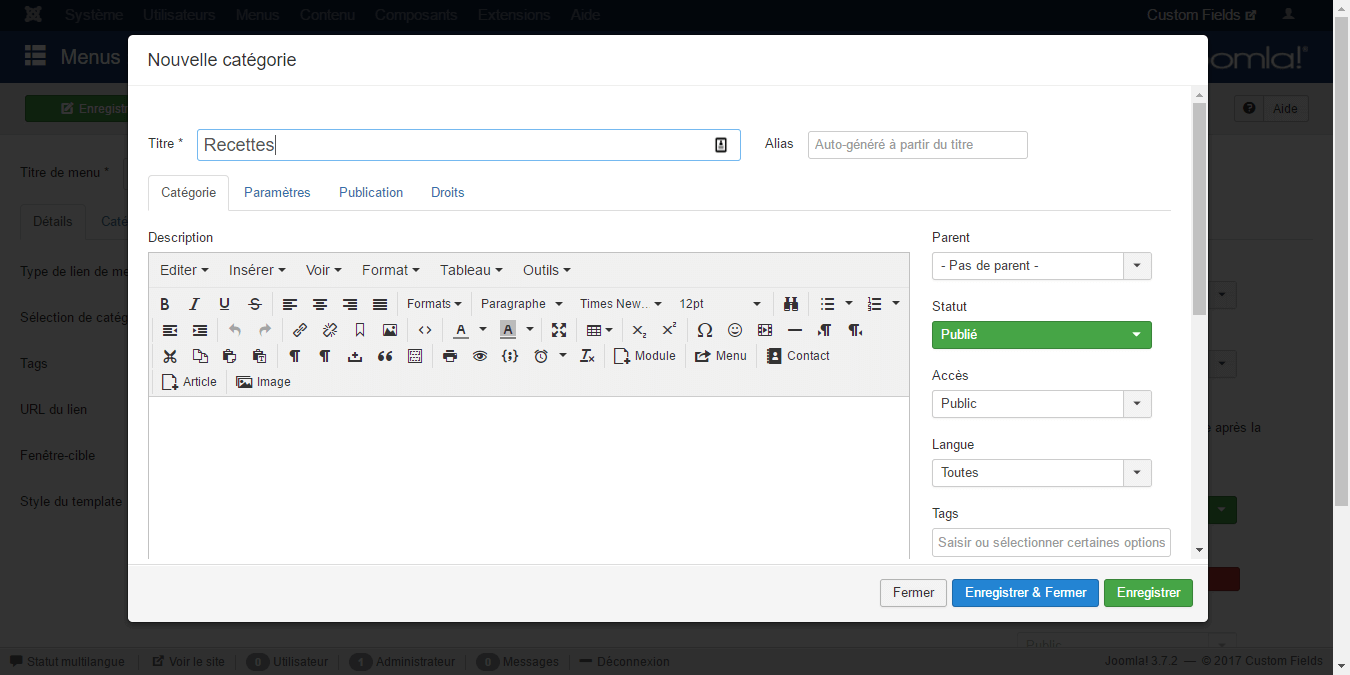
In this workshop we start with an empty Joomla installation, but you can also follow the steps on an existing Joomla site. First we create a new **menu item** called "Recipes" in the Joomla Menu Manager and choose the **Category Blog** view. A handy new functionality (also since Joomla 3.7) is that we can create a category "Recipes" directly from the menu. It is therefore no longer necessary to create the category first before we create the corresponding menu item.
---
---

### Creating field groups
We then create new "Field groups" for items. We do this under Content > Field Groups. We give "Recipe" as Title for the first field group that we created, and "Ingredients" for the second. The optional description that you can enter will be visible above the fields during editing. This can be used as a possible explanation for a field group.
---

### Creating a text field
Now that the field groups have been created, we can start adding fields. First we create a field for the preparation time of a recipe. Under Content > Fields we create a new field type "Text (text)" and give it the title "Preparation time". This title is automatically copied as a field label, but can be adjusted as desired. We also see various options for the field, for example, we can set whether a field is required or not. We do not set anything else for this field, but we do assign the field to the group "Recipe" on the right and save the field. Once you have saved a field, it is no longer possible to change the type. (NDLR : if you ever want to change the type, simply delete your field and create another one)
---

---

### Create article
Now that we have created the first field, we are going to test this by adding a recipe as an article. We add the preparation steps to the content of the article and under the "Images and links" tab we select an image for the recipe. Between the tabs that are visible by default when adding an article, there is now also a "Recipe" tab. This is the Field Group that we have created and we also see the "Preparation time" field there. Enter the recipe preparation time here and save the item.
---

---

### Position of the field
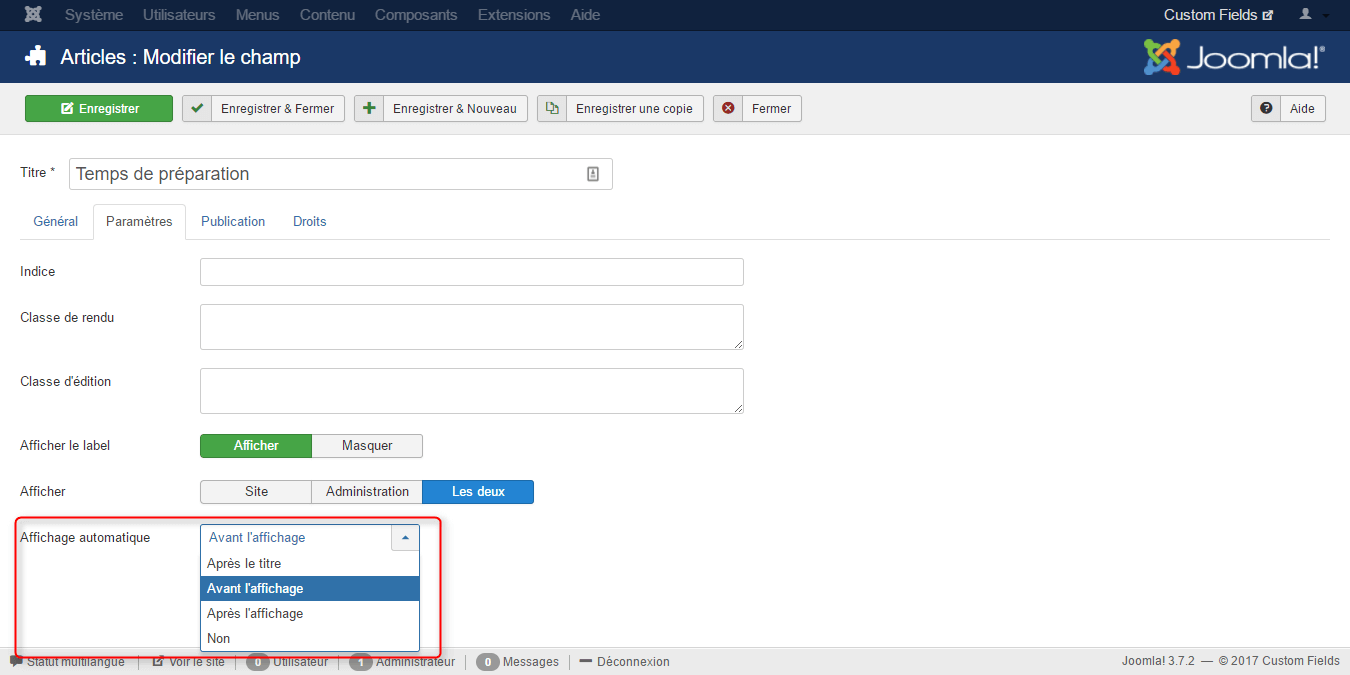
If we now view the recipe on the website, we see the preparation time above the text of the article. For each field you can set the "Automatic display" in field options. You can choose from several options, namely "After the title", "Before display", "After display"… and "Do not automatically display". Try the different options and see where the field will be visible in the article.
We now know how we can create fields and where they become visible in management and on the website. Time to add a few more fields.
---
---

### Create list field
For the new field "Type of dish" that we add, we choose type "List (list)". This field results in a dropdown list where you can choose from a number of preset options. In the "List values" we enter three options: "Starter", "Main course" and "Dessert" (NDLR : the Text is what will be displayed, the Value is what will be written in the database so don't change the latter unless you know what you are doing). It is also possible to specify that a user can select multiple options when setting "Multiple" to "Yes". We also assign this field to the "Recipe" Field Group so that it becomes visible under the tab in the article.
---

---

### Create number field
One of the other types of fields we can choose from is "Integer" (an integer being a simple number). We use this field type to automatically generate a dropdown list of numbers. For "First" we set "1", for "Last" "10" and for "Step" we enter "1". If we save this field and go to the article, we see that a dropdown list has become visible with the numbers 1 to 10. Of course we could also have chosen the field type list and entered all the numbers ourselves. (NDLR : if you wanted to display a Year ranging from 2019 to 1900 by descending order, you could set "First" to 2019, "Last" to 1900 and "Step" to "-1")
---

---

### Create URL field
To be able to enter the source URL of a recipe, we create a field of type "URL". We choose to allow only "HTTP" and "HTTPS" links and we select these options under "Scheme". Under the "Options" tab, for "Automatic display" we choose "After display" so that the field will appear at the bottom of the article. It is also possible to provide classes that will be used to display the field, but do choose from classes that have been setup in the template. We enter the "muted" class for "Render class". Because the standard Joomla template (ie Protostar) uses version 2.3 of the **Bootstrap** the CSS framework, this field will have a gray text color. (NDLR : of course, you can always use your own CSS of any of this "Render class")
---

---

### Create Editor Field
We want to enter the ingredients of the recipe through a field with an editor. To do this, we create a new field of type "Text editor (editor)" for which we can enter various options such as the width and height of the editor. This time we set the "Field group" to the "Ingredients" group. This makes this field visible in a new tab when editing an article. For the "Render class" we enter "well well-small", which gives the visitor the ingredient list on the site in box with gray background.
---

---

### Create field for quote
The last field we create is a field of type "Text" that will be used for adding a sort of quote in the article itself. We set the "Automatic display" to "Do not automatically display", because we want to place this field somewhere in the middle of our recipe. We set "Show label" to "Hide" so that only the contents of the field are shown and not the label.
---

### Load field in article
Now that we have created the field for the quote, we can load it where we want inside the text of the article. We do this by placing the short tag "{field X}" where the field should be visible. Of course, you should replace "X" by the ID (number) of the field that you want to load. If you have a field ID of 7, you must type your shorttag as "{field 7}". In the Editor, we also give to the shorttag the style "blockquote". If we have now entered a quote for the field itself and have saved the article, it will be visible at the chosen location in the article on the site. (NDLR: there is also a button "Fields" allowing to select the field you wish easily with an interface, without even know its ID)
---

### Setting order of fields
When managing the fields, it is also possible to set the order of the fields. This works via the Joomla drag & drop principle. If you go to Content > Fields you can click on the three black little squares in front of a field and drag & drop to change the order accordingly.
---

---

### Assigning fields to categories
If your website offers other articles besides the Recipes (like News articles), you may not want the field group for Recipe attributes to also become visible in those articles. This can be prevented by setting categories for the fields which should not appear in all articles. When editing a field, on the right side you will see "Category" option where you can select one or more categories. So you can easily create specific fields for each category if desired.
---

---

### Set Visibility for field
For each Field or Field Group you can set the access level through the "Access" tab that is also available for items, menu items, and modules among others. For example, we want to be able to show the ingredients only to the members of the site. We do this by setting the "Access" for the "Ingredients" field to "Registered". On the site, unless you are logged in, you will no longer see the ingredients in an article. If you log in you will see the field again.
---

---

###Show field to guests
For non-logged in users, we do want to show a text that needs to be logged in to view the ingredients. We therefore create a new field of type "Text editor (editor)" and enter the following text :
```html
present slides https://slides.woluweb.be
present video [YouTube](https://www.youtube.com/watch?v=Ui1vR4Z5twA)
[Basic Joomla Tutorials](https://www.basicjoomla.com/) ● [@basicjoomla](https://twitter.com/basicjoomla)
https://joomla.org.au/news-articles/australian-virtual-user-group-events/avjug-august-2020-marc-dechevre-joomla-custom-fields
## Introduction

---
Since Joomla 3.7, it is possible to easily add extra fields to Articles, Contacts, and Users. This becomes possible with the new functionality **Custom Fields**.
There are 16 standard types of fields available, ranging from a Text field, Dropdown, Date selection to a field to make your own SQL selection.
With these fields, you can ensure that data is entered on the website in a structured way.
Those separate inputs can then be used freely when displaying Articles, Contacts or Users.
---
- As an Administrator you can **easily create and configure** these fields in Joomla.
- Thanks to the numerous **Options** the fields can be arranged completely according to your wishes and become visible on the front-end, back-end or in both places.
- The fields can be **grouped** and are displayed in Tabs when editing content.
- It is also possible to set
- the **ACL** (Access Control Lists, ie access rights) for the fields so that only certain users may be be able to see/edit them
- and the **Language** to ensure that a field is only visible for a specific language
---
In this workshop, you will be introduced to this new powerful functionality in Joomla.
You are going to create a simple Recipes website based on Joomla Articles where we add extra attributes such as Dish Type, Ingredients, Number of people and Preparation Time.
Thanks to the Custom Fields, we can enter and display this information in a structured way.
---

## Step by step
Let us do this in 20 little easy steps.
### Create Recipes menu & category
In this workshop we start with an empty Joomla installation, but you can also follow the steps on an existing Joomla site. First we create a new **menu item** called "Recipes" in the Joomla Menu Manager and choose the **Category Blog** view. A handy new functionality (also since Joomla 3.7) is that we can create a category "Recipes" directly from the menu. It is therefore no longer necessary to create the category first before we create the corresponding menu item.
---

---

### Creating field groups
We then create new "Field groups" for items. We do this under Content > Field Groups. We give "Recipe" as Title for the first field group that we created, and "Ingredients" for the second. The optional description that you can enter will be visible above the fields during editing. This can be used as a possible explanation for a field group.
---

### Creating a text field
Now that the field groups have been created, we can start adding fields. First we create a field for the preparation time of a recipe. Under Content > Fields we create a new field type "Text (text)" and give it the title "Preparation time". This title is automatically copied as a field label, but can be adjusted as desired. We also see various options for the field, for example, we can set whether a field is required or not. We do not set anything else for this field, but we do assign the field to the group "Recipe" on the right and save the field. Once you have saved a field, it is no longer possible to change the type. (NDLR : if you ever want to change the type, simply delete your field and create another one)
---

---

### Create article
Now that we have created the first field, we are going to test this by adding a recipe as an article. We add the preparation steps to the content of the article and under the "Images and links" tab we select an image for the recipe. Between the tabs that are visible by default when adding an article, there is now also a "Recipe" tab. This is the Field Group that we have created and we also see the "Preparation time" field there. Enter the recipe preparation time here and save the item.
---

---

### Position of the field
If we now view the recipe on the website, we see the preparation time above the text of the article. For each field you can set the "Automatic display" in field options. You can choose from several options, namely "After the title", "Before display", "After display"… and "Do not automatically display". Try the different options and see where the field will be visible in the article.
We now know how we can create fields and where they become visible in management and on the website. Time to add a few more fields.
---

---

### Create list field
For the new field "Type of dish" that we add, we choose type "List (list)". This field results in a dropdown list where you can choose from a number of preset options. In the "List values" we enter three options: "Starter", "Main course" and "Dessert" (NDLR : the Text is what will be displayed, the Value is what will be written in the database so don't change the latter unless you know what you are doing). It is also possible to specify that a user can select multiple options when setting "Multiple" to "Yes". We also assign this field to the "Recipe" Field Group so that it becomes visible under the tab in the article.
---

---

### Create number field
One of the other types of fields we can choose from is "Integer" (an integer being a simple number). We use this field type to automatically generate a dropdown list of numbers. For "First" we set "1", for "Last" "10" and for "Step" we enter "1". If we save this field and go to the article, we see that a dropdown list has become visible with the numbers 1 to 10. Of course we could also have chosen the field type list and entered all the numbers ourselves. (NDLR : if you wanted to display a Year ranging from 2019 to 1900 by descending order, you could set "First" to 2019, "Last" to 1900 and "Step" to "-1")
---

---

### Create URL field
To be able to enter the source URL of a recipe, we create a field of type "URL". We choose to allow only "HTTP" and "HTTPS" links and we select these options under "Scheme". Under the "Options" tab, for "Automatic display" we choose "After display" so that the field will appear at the bottom of the article. It is also possible to provide classes that will be used to display the field, but do choose from classes that have been setup in the template. We enter the "muted" class for "Render class". Because the standard Joomla template (ie Protostar) uses version 2.3 of the **Bootstrap** the CSS framework, this field will have a gray text color. (NDLR : of course, you can always use your own CSS of any of this "Render class")
---

---

### Create Editor Field
We want to enter the ingredients of the recipe through a field with an editor. To do this, we create a new field of type "Text editor (editor)" for which we can enter various options such as the width and height of the editor. This time we set the "Field group" to the "Ingredients" group. This makes this field visible in a new tab when editing an article. For the "Render class" we enter "well well-small", which gives the visitor the ingredient list on the site in box with gray background.
---

---

### Create field for quote
The last field we create is a field of type "Text" that will be used for adding a sort of quote in the article itself. We set the "Automatic display" to "Do not automatically display", because we want to place this field somewhere in the middle of our recipe. We set "Show label" to "Hide" so that only the contents of the field are shown and not the label.
---

### Load field in article
Now that we have created the field for the quote, we can load it where we want inside the text of the article. We do this by placing the short tag "{field X}" where the field should be visible. Of course, you should replace "X" by the ID (number) of the field that you want to load. If you have a field ID of 7, you must type your shorttag as "{field 7}". In the Editor, we also give to the shorttag the style "blockquote". If we have now entered a quote for the field itself and have saved the article, it will be visible at the chosen location in the article on the site. (NDLR: there is also a button "Fields" allowing to select the field you wish easily with an interface, without even know its ID)
---

### Setting order of fields
When managing the fields, it is also possible to set the order of the fields. This works via the Joomla drag & drop principle. If you go to Content > Fields you can click on the three black little squares in front of a field and drag & drop to change the order accordingly.
---

---

### Assigning fields to categories
If your website offers other articles besides the Recipes (like News articles), you may not want the field group for Recipe attributes to also become visible in those articles. This can be prevented by setting categories for the fields which should not appear in all articles. When editing a field, on the right side you will see "Category" option where you can select one or more categories. So you can easily create specific fields for each category if desired.
---

---

### Set Visibility for field
For each Field or Field Group you can set the access level through the "Access" tab that is also available for items, menu items, and modules among others. For example, we want to be able to show the ingredients only to the members of the site. We do this by setting the "Access" for the "Ingredients" field to "Registered". On the site, unless you are logged in, you will no longer see the ingredients in an article. If you log in you will see the field again.
---

---

###Show field to guests
For non-logged in users, we do want to show a text that needs to be logged in to view the ingredients. We therefore create a new field of type "Text editor (editor)" and enter the following text :
```html
Log-in to view the ingredients under the option "Default value". No account yet? Create one!
``` This way we do not have to enter the text again for each article. We also (i) set the "Access" to "Guests", (ii) choose the "Ingredients" field group (iii) and enter "well well-small" in "Render class" (NDLR: which gives a gray background in **Boostrap** v2.3). This field is now visible on the site as long as you are not logged in. ---  ---  ### Rights for editing In addition to setting visibility, it is also possible to set which user group may edit the contents of the field. Under the "Permissions" tab you can allow or deny the "Edit Custom Field Value" action. This is adjustable per field, but also for a field group so that it does not have to be set for every field. In this way you can let a user group edit articles without being able to edit a certain field. This is useful if, for example, you want to set up an article publishing workflow where a team can edit the description of a recipe but not some specific fields. --- 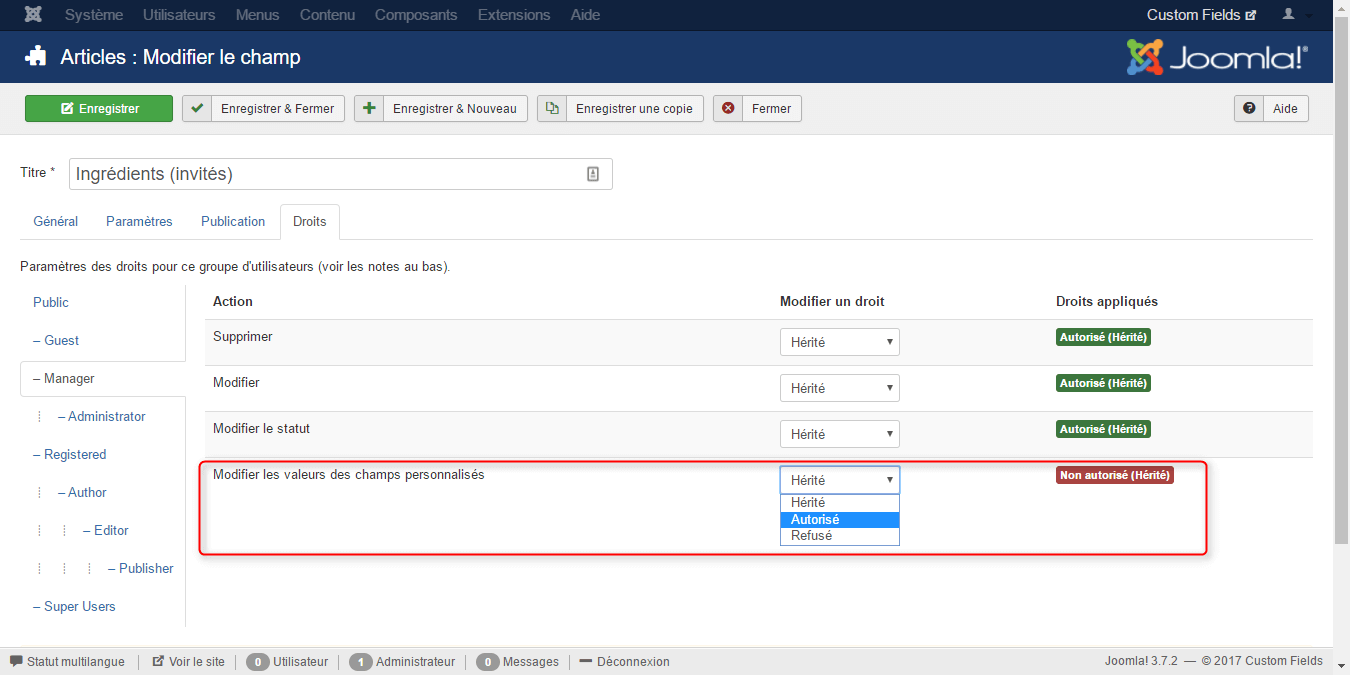 ---  ### Create Template Override The fields are now all visible but we would like to display the ingredients on the left side of the article. We can achieve this by creating a Template Override under Extensions > Templates > Templates. Open the active template there and go to the "Make overrides" tab. Then click on "com_content > article". The override has now been created by Joomla and we can further customize it by finding it back under the tab "Editor" in the folder html > com_content > article > default.php --- (NDLR: if you don't rename that "default.php" file, then it will apply to all articles on the website. If you want to have several layouts then just rename that file to recipe.php f.i. Then, in every Article where you want to use that layout, just select the Layout under the Options tab. Or even easier of you have many articles: create or edit the Menu Item (Category Blog or Category List) pointing to the Category you wish and there select the Layout under the Options tab. That Menu Item can even be hidden. It will still work to get the correct Layout for all the concerned articles) ---  ### Adjust article view In this file we look for the line ```php item->text; ?> ``` (which displays the Article's content) and replace it with: ```php