Comment tester Joomla!4


https://slides.woluweb.be
Note: ces slides sont en cours de construction.
Tout n’est pas encore traduit en français. Merci pour la compréhension ;)
1 Documentation
1.1 Documentation officielle
- https://docs.joomla.org/Bugs_%26_Fun_@Home
- https://docs.joomla.org/Testing_Joomla!_patches
- https://docs.joomla.org/J4.x:Setting_Up_Your_Local_Environment
1.2 Documentation - autres ressources
- J4 EN https://www.youtube.com/watch?v=22RXppJjXf8
- J3 EN https://brian.teeman.net/joomla/873-a-dummies-guide-to-joomla-bug-testing
- J3 EN https://www.slideshare.net/woluweb/comment-devenir-un-testeur-joomla
- J3 FR https://www.slideshare.net/woluweb/how-to-become-a-joomla-tester
3 Le testing
3.1 Logging in
Connect with your OWN login/password.

3.2 Setting up the patch tester
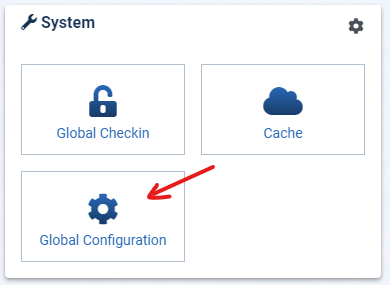
Upon entering the console, go to ‘Global Configuration’.
Go to the global configuration options of the ‘Patch Tester’ component, GitHub authentication tab. At this point, you need to have a GitHub account.

Click on ‘Create a personal access token’. Follow GitHub instructions. Enter the token into the ‘GitHub Token’ field. Save.
3.3 Go to the Joomla Patch Tester component.

Click on ‘Fetch Data’. DO NOT fetch data if the GitHub authentication has not been executed previously.

3.4 Learning about issues
Before even starting to test patches, you need to select one and read what the issue is all about.
If you decide to go along with the issue you have selected, go to the Google sheet we are sharing today and add the issue number in line with your information. That way, other Joomlers won’t be testing the same patch as you.
Note: a patch is merged into the project once at least 2 successful tests have occurred and no issues have been raised.
You can filter the issues by topic.
- View an issue on GitHub > Click on ‘View on Github’
- View an issue in the Joomla! Issue tracker (best) > Click on ’View on Joomla! Issue Tracker
3.5 Checking an issue
Check the actual results BEFORE applying the patch. In the Joomla instance you are using, check that the problem is still present and that you indeed are experiencing the issue.
3.6 Applying a patch
Click on ‘Apply Patch’ to incorporate the fix for the issue in your own system.

3.7 Checking that the issue is resolved
Once the patch has been applied, go back to the issue tracker to check what are the expected results AFTER applying the patch.
On your system, check that the issue(s) has/have been fixed.
3.8 Giving feedback
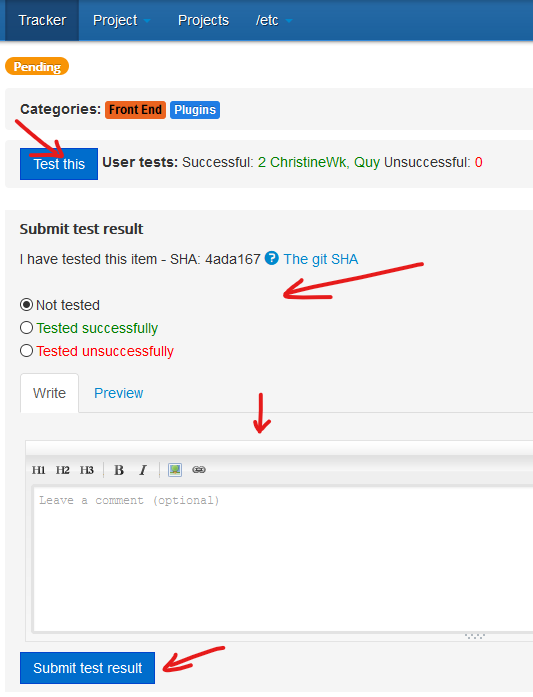
In the issue tracker, click on ‘Test this’. You can now give your personal results. If the test has been unsuccessful, please provide some explanations to help the developer find out what went wrong.
3.9 Revert the patch
Click on ‘Revert Patch’ in the Joomla console, under

3.10 Repeat
At this point, you should be familiar with the way this work :-) and you are welcome to try and test some more issues!
4 Comment installer le pack de langue français
En résumé 1. Téléchargez le pack de langue FR sur Crowdin 1. Installez le pack de langue FR 1. Choisissez la langue par défaut
Ecran de connexion de Joomla4

4.1 Téléchargez le pack de langue FR sur Crowdin
- Accédez à l’URL suivante :
https://crowdin.com/project/joomla-cms - Cliquez sur le drapeau français

- Cliquez sur le nuage puis sur « Download »
- Téléchargez le fichier .zip sur votre ordinateur
Note : l’archive .zip contient les fichiers langue pour Joomla 3 et Joomla 4, ne la décompressez pas, les fichiers correspondants à votre version de Joomla seront détectés lors de l’installation et eux seuls seront installés !

4.2 Installez le pack de langue Fr dans Joomla 4
- Depuis la page d’accueil de l’administration cliquez sur « System »

- Cliquez ensuite sur « Extensions » Note : le pack de langue s’installe comme une extension

- Cliquez sur l’onglet « Upload Package File »
- Glissez l’archive .zip téléchargée dans la zone en-dessous ou
Cliquez sur le bouton vert pour sélectionner l’archive .zip sur votre ordinateur

- Un message confirme l’installation du paquet de langue FR pour Joomla 4
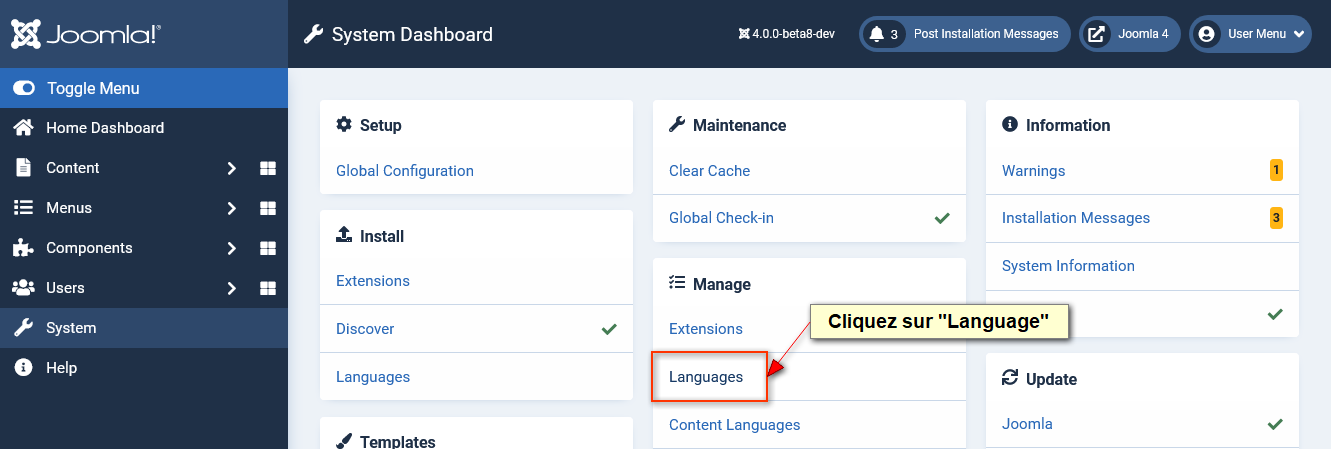
- Cliquez à nouveau sur « System »

4.3 Choisissez la langue par défaut
- Cliquez sur « Languages » pour accéder à la gestion des langues installées
- Cliquez sur le « Rond gris » pour le transformer en « Etoile » et sélectionner ainsi la langue FR
- Répétez ensuite l’opération pour l’interface d’administration…

Votre Joomla 4 est maintenant en français !
5 Remerciements
Merci à Olivier Buisard pour les échanges ainsi que ses captures d’écran réalisées à l’occasion du Bugs & Fun @ Home du #jdayusa
2 Comment installer Joomla!4
2.1 Tests NPM et non-NPM
Si on monte son site avec (1) launch.joomla.org ou (2) sur son serveur local/distant à partir du “Nighly Build” alors il n’est pas possible de tester les Patches qui touchent au CSS et au Javascript.
En effet, pour tester ces derniers, il faut avoir un environnement complet (avec Composer, NodeJS, NPM, …).
2.2 Nightly Builds
https://developer.joomla.org/nightly-builds.html
2.3 Sample data - données d’exemple
NB: multilingual sample data can be used if you have more than 1 language installed. it is very handy because it will also do the necessary basic stuff for a multilanguage site. but that’s only needed for testing multilanguage stuff
2.4 Patch Tester
https://github.com/joomla-extensions/patchtester
2.5 JoomlaTools Gitpod
Exemple: pour avoir automatiquement le build de la branche actuelle ‘4.0-dev’ décommenter (càd enlever le #)
joomla_beta=4.0-devdanshttps://github.com/joomlatools/joomlatools-gitpod/blob/master/.gitpod/config.sh
2.6 Exemple de patch
https://issues.joomla.org/tracker/joomla-cms/33977
(lien mentionné dans le patch : https://update.joomla.org/core/nightlies/next_major_list.xml)