Playing with the Joomla Web Services (API) in Joomla 4 or 5 or 6
by Marc Dechèvre: https://www.woluweb.be — all presentations: https://slides.woluweb.be


[ edit 2024.09.04: there are also webservices for Media. It is not documented yet it seems but you can find more information here https://github.com/joomla/joomla-cms/pull/35788 ]
At the end of this presentation, you will be able a.o. to import your Articles together with their Custom Fields to your Joomla website directly from a Google Sheet thanks to the Joomla API
This script was initially written for Joomla 4.
On 17 October 2023 Joomla 5 was released and tadaaam: this script is also 100% compatible with Joomla 5 🎉
Even better: it works in Joomla 5 even when the Compatibility Plugin is disabled… which means that it is already compatible with the future Joomla 6 🎉
This presentation was made at
- BasicJoomla 2022.11.23 video - English
- JoomlaDay NL 2023.05.13 video - English
- JoomlaDay FR 2023.06.17 video - French
- JUG London 2023.06.20 video - English
- JoomlaDay D-A-CH 2023.09.16 video - English
1 Please contribute
Help improve this presentation:
- if you think of other tips & tricks
- if any information can be more precise
- if you know of any other resource
- if you spot any typo
- if you see any error
- …
then please get back to me! ❤️💙🧡💚
2 Let’s start with a live demo
Let’s start with the end, namely with a live demo of what we will achieve :
Here is the description of this video where we see respectively 1. the Articles Manager with an article called “demo before synchronizing” 1. a Google Sheet where we have changed the Title to “demo JD23FR from Metz” 1. the “synchronize” button in the backend, which is a link to the PHP script 1. the browser tab where the script is running giving the feedback of the Articles Creation/Synchronization (note: the script starts to process immediately but the feedback in the browser takes some time because it does not show row per row but “block per block”) 1. the Articles Manager with the Article renamed from “demo before synchronizing” to “demo JD23FR from Metz”

3 How this presentation came to life
There have already been several presentations about the Joomla API.
They were certainly interesting (showing Postman, explaining how you can create a Smartphone App exchanging with your Joomla website, …) but I was always a bit frustrated because:
- the target of these session was more developers or people who are already play with APIs
- there was never a basic example or a step-by-step procedure allowing to “lower the threshold”
This changed on 23 September 2022 where I had the chance to be present at JoomlaDay D-A-CH (gathering several german-speaking countries, namely Germany - Austria - Switzerland). In particular Peter Martin gave an excellent “How to use APIs in your Joomla website?” (see links hereafter): At the end of his session, Peter would give a few little PHP scripts showing how to create or update Articles.
I asked to Peter whether he could share his scripts. He did even better: there is a new official website Joomla! Programmers Documentation with a page about Web Services and Peter made a Pull Request on Github to add the examples (see hereafter).
Coming back to Belgium, I was really excited to play with these examples.
Then I contacted Alexandre Elisé from Martinique, who is very passionate about the Joomla API and we elaborated on these examples. Indeed
- I had ideas of real usecases for the Joomla API
- and Alexandre had the coding skills to bring those ideas to life
So after several iterations over a few weeks, we ended up with a series of “little” scripts. The goal was indeed
- to give a flavour of what Joomla API can bring
- to provide short and easy-to-customize scripts (I like to say “one-page scripts” since in practice they have only about 200 to 300 lines)
- to have scripts which are independent of Joomla’s back-end
- note though that they could be easily adapted to use the Joomla Framework… but then it would become an installable extension and this goes beyond the scope of this initiation
- the advantage of an independent script is that it can even run on another server, be triggered by a cron task (from your server Panel… or from the native Joomla Task Scheduler introduced in Joomla 4 as well)
So a long story short: this presentation aims at allowing a maximum of people to start using the Joomla API, which offers a strong competitive advantage compared to other CMS for example.
4 Resources
Peter Martin - “How to use APIs in your Joomla website?” at JoomlaDay D-A-CH on 2022.11.23
- https://www.youtube.com/watch?v=AXytRiEkjVc
- https://petermartin.nl/en/presentations/joomla/how-to-use-apis-in-your-joomla-website
- https://slides.db8.nl/md/22-joomla4-api.html
Alexandre Elisé
- Alexandre’s blog: https://apiadept.com/blog-joomla-specialist
- API collection for Postman: https://github.com/alexandreelise/j4x-api-collection
- Series of scripts showcasing the Joomla API: https://github.com/alexandreelise/j4x-api-examples
When you go to https://github.com/alexandreelise/j4x-api-examples please click on the Star button if you appreciate Alexandre’s scripts & contribution : 
Joomla! Programmers Documentation (in construction)
- https://manual.joomla.org/docs/general-concepts/webservices
- Peter Martin’s PR: https://github.com/joomla/Manual/pull/41/commits/647588e4f90ee692b731cb468a3037eff4df24c1
- Alexandre Elisé’s improvement on that: https://github.com/alexandreelise/Manual/blob/patch-1/docs/general-concept/webservices.md
Joomla! Documentation
- Adding an API to a Joomla Component https://docs.joomla.org/J4.x:Adding_an_API_to_a_Joomla_Component
5 How to get the Joomla API Token
Before using the Joomla API (and any of the scripts below) we need a Joomla API Token.
By default, the Joomla API Token can only be generated for Super Users.
So be sure to keep it secret because any person having somehow access to that Token is de facto a Super User and can do everything on your website, including deleting everything.
5.1 Giving access to non Super Users
Suppose you want allow non Super Users to access the API (which is necessary if you want to give a Token to a third-party who only wants to fetch data for example).
Then simply edit the User - Joomla API Token plugin and adapt the Allowed User Groups:

Let’s suppose you want to give a “read” access to someone. You could then add the “Registered” Usergroup in the plugin.
But that would mean that all Registered Users would then have access.
The best way to implement this is
- to create a dedicated Web Service Usergroup with Web Services access only
- then create a user who is
- in the Registered Usergroup
- and Web Service Usergroup
- but not in the Author Usergroup
so that that user has access to his Frontend key but no write access because he’s not in the Author Usergroup (or the Usergroup that has Write permission on core.create on Articles).
Note: this was already mentioned in 2022 by Alexandre Elisé but I had not understood that it was already available / functional. I had thought he was proposing a tweak :)
On 2022.11.25 Alexandre Elisé shares this additional information on Facebook:
“You don’t need to be a Super User to access the Joomla Api. You can create a Web Services usergroup for example, go to Global Configuration and give this Group Permissions for API and site login to be able to see the token. You need also to add the Web Services group you just created to the list of allowed groups in the token user plugin config. But for now you still cannot have fine-grained ACL and Access Level per endpoint.For more security you could also disable sensitive webservices plugins like the users web services plugin but then the consumer app using the token cannot manage user info. I haven’t tried it yet, but I think if you give specific permissions to the Web Services usergroup then add only app user in this group you could achieve want you want even if it’s still not per route / endpoint.”
“Just did a quick test on a fresh joomla 4.2.5 install you don’t need to be Super User. morever Joomla seems to already handle permissions per endpoint but only for core endpoints. At least that’s what I’ve tried. that means that if you create for example a web services group to manage all consumers of your Joomla web services and then deny create patch delete users for this usergroup the app/consumer of the joomla web services will get a 403 Forbidden http status code when trying to perform denied actions.”
Joomla Api Without Super User > Demo video (18 min)
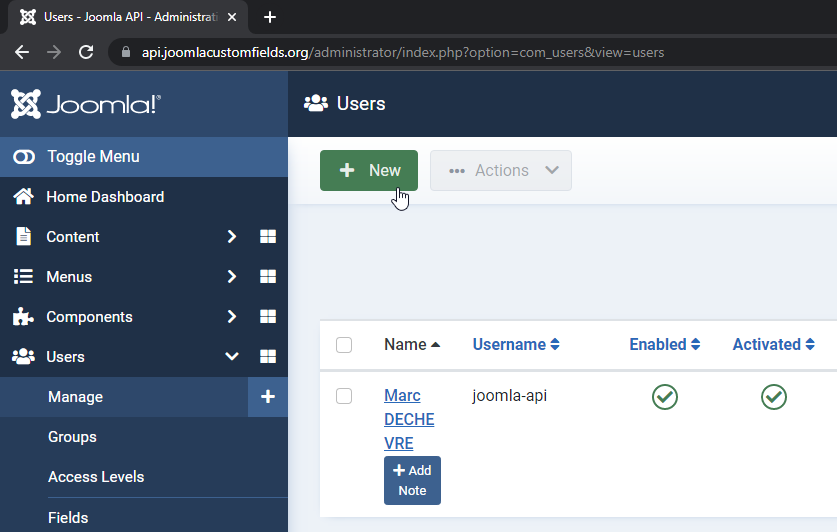
5.2 Create a new User
Actually you could of course create a Joomla API Token for your own account.
But it is probably a good practice to create a distinct user
- you can then for example disable at any time
- you can then see easily in the User Actions Logs who has done what and when (and see whether it was the API or yourself)
5.3 Give a strong password

5.4 Assign to the User Group Super User

5.5 Go the Joomla API Token tab and Read

5.6 Save
Now that you have saved the User, the Joomla API Token has been created… but for security reasons only that given user can see it (nobody else, not even other Super Users).

5.7 Log in as the new User and copy the Token

6 Create, Update, Fetch and Delete Joomla Articles with the API
6.1 Create Joomla Articles with the API
6.1.1 Terminology
Some basic terminology first: When using the Joomla API
- Create =
post - Update =
patch - Fetch =
get
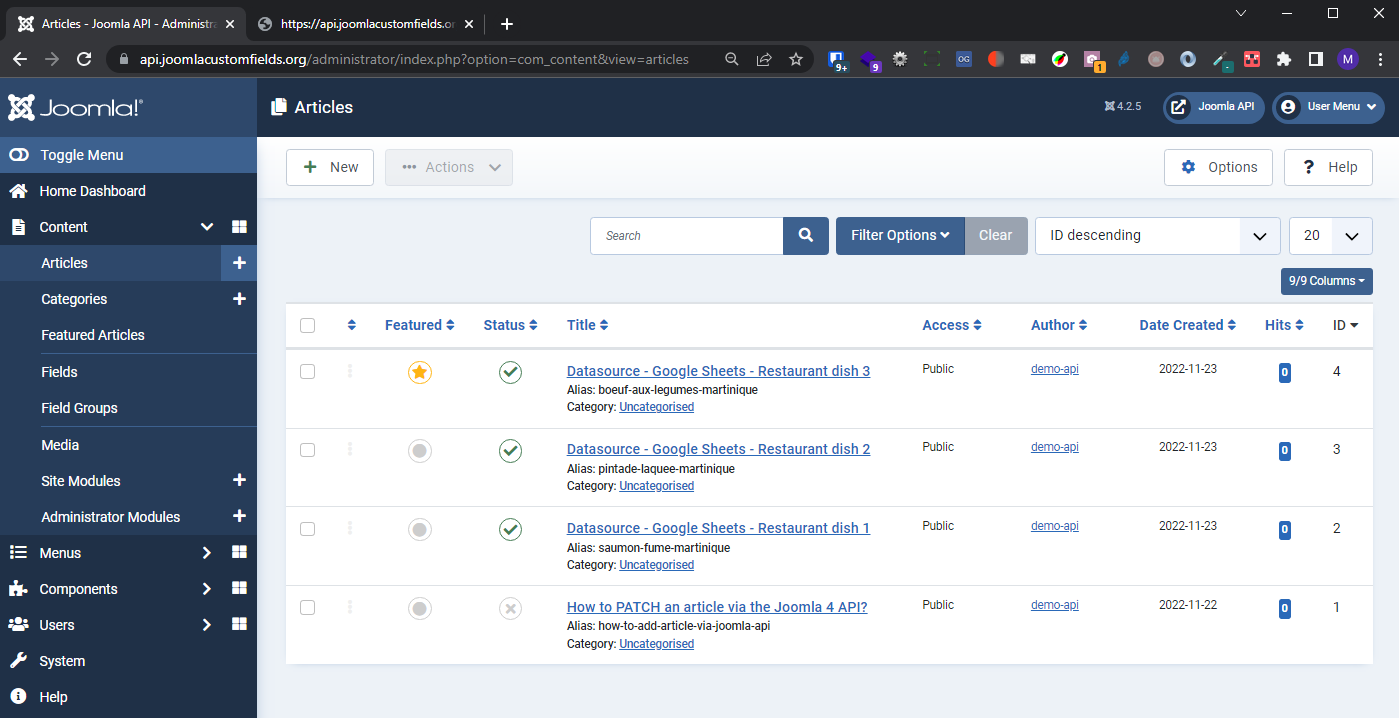
6.1.2 See the Articles Manager
This is a fresh website so I see that “No Articles have been created yet”

6.1.3 Prepare the POST script
Create your POST script on your website
- create a new file on your website (for example
api-post.phpat the root) - go to https://github.com/alexandreelise/Manual/blob/patch-1/docs/general-concept/webservices.md
- go to the “Using the PHP cURL Functions” section (because we want here an independent script so we don’t use the Joomla Framework version)
- copy the code for “Define some variables” and paste it in your file
- copy the code for “POST” and paste it at the end of your file
Customize your POST script on your website
- in your file adapt the variable
$urlwith your domain name. In my example: - from
$url = 'https://example.org/api/index.php/v1'; - to
$url = 'https://api.joomlacustomfields.org/api/index.php/v1'; - and paste your Token. In my example:
- from
$token = ''; - to
$token = 'c2hhMjU2OjI3NDpmOGMyNGIyMmI4ZTI0YzhlN2VhMGI1YmI2MTk5ODdiODViZWIwYjBhMTkwYzYxMmZkMDEzYWUxNzg5MmE2YzNm';

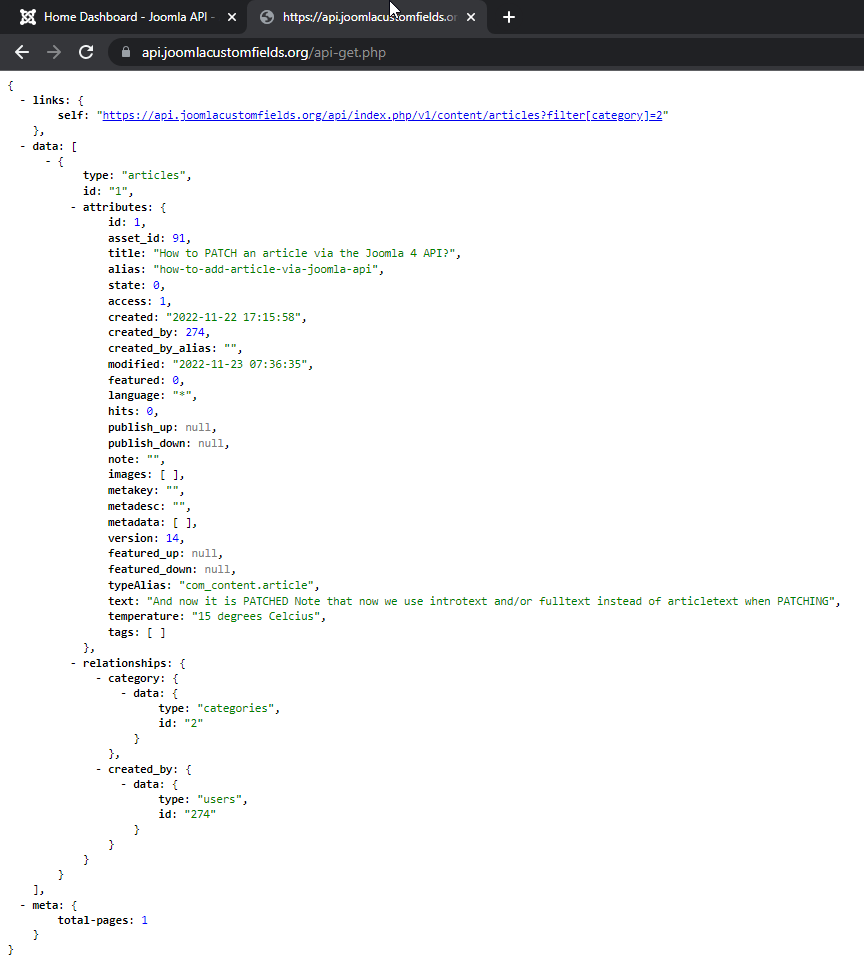
6.1.4 articletext vs introtext and fulltext
Good to know: when you Create an article
- instead of using (just like in the database of a Joomla website) the classical
introtextfor the text which comes before the potential READ MORE- and/or
fulltextfor the text which comes after the potential READ MORE - you can use
articletextwhich is “smart” and will separate your text intointrotextandfulltextwhen detecting<hr id="system-readmore">
6.1.5 The 4 necessary fields
To create an article
- title (Joomla takes care automatically of the alias creation. Reminder: a given alias can only be assigned to 1 article)
- articletext (see explanation above)
- catid (the category ID. Example : une uncategorized which is available by default on every Joomla installation had ID 2)
- language (that you can set on * when you want to assign an article to all languages)
6.1.6 Execute your script
Simply
- open a new browser tab
- type the full url of your script
- press Enter to open that url
- the script is being excuted
- and finally the page displays some feedback
- this is only to reassure you that everything was fine
- as such, displaying anything is totally unnecessary
- with other words, you could simply comment or delete the line
echo $response;

6.1.7 Go back to or refresh the Articles Manager
Tadam you can see that the Article was indeed created!

6.2 Update Joomla Articles with the API
6.2.1 Prepare the PATCH script
The procedure is totally similar to the one of the previous script:
Create your PATCH script on your website
- create a new file on your website (for example
api-patch.phpat the root) - go to https://github.com/alexandreelise/Manual/blob/patch-1/docs/general-concept/webservices.md
- go to the “Using the PHP cURL Functions” section (because we want here an independent script so we don’t use the Joomla Framework version)
- copy the code for “Define some variables” and paste it in your file
- copy the code for “PATCH” and paste it at the end of your file
Customize your PATCH script on your website - in your file adapt the variable $url with your domain name. In my example: - from $url = 'https://example.org/api/index.php/v1'; - to $url = 'https://api.joomlacustomfields.org/api/index.php/v1'; - and paste your Token. In my example: - from $token = ''; - to $token = 'c2hhMjU2OjI3NDpmOGMyNGIyMmI4ZTI0YzhlN2VhMGI1YmI2MTk5ODdiODViZWIwYjBhMTkwYzYxMmZkMDEzYWUxNzg5MmE2YzNm';

Good to know: when you Update an article
- the field
articletextdoes not work - you should use (just like in the database of a Joomla website)
introtextfor the text which comes before the potential READ MORE- and/or
fulltextfor the text which comes after the potential READ MORE
6.2.2 Execute your script
Simply execute your script as already explained above.

6.2.3 Go back to or refresh the Articles Manager
When opening the Article, we can indeed check that
- the Title has changed
- as well as the Introtext and Fulltext

6.3 Playing with Custom Fields
Adding a value to some Custom Field of an Article directly in the database using a query in PHPMyAdmin is not so obvious because it involves several Tables which are linked.
But as you will see, adding a value to some Custom Field of an Article via the Joomla API is super easy.
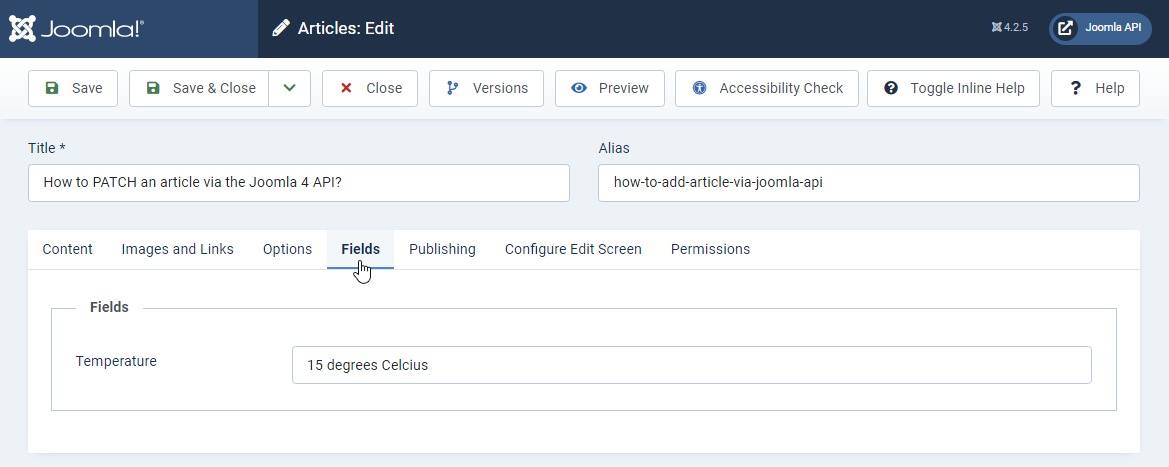
6.3.1 Create a Custom Field
In this example I create a Custom Field of Type “Text”
- its Title is “Temperature”
- its Name (meaning Alias) becomes then automatically “temperature” upon Saving (but I could of course type another Name like “temp” if I wanted)

6.3.2 Adapt the PATCH script
Now I need to edit my api-patch script as follows
- in the
$dataI add a new line'temperature' => '15 degrees Celcius' - (and I don’t forget to add
,at the end of the previous line)

6.3.3 Execute your script
Simply execute your script as already explained above.
You already see on what is displayed that “temperature” is mentioned.

6.3.4 Go back to or refresh the Articles Manager
When opening the Article, we can indeed check that
- the Custom Field “temperature” has been filled in
6.4 Fetch Joomla Articles with the API
A good usecase for this script: an intranet or an app where one wants to display some news (articles) from your Joomla website
6.4.1 Prepare the GET script
Create your GET script on your website
- create a new file on your website (for example
api-get.phpat the root) - go to https://github.com/alexandreelise/Manual/blob/patch-1/docs/general-concept/webservices.md
- go to the “Using the PHP cURL Functions” section (because we want here an independent script so we don’t use the Joomla Framework version)
- copy the code for “Define some variables” and paste it in your file
- copy the code for “GET” and paste it at the end of your file
Customize your GET script on your website
- in your file adapt the variable
$urlwith your domain name. In my example: - from
$url = 'https://example.org/api/index.php/v1'; - to
$url = 'https://api.joomlacustomfields.org/api/index.php/v1'; - and paste your Token. In my example:
- from
$token = ''; - to
$token = 'c2hhMjU2OjI3NDpmOGMyNGIyMmI4ZTI0YzhlN2VhMGI1YmI2MTk5ODdiODViZWIwYjBhMTkwYzYxMmZkMDEzYWUxNzg5MmE2YzNm';

6.4.2 Filter, Search and Order the Articles you are fetching via the API
6.4.2.1 Select another Category
In this example, we suppose we want to get all articles from Category 2
Of course, you can easily change the ID of the Category you need by adapting the following line of code:
$categoryId = 2;
6.4.3 Filter further
What if you only want to get Articles which are Published.
In the database, you probably know that technically being
- Published means that
stateis1 - Unpublished means that
stateis0 - Trashed means that
stateis-2 - Archived means that
stateis2
So all we need to do in the script is to change
/content/articles?filter[category]=
into
/content/articles?filter[state]=1&filter[category]=
So good, now you can filter on State. But you can also filter on other fields. How to know which fields are available? They are listed right under
With other words, we have
author(being the created_by, namely the ID of the author)category(as seen above)state(as seen above)featuredtag(being the ID of the tag of course, not its title)language
Note about filtering by alias : see this issue and the corresponding fix which has been merged since then:
- Joomla 4 Api filter tags/categories by alias not working - filtersearch #42503
- https://github.com/joomla/joomla-cms/issues/42503
6.4.3.1 Multivalue
In particular for the “Tags” filter which is multi-value, it works using the following API filter (3,22,18 and 7 are my tag IDs):
/api/index.php/v1/content/articles?filter[tag]=3,22,18,7
6.4.3.2 Search
Oh wait, look at this line: https://github.com/joomla/joomla-cms/blob/5.2-dev/api/components/com_content/src/Controller/ArticlesController.php#L65. It mentions search
This means that you can also search on the Articles’ Titles. Example:
filter[search]=thelma
Even better: suppose you want to search on the content (introtext and fulltext) of the Articles. Then just like in Joomla’s backend you can prefix your keyword by content:. Example:
filter[search]=content:Magritte
Note: just like in Joomla’s backend, the search is not case-sensitive
6.4.3.3 Ordering and Direction
If we to a bit further in the same file, we get to https://github.com/joomla/joomla-cms/blob/5.2-dev/api/components/com_content/src/Controller/ArticlesController.php#L85. It mentions list
This means that you can also choose the Ordering and the Direction. 3 examples:
list[ordering]=modified&list[direction]=descie ordering by Modification Date (descending)list[ordering]=created&list[direction]=ascie ordering by Creation Date (ascending)list[ordering]=id&list[direction]=ascie ordering by ID (ascending)
6.4.3.4 Final total example
So if we combine all the previous filter[] and list[] possibilities, we can get something as complex/rich as this:
'/content/articles?list[ordering]=modified&list[direction]=desc&filter[state]=1&filter[featured]=0&filter[language]=*&filter[author]=297&filter[tag]=6&filter[search]=content:Magritte&filter[category]='
6.4.4 Execute the script
Simply execute your script as already explained above.
6.5 Delete Joomla Articles with the API
Create your DELETE script on your website
- create a new file on your website (for example
api-delete.phpat the root) - go to https://github.com/alexandreelise/Manual/blob/patch-1/docs/general-concept/webservices.md
- go to the “Using the PHP cURL Functions” section (because we want here an independent script so we don’t use the Joomla Framework version)
- copy the code for “Define some variables” and paste it in your file
- copy the code for “DELETE” and paste it at the end of your file
Customize your DELETE script on your website
- in your file adapt the variable
$urlwith your domain name. In my example: - from
$url = 'https://example.org/api/index.php/v1'; - to
$url = 'https://api.joomlacustomfields.org/api/index.php/v1'; - and paste your Token. In my example:
- from
$token = ''; - to
$token = 'c2hhMjU2OjI3NDpmOGMyNGIyMmI4ZTI0YzhlN2VhMGI1YmI2MTk5ODdiODViZWIwYjBhMTkwYzYxMmZkMDEzYWUxNzg5MmE2YzNm';
We don’t provide screenshots here. By now you know how it works!
7 How to launch any of the scripts automatically
Given the fact that our scripts here are independent of Joomla
- we can put them on our own website
- or even on another server (if we trust its owner of course, since being able to see the Token means being a Super User)
Lauching any of the scripts can be simply done:
- by opening the corresponding URL in a browser
- either directly
- either for example thanks to a nice button in the backend
- by calling this URL in any piece of code (PHP or other)
- by setting up a Cron job calling this URL
- either via the tool provided by your host (free)
- either via some online tool providing cron tasks (in general paid)
- by setting up a Task Scheduler in Joomla
- by using the CLI (Command Line Interface)
So obviously it means that you can automate the execution of the creation / update of your Joomla Articles at any time interval.
7.1 Example 1: via a nice button in the backend
In Joomla 4 it has become even easier than before to create a Custom HTML Module in the backend.
Take advantage of this feature to create a nice interface to your Users.

7.2 Example 2: via Joomla Task Scheduler
The Task Scheduler is a new feature introduced with Joomla 4
- Go to System > Schedule Tasks
- Click on the New button
- Create a Task of Type “GET Request”
- Configure it (put an absolute link for “Request URL”. Example:
https://www.MYDOMAINNAME.com/api-blabla.php)

7.3 Example 3: via the CLI
If you run a PHP script via a browser, and it takes longer than the max_execution_time setting on the server, you get a timeout.
If you run the same file via CLI (Command Line Interface), you won’t encounter such an err_connection_timed_out.
What Command do you have to type. If you have no clue, simply go to the CRON section of your host. There they typically display an example of correct CRON.
In my case the right Command looks like
php -q /home/MYACCOUNT/public_html/sync.php (drop the >/dev/null 2>&1 part if you want to see the feedback given by the script on your screen)
Notes:
- the
-qmeansquiet mode. For more details see https://www.php.net/manual/en/features.commandline.options.php> - if you want to send the log to a file (in the Console it is indeed possible that you can only see the last 1000 lines) then specify an output file for the log
php -q /home/MYACCOUNT/public_html/sync.php >> /home/MYACCOUNT/public_html/sync.txt - if you want to send the output to a log file but also to see it in the Console then you can use
php /home/MYACCOUNT/public_html/sync.php | tee -a /home/MYACCOUNT/public_html/sync.txt - on the examples above I type the absolute path to the files, but if you first position yourself in the folder of
sync.php(in my case by typing firstcd public_html) then the command line is shorter:
php -q sync.php
php -q sync.php | tee -a sync.txt(when you want to send the log both to the screen and the output file) - it is even possible to put the PHP file above the webroot and still launch it from the Command Line, which is more secure since it prevents de facto the file from being triggered from a browser
PS: speaking about CLI, did you read this very detailed article about it published in June 2022 in the Joomla Community Magazine or https://docs.joomla.org/J4.x:CLI_Update ? You can really do amost everything in Joomla with the Command Line, like
- resetting passwords for Users
- reindexing your website (Finder aka Smart Search)
- cleaning the cache
- …
7.3.1 Using your FTP software
Personally I use WinSCP (on Windows) as FTP software.
If your server is are compatible then simply open the menu Commands > Open a Console.

Note:
- I don’t use Filezilla but apparently there is a paid version called “FileZilla Pro and FileZilla CLI”: https://filezillapro.com/docs/v3/filezilla-pro-cli/filezilla-command-line/
- I don’t use Cyberduck but there is a version with CLI: https://docs.duck.sh/cli/
7.3.2 Using the Console in the File Manager of the Panel of your host
Personally I use PlanetHoster as hosting company.
In the File Manager available in their Panel (called N0C) there is a Console button.

7.3.3 Performance via the CLI
From a test conducted on a website being on Shared Hosting (€ 6 / month VAT included) I could synchronize 2750 Articles in less than 20 minutes with
- a series of Native Fields ie: title, alias, state, featured, access, catid, language, images, created and introtext
- 16 Custom Fields
With other words less than 500 milliseconds for each Article…
8 Be the only one who can run your scripts
If you use the CLI (Command Line Interface) then you can simply put your PHP script above the root so that only you can trigger it.
But if the PHP file is not above the root and if somebody knows that you have a script called for example api-test.php, this person could flood your websites with request on that url.
A typical way to avoir that is on Apache servers is to create a htpsswd, meaning you have to
- add a few lines in your .htaccess
- add a .htpsswd file, to which your .htaccess lines will refer with the correct path (for exemple
/YOUR_PATH/public_html/.htpasswd)
When a htpsswd is enabled, you get a popup asking for the defined username & password before accessing.
You can typically
- either use your Host tools to generate such an .htaccess rule
- or use an online generator (like https://hostingcanada.org/htpasswd-generator)
But we need to be more specific because
- we only want to block our scripts, not our whole website.
- we only want to block our scripts if they are launched in the browser, not if they are launched by the website itself
- either via some code
- either via the Task Scheduler
Let us first show a good example of such an .htaccess rule:
<FilesMatch "^api*">
AuthType Basic
AuthBasicProvider file
AuthUserFile /YOUR_PATH/public_html/.htpasswd
AuthName secure
<RequireAny>
Require valid-user
Require ip 127.0.0.1 185.221.181.208
</RequireAny>
</FilesMatch>
8.1 How did restrict the rule to our scripts
Let’s suppose that all my scripts filenames start with api.
Then I want to have this htpsswd popup asking only for the files starting with api.
This is why in the snippet of .htaccess below we have <FilesMatch "^api*">
8.2 How did we allow the scripts if launched by the website itself
See the line Require ip 127.0.0.1 185.221.181.208
- 127.0.0.1 corresponds to the localhost. In some cases it is enough
- in my case though, when launching my script with Joomla’s Task Scheduler, my script was blocked: I also had to allow explicitely the IP of my server
- Q: So how did I find the IP address of my server?
- A: Simply by checking the IP address given for “A Record” for my Domain Name, with any online tool like https://www.ns-lookup.io/
8.3 More information
For more information about this kind of .htaccess rules, see https://httpd.apache.org/docs/2.4/upgrading.html
9 Change the API Token if needed
If you have any reason to think that your API key is not private any more (like me after having shared this presentation) then simply Edit the User in question, go to the Joomla API Token tab and click on Reset
- the old Token is revoked
- a new key is displayed, which you can now paste in all your scripts
If a script having a wrong or revoked Token is called then it will display the following error message: “forbidden”

10 Using the Joomla API to Import and Update Articles directly from a Google Sheet
![]()
Being able to POST or PATCH a single Article programmatically with a few lines of code thanks to the API as shown above is great… but the added value in real life is quite limited at this point.
Indeed, having to prepare 1 script to create only 1 article would seem quite cumbersome. But once you can do it for 1, one starts to think “what about having a loop to create multiple articles” :)
When I first spoke about this with Alexandre, I would already have been happy to do it with a CSV file:
- export to CSV-format from an Spreasheet
- and then select that file with a kind of import button somewhere
But Alexandre went further:
- why bother exporting/importing a CSV file: if you use Google Sheet for example, you can share it with a simple link… to its CSV version
- why importing Articles only into 1 website: let’s have a column in our Google Sheet to select for each row in which website we want to create the corresponding Article
- why limit the import to the native Fields, let’s make it easy to also import (any number of) Custom Fields
- why not allow to also have json in a cell since the following Fields are stored in json-format in the database
- Intro Image & Full Image links, together with their configurations (Description, classes, …)
- Urla, Urlb, Urlc
- Custom Fields allowing multiselection
- Custom Fields of type Subform
- why having to respect some order of the columns in the Google Sheet: let’s allow the user to have any order
10.1 Prepare Google Sheets
10.1.1 Create Google Sheets
Create a Google Sheets
- go to https://drive.google.com/
- click on the New button
- select Google Sheets
- give a Title to the newly create Google Sheets
Now we need to have some sample data with the right structure for our Google Sheets. We don’t want to reinvent the wheel so let’s have a look at the following script:
In particular I see the following line $csvUrl = 'https://docs.google.com/spreadsheets/d/1IJXrctQPnykw4NVcvthsJsf9GflYvb6W_-lEsavA6xE/pub?output=csv';
Excellent, let’s copy/paste this URL in a browser
https://docs.google.com/spreadsheets/d/1IJXrctQPnykw4NVcvthsJsf9GflYvb6W_-lEsavA6xE/pub?output=csv
This makes my browser download a CSV file. I could start from this file… but an easier way is to simply display the Google Sheet directly on the browser by dropping the ?output=csv at the end of the URL.
With other words, I open
https://docs.google.com/spreadsheets/d/1IJXrctQPnykw4NVcvthsJsf9GflYvb6W_-lEsavA6xE/pub
Then
- I copy/paste the content of this Sheet in my own empty Google Sheets
- I delete the following columns if they are still there (they were actually created at some point only to make more tests with the script)
- alias-seed
- seed
- article-subform-field (which is useful only if you want to import Custom Fields of type Subform which are stored in JSON format in the database)
- for the demo here I only keep the first 3 rows of content

10.1.2 Share Google Sheets
In Google Sheets
- select the Menu File > Share > Publish on web
- on the popup window
- select the Sheet containing your data
- select CSV (and not webpage nor PDF nor whatever)
- click on the Publish button
- copy the URL now displayed in the popup (and paste it somewhere, we will need it later)
- close the window
In our case, the url is
https://docs.google.com/spreadsheets/d/e/2PACX-1vT5Th1TKSKv3vZuEvTnpK_MPqhItjuyV8ierdbNQa9FV2nYWHV78Cd9IRGbP9BHIXPCmnCrs6Jm5791/pub?gid=0&single=true&output=csv
So if you want to have a preview of that directly on your browser, take the url without what follows /pub, namely
https://docs.google.com/spreadsheets/d/e/2PACX-1vT5Th1TKSKv3vZuEvTnpK_MPqhItjuyV8ierdbNQa9FV2nYWHV78Cd9IRGbP9BHIXPCmnCrs6Jm5791/pub
Screenshots (my computer is obviously is French but it is pretty straigtforward):


10.2 Basic example
10.2.1 Prepare Google Sheets script
Create your Google Sheet script on your website
- create a new file on your website (for example
api-google-sheet.phpat the root) - go to https://github.com/alexandreelise/j4x-api-examples/blob/master/using-raw-php/smart-add-edit-to-multiple-sites-from-csv-url.php (because we want here an independent script so we don’t use the Joomla Framework version)
- copy the code and paste it in your file
Customize your Google Sheet script on your website. In your file adapt the following variables
$csvUrlwith the url we just got from Google Sheets$baseUrl. In my case- I replace
'app-001' => 'https://app-001.example.org',by'app-001' => 'https://api.joomlacustomfields.org',(beware, without the trailing slash!)
- I delete the lines with
'app-002'and'app-003'because I want to import only one 1 website, not on 3 (or more) like the script allows
- I replace
$token. In my case I replace'app-001' => 'yourapp001token',by'app-001' => 'c2hhMjU2OjI3NDpmOGMyNGIyMmI4ZTI0YzhlN2VhMGI1YmI2MTk5ODdiODViZWIwYjBhMTkwYzYxMmZkMDEzYWUxNzg5MmE2YzNm',- I delete the lines with
'app-002'and'app-003'because I want to import only one 1 website, not on 3 (or more) like the script allows

10.2.2 Distant CSV file of local CSV file
In the final version of the script, right next to the $csvUrl parameter there is a $isLocal parameter :
// Public url of the sample csv used in this example (CHANGE WITH YOUR OWN CSV URL OR LOCAL CSV FILE) $isLocal = false;
If you set you set this parameter to true instead of false then $csvUrl will be ignored and the following file mentioned a few lines after will be used:
$localCsvFile = __DIR__ . '/sample-data.csv';
Of course, you could adapt this file name and even folder, for example:
$localCsvFile = __DIR__ . '/myfiles/marc.csv';
Beware: if you get the following error message, it could simply be that your CSV file is not accessible (for example blocked by some .htaccess rule and/or by Admin Tools):
Error message: Syntax error, Error code line: 478, Error CSV Line:__, that line in the script being actually $decodedJsonOutput = json_decode($combinedHttpResponse[$dataCurrentCSVline], false, 512, JSON_THROW_ON_ERROR);
In my own case, adding an exception in the .htaccess maker for marc.csv was not enough: I had to temporarily disable Admin Tools in order to have the script work (I have not figured out yet which Option triggers that behaviour)
10.2.2.1 Allowing the upload of a CSV file in Joomla’s Media Manager
In order to allow the upload of a CSV file in Joomla directly from the interface of the Media Manager (without using FTP for example)
- go to Media Manager > Options > Legal MIME type
- add
text/csvin the list (note that the values are separated by a comma:,)
Personally, instead of adding my CSV files in the images folder, I created another folder at the root (let’s say csv) and then go to the plugin FileSystem - Local where you can add that folder… which will then become visible in the Media Manager.
10.2.2.2 Mmmh, possible issue with Google Sheets since October 2023
[ added in October 2023 ]
Strangely for some reasons now it seems that calling directly the link to the Google Sheet would not work any more (you get some Rrror message like “First line MUST NOT be empty. It is the header”… which is what you get also if you put a wrong link to a local CSV file). I still have to investigate.
But anyways, since the script also work with Local files you can simply do the following:
- in Google Sheets you go to File > Download > CSV
- then you upload the file to your website (naming it after the name you have chosen in the script, see above)
If you have the opportunity to help me investigating this issue, please contact me! 🙂
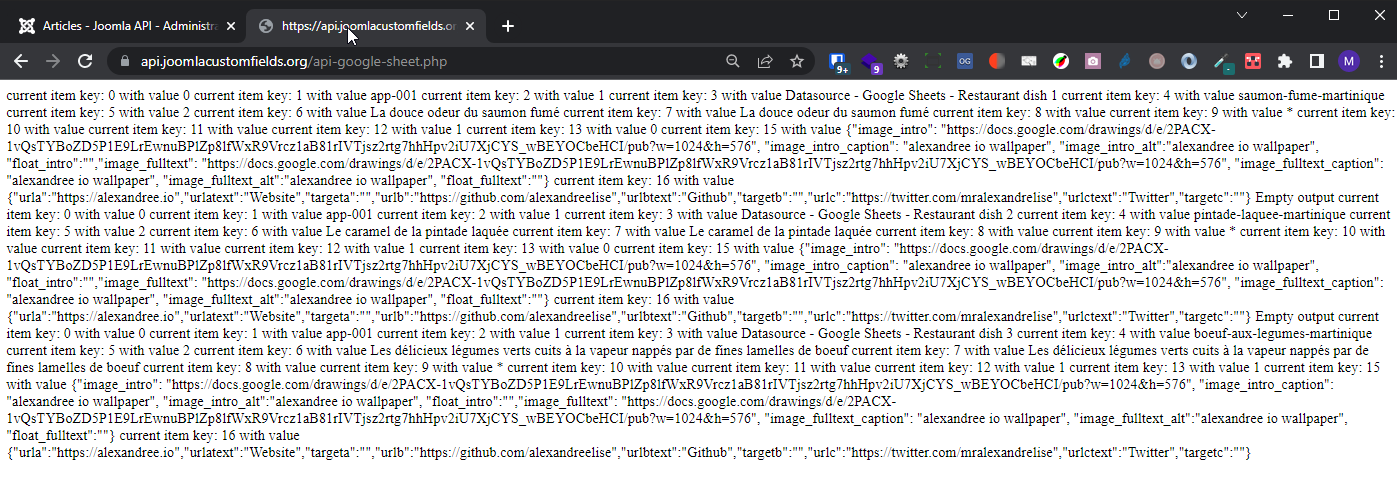
10.2.3 Execute your script
Simply execute your script as already explained above.
Normally this script should not necessarily display anything and just run in the background.
Still the script displays some feedback: this is clearly not necessary but allows to visually check that something indeed happened (and once I could see that some rows were not processed and could identify the cause in the Google Sheets for example).
Beware: I have already noted that Google Sheets sometimes take 1 minute or so before actually updating the CSV version (even if other users of the Google Sheet see your changes “live”). So if after executing your script you see no difference, simply wait 1 minute and relaunch it
10.2.4 Go back to or refresh the Articles Manager
When opening the Article Manager, we can indeed check that
- new articles have been created. Tadam!
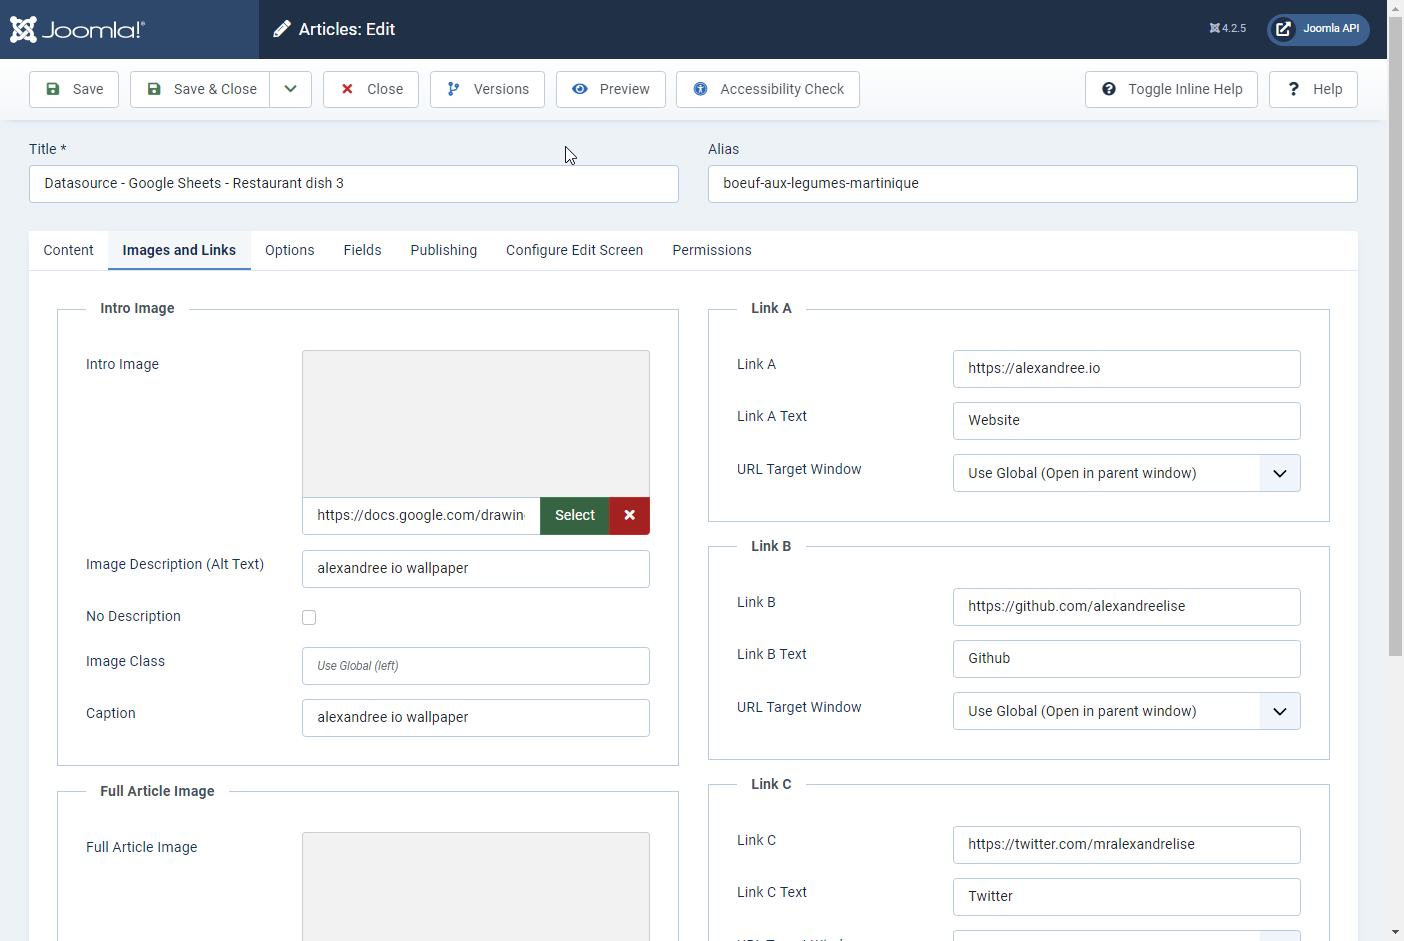
And when opening any of them, we can also see that everything is there
- introtext of the article
- link / description / class / caption for Intro Image and Full Image
- urla, urlb, urlc
Note:
- in this case, for the Intro Image and the Full Image we simply put an link to an external image in the Google Sheets
- in real life, one would probably want
- either to use Joomla’s Media Manager to select the images
- or use something more powerful than Google Sheets, like AirTable which allows to put images in a “cell” (see the AirTable script which is even capable of physically copying the Airtable images locally to the website)

10.2.5 If you want to Update your articles later on
You have probably noted that the first column in the Google Sheet was id, being of course the ID for each article.
Actually we wanted one single script which works both to Create and to Update Articles.
But how to make the script “smart” enough for that?
- if the
idis 0 then the script will Create an article - if the
idis any other number, it will Update the article having the corresponding ID
So at this point, if there is a chance that I execute again this script in the future, I don’t want to re-create the already existing articles.
Therefore, in my Google Sheet
- I put manually the
idof each already created article - and if I wish to create new articles next time I run the script, I can also do it by giving them the
id0 - and so on each time I run the script
Illustration with my adapted Google Sheet where
- I change the ID, the Title and the Alias for the first 3 articles
- I add a new row to create a new article

And the result in the Articles Manager after running the script again:

Obviously in your Google Sheets you can change the value of any field. Example: language is set on * (meaning all languages since it is the way it is encoded in the database) but you could specify a language like fr-FR
10.2.6 Two rounds to process
The script runs two loops:
- first it it creates all the article it is asked to create
- but if the required alias is already taken it cannot create the article
- then it remembers that
- and once the first loop is finished it makes a second loop in order to create those articles, by adding a random number to the required alias (in the code see the section // Handle errors and retries)
10.2.7 Other smart features
Note that the script has also been made as “smart” as possible for different aspects. Examples:
- if there is an error for a given row, the script will simply skip that row but go on with the next ones. Examples
- there is a Custom Field of type Link but in the corresponding cell the User has types Text or types an email address
test@test.combut forgets to mention the protocolmailto:) - some required data are missing
- there is a Custom Field of type Link but in the corresponding cell the User has types Text or types an email address
- as you might know, in a given Category an alias can only be given once to an Article
- so if a certain alias is already given, the script will add a random number to the proposed alias so that it can still be processed/created. Illustration:

10.3 Advanced example
The following steps are not necessary of course: it only applies if you intend to use the script for example
- to import other native Fields like
publish_up,publish_down,featured_up,featured_down(to find the right name for these fields, simply look in the database at the table columns…) - to import Custom Fields
10.3.1 featured_up and featured_down
Relatively recently, Joomla added 2 new fields in the Article form:
featured_upfeatured_down
So it means that you can also use that Joomla’s API (and this script) in order to import those fields, even though they are not in the content table but in the content_frontpage table!
If you do it via the script, just don’t forget to add featured_up and/or featured_down in the list of Fields that are to be synchronized…
Pay attention: apparently if from the work via Joomla’s interface, those fields will be emptied (even if you fill them in)
- if you Save the Article without having set
FeaturedtoYes - if you change the Featured/Unfeatured option by clicking on the icon from the Articles Manager
So obviously if you use Joomla’s API the same thing happens: you have to have a column featured set to 1 otherwise your columns featured_up and/or featured_down will just remain empty in Joomla even if you had filled in values in your Sheet.
10.3.2 Create Custom Fields in Joomla
Let’s suppose we create a website for a Rock band. It would be much easier for the musicians to add their new concerts simply in a Google Sheets than to lean how to use a CMS.
Those concerts would then be easily imported and/or updated in the website.
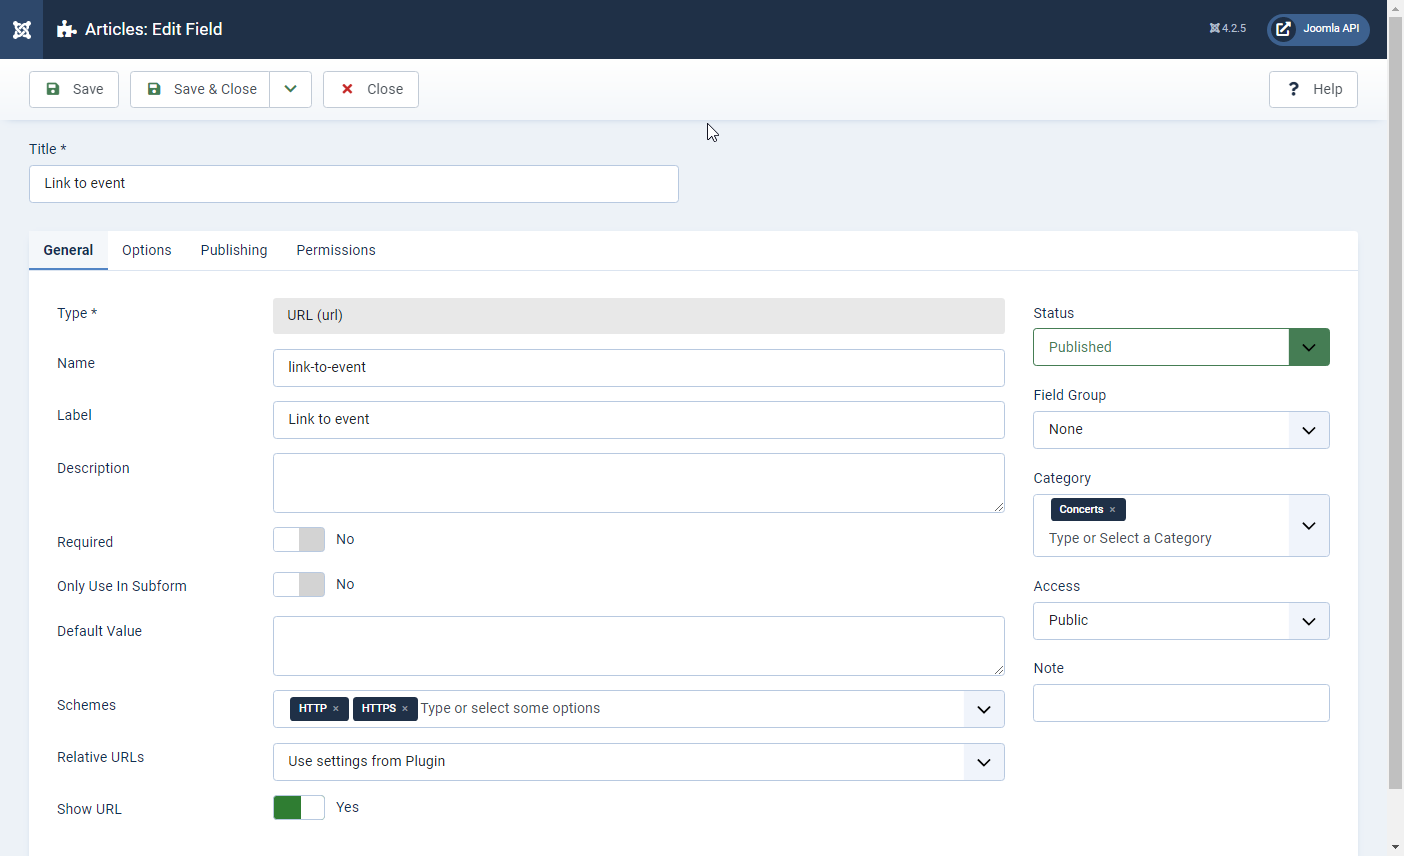
So let’s create a new Category Concerts and assign to it the 3 following Custom Fields:
- Date and Time: CF of Type Calendar with name
date-and-time - Venue: CF of Type Text with name
venue - Link to Event: CF of Type URL with name
link-to-event


10.3.3 Adapt the Google Sheet
Since we create a new Category (“Concert” with ID 8), let us change the value of the catidcolumn from 2 to 8 in the Google Sheet.
Let us also create the following columns in the Google Sheet:
publish_up,publish_down,featured_up,featured_downdate-and-time,venue,link-to-event
Note: when you type date, they should have the following format: 2022-11-23 20:00:00 (and visibly it imports dates in the real TimeZone of your website, as if you were typing them from Joomla’s backend)
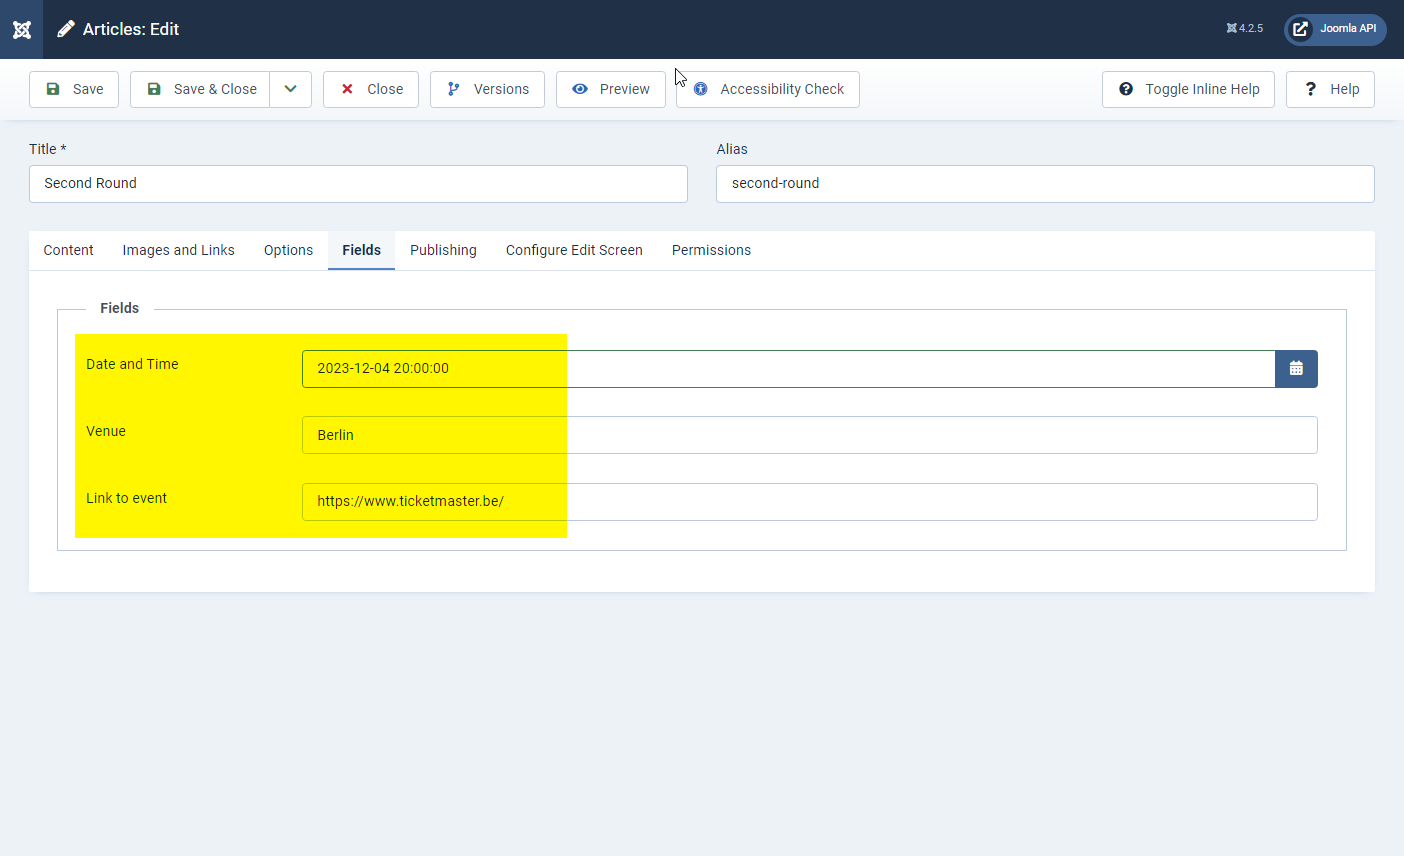
Here is an example with some values:

10.3.4 Adapt the script
In your script
- add the custom fields by changing
$customFieldKeys = [];into$customFieldKeys = ['date-and-time','venue','link-to-event'];

- and add the following block inside the
$defaultKeysarray:
        'publish_up',
        'publish_down',
        'featured_up',
        'featured_down',
10.3.5 Go back to or refresh the Articles Manager
Tadam!
Our Categories have indeed been Updated:

Our Custom Fields have indeed been Updated:
Our other native Fields have indeed been Updated:

10.4 Special fields like Images or Custom Fields or Type Subform or URLs
Some special fields entails “multiple values”. So how to handle this?
Suppose you want to import an image or a Custom Field of Type Subform.
As you might be aware, in the database these fields are saved in json format.
So what should we type in our Google Sheet cell ? The easiest way is to save a real Article on the website and see in the database what the corresponding json is.
Note that we don’t need in the Google Sheet to “escape the / character”. With other words we simply type / and not \/
Example for Image (which includes the Intro Image and the Full Image, together with their ALT, Caption etc):
{"image_intro":"images/test.jpg","image_intro_alt":"","float_intro":"","image_intro_caption":"","image_fulltext":"images/test.jpg","image_fulltext_alt":"","float_fulltext":"","image_fulltext_caption":""}
Example for a Custom Field of Type Subform having in this case 2 Custom Fields (field2 and field7) and 3 values (row0, row1, row2) - note: it also accepts HTML tags but I can’t paste them here in the presentation:
{"row0":{"field2":1410,"field1":"This an article summary 1 for this dessert. Short & Sweet!", "field7": "What's up Super Joomlers! Alex here...Proud to be a joomler. Nowadays focusing on Joomla! 4.x Web Services Apis."}, "row1":{"field2":1410,"field1":"This an article summary 2 for this dessert. Short & Sweet!", "field7": "What's up Super Joomlers! Alex here... Proud to be a joomler. Nowadays focusing on Joomla! 4.x Web Services Apis."}, "row2":{"field2":1410,"field1":"This an article summary 3 for this dessert. Short & Sweet! ", "field7": "What's up Super Joomlers! Alex here... Proud to be a joomler. Nowadays focusing on Joomla! 4.x Web Services Apis."}}
Example for the urls Field (those URL A, URL B and URL C which are native in Joomla):
{"urla":"https://alexandree.io","urlatext":"Website","targeta":"","urlb":"https://github.com/alexandreelise","urlbtext":"Github","targetb":"","urlc":"https://twitter.com/mralexandrelise","urlctext":"Twitter","targetc":""}
Note: my Editor is tweaking my code snippets here. Of course all the " are regular double quotes (and not italic). And the Github icon is also added by the Editor
10.5 Fields with potentially multiple values like Custom Fields of Type List or Checkbox
Suppose you have a Custom Field of Type List or Checkbox. For those CF
- there is typically an Option to allow or forbid Multiple Values
- when you create your proposed options, for each of them you specify
- a Text (ie what will be displayed in the front-end and in the back-end)
- a Value (ie what is written in the database)
In that case
- if don’t have Multiple Values
- in the Google Sheet you should simply type the unique Value (example:
chocolate)
- in the Google Sheet you should simply type the unique Value (example:
- if you have Mutiple Values
- in the Google Sheet you should then type
{"0":"fries","1":"chocolate","2":"beer"}(without spaces) if the 3 values that I want are fries, chocolate and beer
- in the Google Sheet you should then type
Note: when you want to have multiple values in a CF, you typically choose between a CF of Type Checkbox and a CF of Type List
- when importing multiple values to a CF of Type Checkbox, everything runs fine
- when importing multiple values to a CF of Type List
- apparently at the moment the script might throw the following message
Cannot use object of type stdClass as array - but this does not prevent the script from executing and the content from being imported
- this problem could be related to this https://github.com/joomla/joomla-cms/issues/38724 and https://github.com/joomla/joomla-cms/pull/38655. Please contribute!
- apparently at the moment the script might throw the following message
10.6 Fields with potentially multiple values like Custom Field of Type Articles Field by Regular Labs
Articles Fields by Regular Labs is a powerful Type of Custom Field allowing to select other Articles: https://regularlabs.com/articlesfield
A good example : for a Library website you have typically have a Category “Books” and a Category “Authors”. You could then link each Book Article to one or several Author Article(s).
If you have multiple values, I have tested succesfully the following 2 methods (let’s suppose we want to link to Articles having ID 12 and 13):
- in the Google Sheet, type
12,13then Synchronize. After that Edit the Article in the Backend (the 2 values do appear there but are not yet correctly saved in the database) and Save it - in the Google Sheet, type directly the values in JSON-format, ie
{"0":"12","1":"13"}(without spaces), then Synchronise
10.7 Formula in Google Sheet to transform comma-separated values into the desired JSON
[ added on 30.03.2023 ]
Suppose you have multiple values on the Google Sheet in the form of comma-separated values 12,Se,Lan,Dis.
In order to import them we need to transform them in JSON-format as explained above: {"0":"12","1":"Se","2":"Lan","3":"Dis"} (without spaces)
Let’s see how to achieve this in a few steps, with a Custom Formula.
10.7.1 Apps Scripts
In Google Sheets, go to Extensions > Apps Scripts
Note: if you get a 404 error after a message “too many directions”, it is because Google does not properly manage its redirections when you are logged in simultanously to several Google Accounts. In that case, two options:
- log out from all other Google accounts
- or simply open your Google Sheet in Private/Incognito mode in your browser
In the Apps Scripts interface
- paste the following function
- Rename the project (on the top left)
- click on the Save Project icon
/**
 * Transforms a comma-separated list into indexed JSON in order to import multiple values of a Custom Fields into the website
*/
function CREATEJSON(input) {
  if (input) {
    let result = {};
    let key = 0;
    input.split(',')
    .forEach(item => {
      let val = item;
      result[key] = val;
      key = key + 1;
    }); // we now have an array which is formatted as we wish
    let myjson = JSON.stringify(result, null, ' '); // we transform the array in JSON format
    myjson = myjson.replace(/\n/g,""); // we remove the line breaks \n globally g
    myjson = myjson.replaceAll(" ",""); // we remove all spaces
    return myjson;
  } else return '';
}
What does this script do?
- if the source cell is empty we do nothing
- we split the comma-separated list in order to create an array
- we transform the array in JSON format
- we remove the line breaks
\ngloballyg - we remove all spaces
- if the source cell is empty we simply return ’’, namely nothing
Note: mmmh apparently this formula works when being in the Google Sheet itself… but it displays as #NAME? when Publishing To Web (be it in the browser or in CSV). So a temporary workaround would be to copy the result of the custom function/formula and to paste it as value/text in a new “extra column” in the Google Sheet. Please help if you find a better workaround for this!
10.7.2 Formula in your Google Cell
In your Google Sheet you can now type the following : CREATEJSON(A2) where A2 is your source cell with 12,Se,Lan,Dis for example. Then you will see the JSON exactly as needed, ie {"0":"12","1":"Se","2":"Lan","3":"Dis"}.
10.8 Formula in Google Sheets in order to transform a Title into an Alias or Slug
=LOWER(REGEXREPLACE(REGEXREPLACE(REGEXREPLACE(REGEXREPLACE(REGEXREPLACE(REGEXREPLACE(REGEXREPLACE(REGEXREPLACE(REGEXREPLACE(TRIM(A1);"([àáâãäå])";"a");"([èéêë])";"e");"([ìíîï])";"i");"([òóôõöø])";"o");"([ùúûü])";"u");"([ç])";"c");"[^a-zA-Z0-9]+";"-");"-{2,}";"-");"^-+|-+$";""))
Here’s how the formula works:
TRIM(A1) removes any leading or trailing spaces from the contents of cell A1
REGEXREPLACE(TRIM(A1), "[^a-zA-Z0-9]+", "-") replaces sequences of non-alphanumeric characters with hyphens
REGEXREPLACE(REGEXREPLACE(TRIM(A1), "[^a-zA-Z0-9]+", "-"), "-{2,}", "-") reduces sequences of multiple hyphens to a single hyphen
REGEXREPLACE(REGEXREPLACE(REGEXREPLACE(TRIM(A1), "[^a-zA-Z0-9]+", "-"), "-{2,}", "-"), "^-+|-+$", "") removes any hyphens at the start or end of the string
REGEXREPLACE(REGEXREPLACE(REGEXREPLACE(REGEXREPLACE(REGEXREPLACE(TRIM(A1), "[^a-zA-Z0-9]+", "-"), "-{2,}", "-"), "^-+|-+$", ""), "([àáâãäå])", "a"), "([èéêë])", "e"), "([ìíîï])", "i"), "([òóôõöø])", "o"), "([ùúûü])", "u")) replaces accented characters with their corresponding non-accented characters
11 Performance
When I first started to play with this script I was importing 100 to 200 articles and it was going fine.
Then I decided to raise the bar for testing purposes and tried with some 2600 article.
I think that the script managed to create some 500 articles (having each 10 Custom Fields). Indeed after a few minutes the script was throwing the following Request Timeout :
This request takes too long to process, it is timed out by the server. If it should not be timed out, please contact administrator of this web site to increase 'Connection Timeout'.
11.1 Using the CLI to avoid Timout
Well, the best solution if you want to avoid any Timout is to launch the script from the Command Line (CLI).
See the corresponding section in the present presentation for more explanations
11.2 Adapting server parameters to increase performance
Especially if you launch the script from the browser you might try to increase the following parameters on your hosting;
- max_execution_time
- max_input_time
- default_socket_timeout
- memory limit
This seems to have done the trick for me when launching the script from the browser. Indeed
- the script still displays a
Request Timeoutafter 5 minutes - but actually the process continues and I see that my articles are being further updated
11.3 Disabling Versioning and Smart Search Indexation
If you need to increase performance even more (for example because you have a huge amount of Articles to import), I guess that the following actions would help:
- disabling Smart Search (to be more precise, the
Smart Search ContentandContent Smart Search. Maybe 1 of those 2 would be enough but I did not check their exact respective action) - disabling
Versioning
Indeed, every Article creation or update triggers the Smart Search and the Versioning which probably take extra resources before passing onto the next Article.
11.4 Adjusting the parameters of the script
[ added on 30.03.2023, improved on 2023.04.25 ]
In the version of the script released end of March 2023, a new variable $silent has been added. If set to 0 then the script will not display anything on the screen, which can only increase performance. Of course, if you are still testing your customization of your script, you probably want to set it on 1 or 2 so that you have some feedback about what has happened.
Illustration below:
// 0: hide both response result and key value pairs (gives a blank screen)
// 1: show response result only (gives a summary for each processed row) 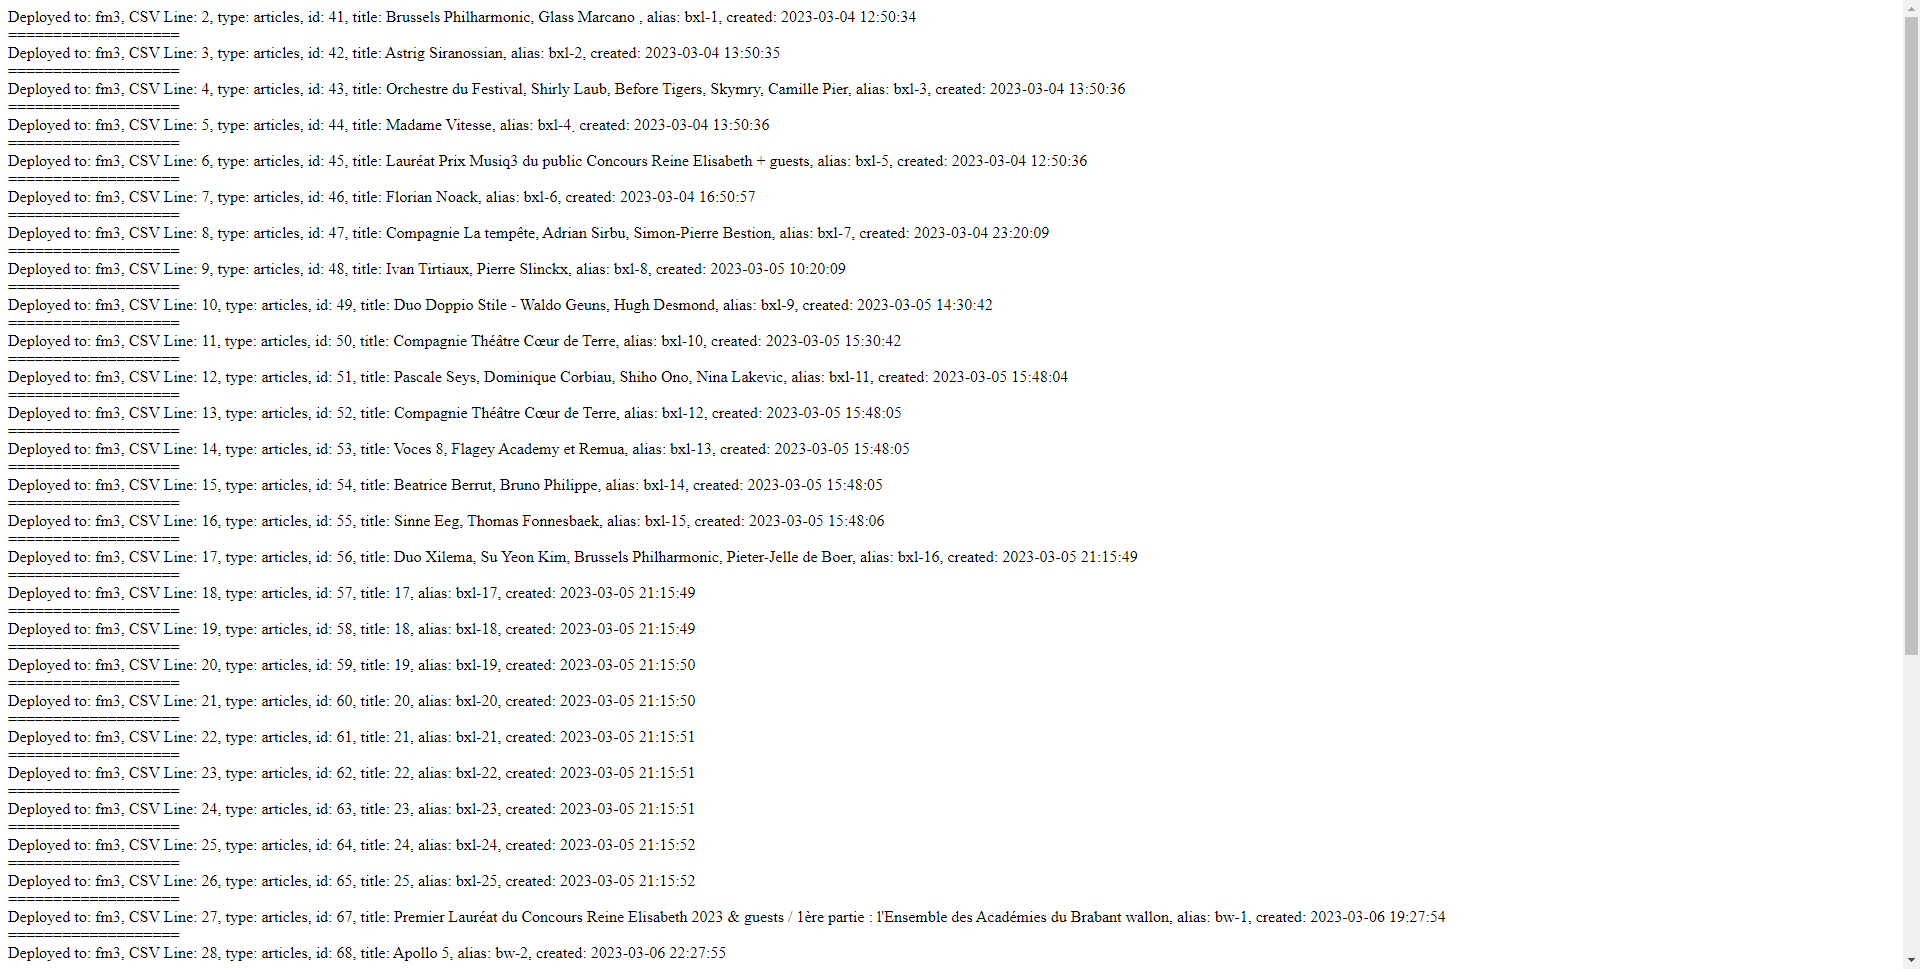
// 2: show key value pairs only (gives for each row the details of all the processed columns, so custom fields included) 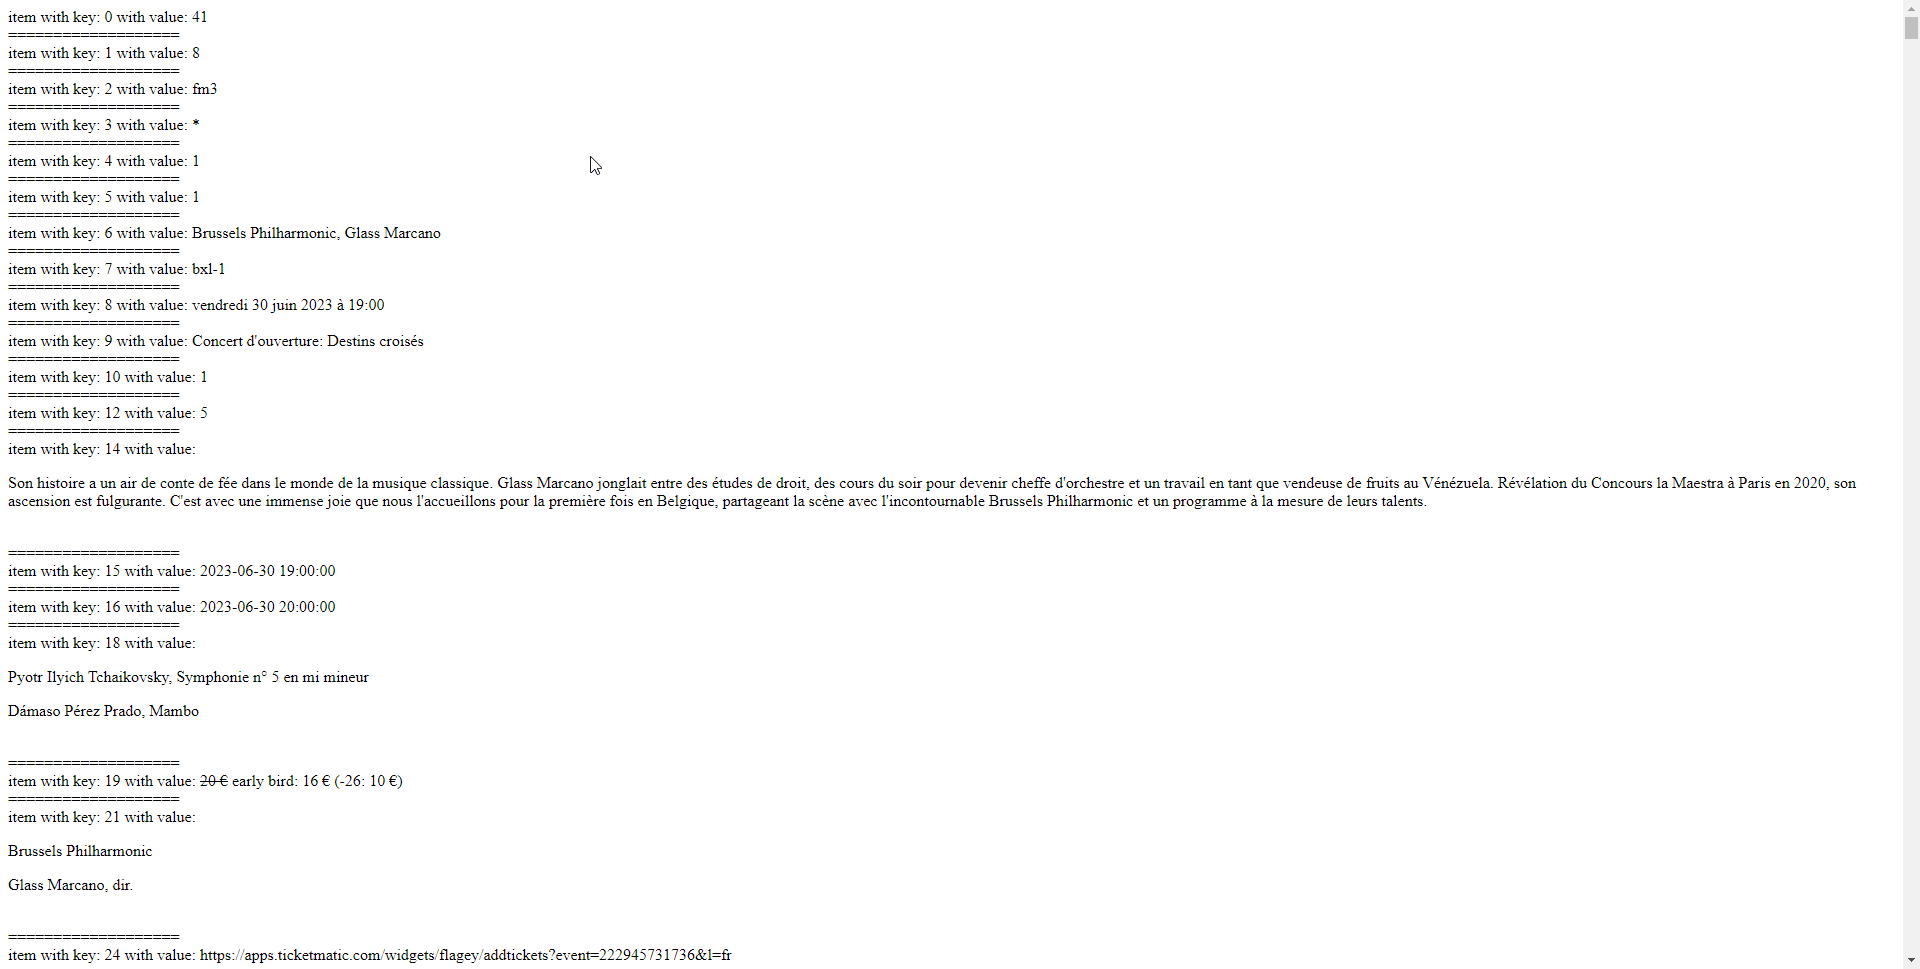
12 Difference between using the API or using a direct SQL query in the database
One could think of importing / updating their Articles directly with a SQL query (based somehow on the same data in the Google Sheet).
Doing so would indeed directly modify the database… but it would not trigger all the Actions foreseen by Joomla (typically onContentAfterSave) such as
- Smart Search
- Versioning
So that if those Actions make sense for you then the API is better because it is really as if every Article would be manually edited in the backend.
But for pure performance, writing directly to the database can only be more performant.
13 Troubleshooting
If no Article is created or updated when you launch the script, here is what you can do
- check that everything is OK in the script (your API key, the link to the Google Sheet, the structure of the Google Sheet)
- check the log:
- go to System > Global Configuration > tab Logging > enable
Log Almost Everything+ be sure thatLog Prioritiesis set toall - relaunch the script
- see /administrator/logs/everything.php
Note: if you want to make your life easier, install this little free plugin made by Yannick Gaultier, which allows to view/download/delete all logs files produced by Joomla directly from the backend: https://weeblr.com/joomla-seo/4logs-simple-free-logs-viewer
Here are two practical examples of issues that I faced myself.
13.1 Example 1 - some custom field is required
One day I encountered the following error message in /administrator/logs/everything.php
#Fields: datetime priority clientip category message
2023-01-18T16:11:36+00:00 CRITICAL error Uncaught Throwable of type Tobscure\JsonApi\Exception\InvalidParameterException thrown with message "Field required: Event Category". Stack trace: #0 [ROOT]/libraries/src/MVC/Controller/ApiController.php(362): Joomla\CMS\MVC\Controller\ApiController->save()
Actually the Custom Field “Event Category” was required but that Custom Field was empty in my Google Sheet.
So just like you could not Save an Article via the Interface in that case, you can’t do it neither via the API…
13.2 Example 2 - conflict caused by 3rd party extension
I have already had the case that an extension (CFI plugin in my case) would prevent the API from working, which I also discovered thanks to the Log file.
My workaround was to restrict the plugin to Super Users so that it would not interfere.
13.3 Example 3 - special characters in the Google Sheet
The following one was quite tricky: somes Articles would be imported normally with the script… but some other ones would throw such an error :
Fatal error: Uncaught ValueError: array_combine(): Argument #1 ($keys) and argument #2 ($values) must have the same number of elements in /home/my-sync-file.php:151 Stack trace: #0 /home/my-sync-file.php(151): array_combine(Array, Array) #1 /home/my-sync-file.php(194): {closure}('https://docs.go...', Array, Object(Closure)) #2 {main} thrown in /home/my-sync-file.php on line 151
After some time, I realized that the users were using a kind of “curly single quote” instead of the “regular single quote”… and that “curly single quote” would be interpreted as the end of the field, causing a discrepancy :
- wrong:
l’oasis - correct:
l'oasis
Similarly, the “compressed three dots”:
- wrong:
… - correct:
...
The following were working fine in my case :
"Rumba Rules“(ie a kind of curly double quote)« covid-19 »(ie “guillemets français”)
The only solution to those cases is to make a Search a Replace for the whole Google Sheet.
How to identify them easily: copy-paste your texte in Visual Studio Code (or some other pro editor or even maybe Nopedpad++): it highlights all the special characters like accented characters and those nasty cases.
13.4 Example 4 - Break Line in the Google Sheet
When you type text in some cell of a Google Sheet, if you want to create a new line within that given cell, you can simply press CTRL+ENTER.
Apparently (I should test further to be 100% sure), having this at the end of a Field like Title which is pure text would cause the import/synchronization of the corresponding Article to fail.
For Custom Fields of Type Editor, this would be no problem - I have tested it - although you would loose the “break line” in Joomla, having then one unique long paragraph in the Article (want a solution for that? see the tip in the next section).
14 Final tip
One final tip if you want to have multiple paragraphs in the cells of your Google Sheet :
If you want a formula to replace automatically all the “Break Lines” that users have typed in the cells of your Google Sheet by proper HTML tags like <p> and </p>, you can simply use a Regular Expression (REGEX) like the following one, the “Bread Line” being identified by \n :
=if(A1="";"";"<p>"®EXREPLACE(A1;"\n";"</p><p>")&"</p>")
If you don’t need a formula but simply need to “Search and Replace all” in your Google Sheets once and for all then simply enable the Regex Option when Searching \n (enable the Regex option) and replace by nothing.
15 Using the Joomla API to Import and Update Articles directly from AirTable
![]()
You have probably already heard of AirTable: https://airtable.com/
If not, let’s simplify it by saying that it is a big like a Google Sheet but really more powerful:
- its goal is not to make calculations
- since it is a real online database
In practice, more and more companies/associations are moving their data to Airtable so that they are interconnected and no more in silos.
Note:
- even if you use AirTable you could still use the CSV script above since it is possible to export an AirTable View to CSV. See indeed “Download a View to CSV”: https://support.airtable.com/docs/download-a-view-to-csv
- in their newsletter of Thursday 16-02-23, Airtable announces the end of the current system of API Key: https://support.airtable.com/docs/airtable-api-key-deprecation-notice
15.1 Prepare Airtable
After creating a table in Airtable and before using it in our script, we need to make that table publicly available with the Airtable API
Details coming soon
15.2 Prepare your Airtable script
Breaking news: now support for adding multiple downloaded and cached images as attachments
Details coming soon
15.3 -
Details coming soon
16 GraphQL API together with the Joomla API
Add or Edit Joomla! Articles Via API To Multiple Sites Chosen Randomly in from a predefined list Using Github GraphQL API
16.1 Prepare your OMDb script
Details coming soon
16.2 -
Details coming soon
17 OMDb API together with the Joomla API
Note: OMDb is a Movie database
Turn your top 5 favorite movies into Joomla Articles thanks to OMDb API and Joomla API
Details coming soon
17.1 Prepare your OMDb script
Details coming soon
17.2 -
Details coming soon
18 Using the Joomla API with Convert Forms by Tassos
Convert Forms 4 (released around end of February 2023) ships with new very interesting features like Tasks, including Webhooks.
It is nice because it allows for example visitors to create an article with a Form which is simpler than the native Joomla front-end article creation (which shows many fields on many tabs, even if you could always create your own override of edit.php in order to customize it).
18.1 Small introduction as published by Tassos
One of the Apps included in the Convert Forms 4 Tasks new section is Webhooks.
A webhook allows you to automatically send real-time information from your form to some other service or tool outside of your Joomla site without writing a single line of code.
The documentation of the Webhooks App is now published, showing you how to create webhooks with Convert Forms. You can also find a detailed tutorial on utilizing Joomla’s 4 Web Services API and creating a new Article on a remote Joomla 4 site with the power of webhooks!
- Webhooks App: https://www.tassos.gr/joomla-extensions/convert-forms/docs/webhooks
- Working With Tasks: https://www.tassos.gr/joomla-extensions/convert-forms/docs/working-with-tasks
- Download Convert Forms 4 BETA: https://www.tassos.gr/developer-releases
18.2 My first experience
After creating easily a simple Article with Title & Text thanks to Convert Forms 4, I decided to try to go one step beyond and add Custom Fields:
- one of type Text. Just works out of the box!
- then one of type URL for an Email
- there of course the Article Creation would be refused by the API bc it expects “mailto:contact@domain.com” and not “contact@domain.com”
- so my little workaround to make it work was to type in the Task mailto:{field.5} (because in my case the Email field has ID 5)
19 Other ways of importing content into Joomla Articles
The goal of this presentation was to show how to import content into your Joomla Articles with a simple & short independent script, using the Joomla API.
But of course, you might prefer to choose a ready-to-use extension. I surely don’t know all of them, but if I were the first 3 coming to my mind:
- ROCSVI by Roland Dalmulder - paid
clearly the most complete/universal tool to import/export content to/from Joomla - JoomGrabber by Joomboost - paid
- CFI by JoomLine - free
20 Thank you
Peter Martin for his excellent presentation about the Joomla API which allowed me to finally dive into this topic
Alexandre Elisé for all the interesting chats about the Joomla API a.o. and for taking the time to provide a new script every time I was having a new idea of improvement!
Tim Davis for having me on his YouTube Channel for the first version of this presentation
So many members of the Joomla Community for being #jPositive
😉
21 Get in touch
Marc Dechèvre | @woluweb
+32 474 37 13 12 | +32 2 772 58 69
https://www.woluweb.be/contact
Other presentations